# Overview
> Cooper is the construction management platform that keeps your people, projects, money and communication in one place. Start here to find your way around these docs.
Source: https://docs.cooperbuild.ai
Keywords: welcome, introduction, getting started, help, cooperbuild
Cooper brings everything a construction company runs on into one workspace: the people and companies you work with, your projects and estimates, procurement and accounting, and every conversation — email, chat, phone, and meetings — tied back to the work it is about. AI agents work alongside your team inside Cooper and from the AI apps you already use.
These docs explain what every part of Cooper is for and exactly how to use it.
## Find what you need
- **Search** — press ⌘ K (or Ctrl K on Windows) from any page and type what you are trying to do, for example "add a human" or "missed calls".
- **Browse** — pick a module from the tabs at the top. Each module starts with an overview page, then one page per feature.
- **Ask an AI** — open the **Open** menu at the top of any page and choose **Open in Claude** or **Open in ChatGPT** to ask questions about that page.
## Modules
- [Connect](https://docs.cooperbuild.ai/connect.md) — Humans, organizations, teams, action items, the team map, and every channel you use to talk to people: Inbox, Mail, Chat, Meetings and Phone.
> **Note: More modules are on the way**
>
> Documentation for Projects, Estimating, Procurement, Accounting and the rest of Cooper is being added module by module.
## How these docs are organized
Every feature page follows the same layout, so you always know where to look:
| Section | What it answers |
|---|---|
| Key concepts | What the words on the screen mean |
| Tasks (one heading each) | How to do a specific thing, step by step |
| Fields reference | What every field on a form means and whether it is required |
| Permissions | Who can see and change what, and how an admin grants access |
| Troubleshooting | What to do when something doesn't look right |
| For AI agents | How AI agents work with the feature through the Cooper MCP server |
## Sign in to Cooper
Open [app.cooperbuild.ai](https://app.cooperbuild.ai) and sign in with your work email. Cooper is also available on [iOS](https://apps.apple.com/ph/app/cooperbuild-ai/id6752608157) and [Android](https://play.google.com/store/apps/details?id=com.cooperbuild.ai.app).
## Use these docs with AI
Every page is also available as plain Markdown, and the whole site is indexed for AI tools. See [Use the docs with AI](https://docs.cooperbuild.ai/ai-agents.md).
---
# Use the docs with AI
> How AI agents and AI apps can read Cooper's documentation — Markdown pages, llms.txt, and the Cooper MCP server.
Source: https://docs.cooperbuild.ai/ai-agents
Keywords: llms.txt, markdown, mcp, claude, chatgpt, cursor, rag, ai agent, model context protocol
These docs are written for people and for AI agents alike. An agent that gets stuck while using Cooper — through the Cooper MCP server or inside Cooper itself — can look up the answer here the same way a person would.
## Read any page as Markdown
Add `.md` to the end of any page's address to get the same page as plain Markdown, with no navigation or styling:
| Page | Markdown |
|---|---|
| `https://docs.cooperbuild.ai/connect/humans` | `https://docs.cooperbuild.ai/connect/humans.md` |
| `https://docs.cooperbuild.ai/connect/phone` | `https://docs.cooperbuild.ai/connect/phone.md` |
On any page you can also click **Copy Markdown**, or open the **Open** menu and choose **View as Markdown**.
Links inside the Markdown point to the Markdown version of the linked page, so an agent can follow them without leaving Markdown.
## Load the whole documentation
| File | What it contains |
|---|---|
| [`/llms.txt`](https://docs.cooperbuild.ai/llms.txt) | An index of every page: title, one-line description, and the link to its Markdown. Follows the [llms.txt](https://llmstxt.org) standard. |
| [`/llms-full.txt`](https://docs.cooperbuild.ai/llms-full.txt) | Every page's full Markdown in a single file, for loading into an agent's context or a retrieval (RAG) index. |
Every feature page has the same sections — Key concepts, one section per task, Fields reference, Permissions, Troubleshooting, and **For AI agents** — so retrieval systems can split pages on headings and each chunk still makes sense on its own.
## Ask about a page in Claude or ChatGPT
Open the **Open** menu at the top of the page and choose **Open in Claude** or **Open in ChatGPT**. A new chat opens with that page loaded, ready for your questions.
## Connect an AI app to Cooper (MCP)
The Cooper MCP server lets Claude, ChatGPT, Cursor, VS Code, Claude Code and other MCP-compatible apps read and act on your Cooper data, with your own login and permissions.
### Step 1: Add the Cooper server URL
In your AI app's connector or MCP settings, add a new server with this URL:
```
https://api.cooperbuild.ai/mcp
```
### Step 2: Sign in and approve
A Cooper sign-in screen opens. Sign in, review what the app is asking for, and click **Authorize**.
### Step 3: Start chatting
Return to your app. Cooper's tools appear automatically. Try "Show me active projects in Cooper."
Step-by-step guides for each AI app are in Cooper under **Connect AI** at [app.cooperbuild.ai/mcp](https://app.cooperbuild.ai/mcp).
> **Note**
>
> Connected apps follow the same permissions as your Cooper login. An AI app can never see or change anything you can't.
## Guidance for AI agents
If you are an AI agent working with Cooper:
1. When a Cooper tool returns an error or an unexpected result, search this site for the tool name (for example `search_humans`) or the error text. Each feature page's **For AI agents** section lists the tools for that feature, what they do, and common errors with their fixes.
2. Prefer the `.md` version of a page — it has the same content in fewer tokens.
3. Start from [`/llms.txt`](https://docs.cooperbuild.ai/llms.txt) to find the right page, then fetch only the pages you need.
4. A "permission denied" error means the signed-in person's role does not allow that action. Tell the person which permission they need (each page's **Permissions** section names it) rather than retrying.
5. If someone belongs to more than one workspace, the connection starts in their main workspace. Switch workspaces when asked, for example "Switch my Cooper workspace to Acme".
## Troubleshooting
### The app says it cannot reach the Cooper server
Check the address is exactly `https://api.cooperbuild.ai/mcp`, including `/mcp` at the end. Remove the connector and add it again if you changed it.
### The sign-in window closes or never opens
Allow pop-ups for the AI app and for Cooper, then try again. In Safari, turn off "Prevent cross-site tracking" while you connect.
### It worked before, but now asks me to sign in or shows 401 Unauthorized
Sign-ins renew for up to 30 days, and revoked credentials stop working straight away. Disconnect Cooper in the app and connect it again.
### A tool says permission denied
Connected apps follow the same role checks as Cooper itself. Ask a workspace admin for access to that part of Cooper.
---
# Connect
> Connect is where Cooper keeps the people and companies you work with, and every channel you use to talk to them — email, mail, chat, meetings and phone — tied back to your projects.
Source: https://docs.cooperbuild.ai/connect
Keywords: crm, contacts, communication, people, companies, connect module
**Connect** holds everyone your company works with, and every way you talk to them. Your teammates, clients, vendors and subcontractors live here as **humans** and **organizations**. Your conversations with them, whether email, chat, meetings, phone calls or texts, are linked back to those records and to the projects they are about. Cooper's AI reads those conversations and turns the requests in them into **action items**, so nothing that someone asked for is lost.
Open **Connect** in the left sidebar to see its pages. Which pages you see depends on your role. See each page's **Permissions** section.
## People and companies
- [Humans](https://docs.cooperbuild.ai/connect/humans.md) — The people directory: teammates, client and vendor contacts, and leads, with each person's full history.
- [Organizations](https://docs.cooperbuild.ai/connect/organizations.md) — The external companies you work with: clients, vendors, subcontractors, suppliers and partners.
- [Teams](https://docs.cooperbuild.ai/connect/teams.md) — Named groups of people and organizations, used to assign work, share files and invite people in bulk.
- [Action items](https://docs.cooperbuild.ai/connect/action-items.md) — What somebody still owes, picked up automatically from your conversations or added by hand.
- [Map](https://docs.cooperbuild.ai/connect/map.md) — Where your clocked-in team members are right now, and the path they took during a work session.
## Communication
- [Inbox](https://docs.cooperbuild.ai/connect/inbox.md) — Your own Gmail or Outlook mailbox inside Cooper, linked to projects, tasks and people.
- [Mail](https://docs.cooperbuild.ai/connect/mail.md) — The company register of letters, packages and notices, each with an owner and a due date.
- [Chat](https://docs.cooperbuild.ai/connect/chat.md) — One-to-one and group messaging with your team, with files, calls and Cooper's AI agents.
- [Meetings](https://docs.cooperbuild.ai/connect/meetings.md) — Video and audio meetings with your team and outside guests, with automatic write-ups.
- [Phone](https://docs.cooperbuild.ai/connect/phone.md) — Calls, texts and voicemail on your company's Cooper phone numbers, saved to the right project.
## Administration
- [Connect settings](https://docs.cooperbuild.ai/connect/settings.md) — The lookup lists behind Connect, such as organization types, relationship types and industries.
## Inbox or Mail?
These two are easy to mix up:
| | Inbox | Mail |
|---|---|---|
| What it holds | Email from your own connected Gmail or Outlook mailbox | A company-wide register of letters, packages and notices, logged by hand |
| Who sees it | Only you | Everyone with Mail access |
| Use it to | Read, send and reply to email | Make sure every incoming item has an owner and gets dealt with |
See [Inbox](https://docs.cooperbuild.ai/connect/inbox.md) and [Mail](https://docs.cooperbuild.ai/connect/mail.md) for details.
## How Connect fits together
- A **human** usually belongs to an **organization**. Open either record to see the other.
- **Emails, chats, calls, texts and meetings** with a human show up on that human's timeline, and can be linked to a project.
- Requests that come up in those conversations become **action items**, assigned to whoever owes them.
- **Teams** group humans and organizations so you can assign work, share files or invite people all at once.
## For AI agents
Agents connected through the Cooper MCP server can work with every part of Connect. Each page's **For AI agents** section lists the tools for that feature. The most common starting points are `search_humans`, `search_external_orgs` and `action_item_browse`. See [Use the docs with AI](../(getting-started)/ai-agents.mdx) to connect an AI app.
---
# Humans
> Humans is Cooper's people directory. Use it to add, find, edit and remove the people you work with (teammates, client contacts, vendor contacts and leads) and to see everything that has happened with each one.
Source: https://docs.cooperbuild.ai/connect/humans
Keywords: humans, contacts, people, address book, crm, directory, clients, vendors, leads, employees, team members, contact list
**Humans** is the people directory in Cooper. Every person your company deals with gets a human record: your own team members, client contacts, vendor and subcontractor contacts, leads and partners. Office admins, project managers and estimators use it to look someone up, keep contact details current, link people to their [organizations](https://docs.cooperbuild.ai/connect/organizations.md) and see the full history with a person in one place.
Each human has a detail panel. It shows their contact details, their organization, open action items, activities, a timeline of everything that happened with them, their text messages and their email threads.
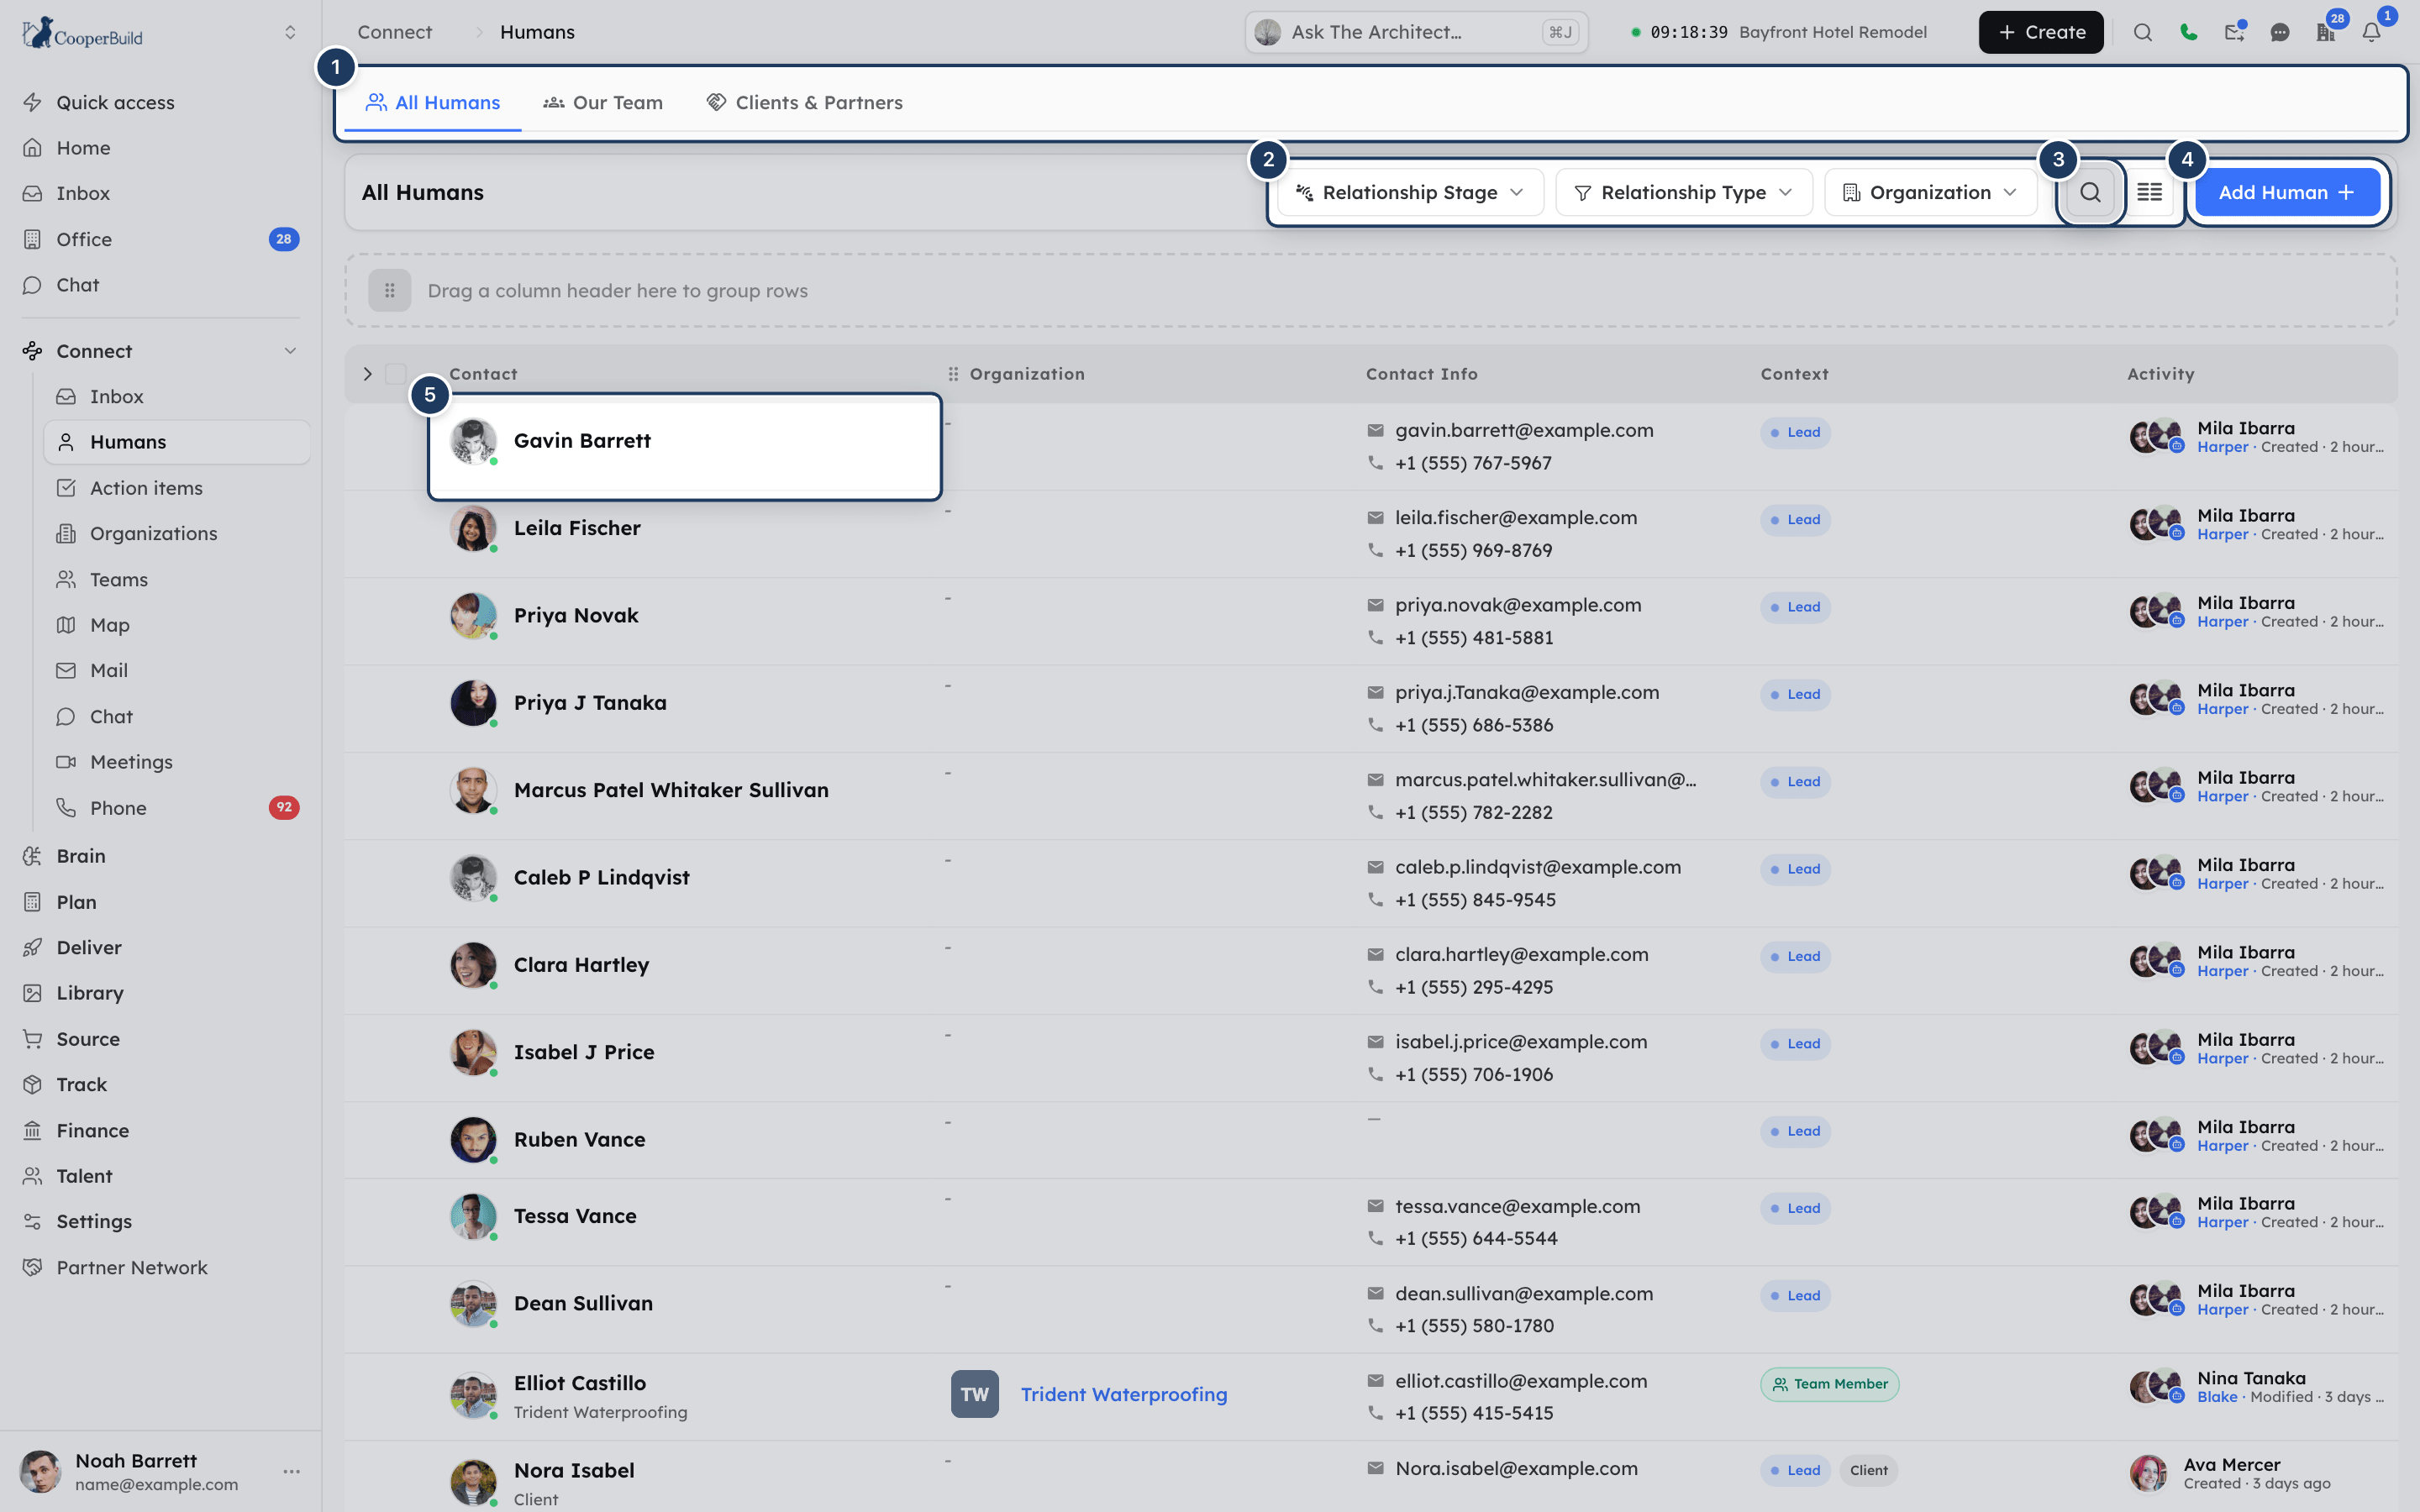
*Screenshot: The Humans list. 1: directory tabs, 2: filters, 3: search, 4: Add Human, 5: a human's row.*
## Key concepts
| Term | Meaning |
|---|---|
| **Human** | One person in your directory. A human has a name and, optionally, contact details, an organization, a relationship stage and a relationship type. |
| **Internal human** | A human marked as part of your own team. Internal humans appear under **Our Team** and show a **Team Member** badge. |
| **External organization** | The company a human works for, such as a client, vendor or subcontractor. See [Organizations](https://docs.cooperbuild.ai/connect/organizations.md). |
| **Relationship stage** | Where the relationship stands: **Lead**, **Prospect**, **Opportunity**, **Counterparty**, **Dormant** or **Inactive**. New humans start as **Lead**. |
| **Relationship type** | A category your company defines, such as Client or Subcontractor. Admins manage the list in Connect settings. |
| **Services** | The labor services a person provides. You pick them from the labor items in your catalog. |
| **System user** | A human who has a login to your Cooper workspace. A system user cannot be deleted from Humans. |
| **Action item** | Something somebody still owes, such as a document to send or an approval to give. See [Action items](https://docs.cooperbuild.ai/connect/action-items.md). |
## Open Humans
1. In the sidebar, open **Connect**.
2. Click **Humans**.
The page lives at `/connect/allHumans`. You see it only if your role has access to Humans. If your company's plan does not include Humans, you see a plan-locked screen instead.
A link that ends in `?humanId=` opens Humans with that person's detail panel already open. When you close the panel, the `humanId` part is removed from the address.
## Switch between all humans, your team and clients
Three tabs sit at the top of the page. Hover over a tab to see what it holds.
| Tab | What it shows |
|---|---|
| **All Humans** | Everyone in your directory: team members, clients and partners. |
| **Our Team** | Internal humans, the members of your own team. |
| **Clients & Partners** | External people who have a login to your workspace, such as portal users, client users and members from other organizations. |
The page title changes to match the tab. Your search and filters stay applied when you switch tabs.
## Read the Humans list
Each row shows one human:
- **Contact**: the photo or initials, the display name, and a line with their title, relationship type and organization.
- A small colored dot on the photo shows how recently the record was updated. Hover over the photo to read it, for example "Updated today", "Getting stale" or "Dormant — 90+ days". Team members show "Team member".
- A **Draft** badge marks a human saved with Draft status.
- **Organization**: the organization name, logo and up to two industries. Hover over it for a summary card. Click the name to open the organization's details.
- **Contact Info**: email and phone. A highlighted icon marks the preferred contact method.
- **Context**: a summary that adapts to the person. Team members show **Team Member**. Leads and prospects show their stage. Dormant and inactive humans show a warning pill.
- **Activity**: when the record was created and last modified, and by whom.
More rows load as you scroll down.
### Sort the list
Click the **Contact**, **Organization** or **Activity** column header to sort by that column.
### Show or hide columns
Click the **Toggle Columns** button (the columns icon) and tick or untick columns. Cooper remembers your choice in this browser.
### Group humans by organization
Drag the **Organization** column header into the bar above the list that says **Drag a column header here to group rows**. To remove the grouping, click the **x** on the **Grouped by** chip.
## Search for a human
1. Click the **Search** icon in the toolbar.
2. Type in the **Search humans…** box.
The search matches first name, display name and email address. It works together with any filters you have applied.
## Filter the Humans list
Use the filter buttons in the toolbar:
| Filter | What it does |
|---|---|
| **Relationship Stage** | Show humans in one or more stages. |
| **Relationship Type** | Show humans with one or more relationship types. |
| **Organization** | Show only humans who belong to one organization. |
Active filters appear as chips under the toolbar, after **Filtered by**. Click the **x** on a chip to remove that filter, or click **Clear all** to remove every filter. Filters are saved in the page address, so you can bookmark or share a filtered view.
## Add a human
You need permission to add humans. Without it, the **Add Human** button does not appear.
### Step 1: Open the form
Click **Add Human** at the top right. The **Add Human** panel opens. If you are on the **Our Team** tab, **Internal Human** is already switched on.
### Step 2: Enter the essentials
Type a **First Name**. This is the only required field. Add **Last Name**, **Title**, **Email** and **Phone Number** if you have them.
### Step 3: Link an organization
In **External Organization**, start typing and pick the person's company from the list. Leave it empty for someone with no company.
### Step 4: Set the stage and team status
Click the stage chip at the top of the form (it starts at **Lead**) to pick a different stage. Switch on **Internal Human** if this person is part of your team.
### Step 5: Add optional details
Open the collapsible sections to add more:
- **More contact options**: **Alternate Email**, **Alternate Number**, **Preferred Contact Method**.
- **Relationship**: **Relationship Type** and **Services**.
- **Address**: **Street**, **City**, **State**, **Postal Code**, **Country**.
To add a photo, click the round avatar at the top of the form and choose an image.
### Step 6: Save
Click **Submit**. The human appears in the list. Click **Cancel** to close without saving. If you entered anything, Cooper asks you to confirm before it discards your changes.
> **Note: One active human per email address**
>
> Two active humans in your company cannot share an email address. If the email is already in use, Cooper shows "An active human with email … already exists in this organization" and names the existing person. Open that person instead of creating a duplicate.
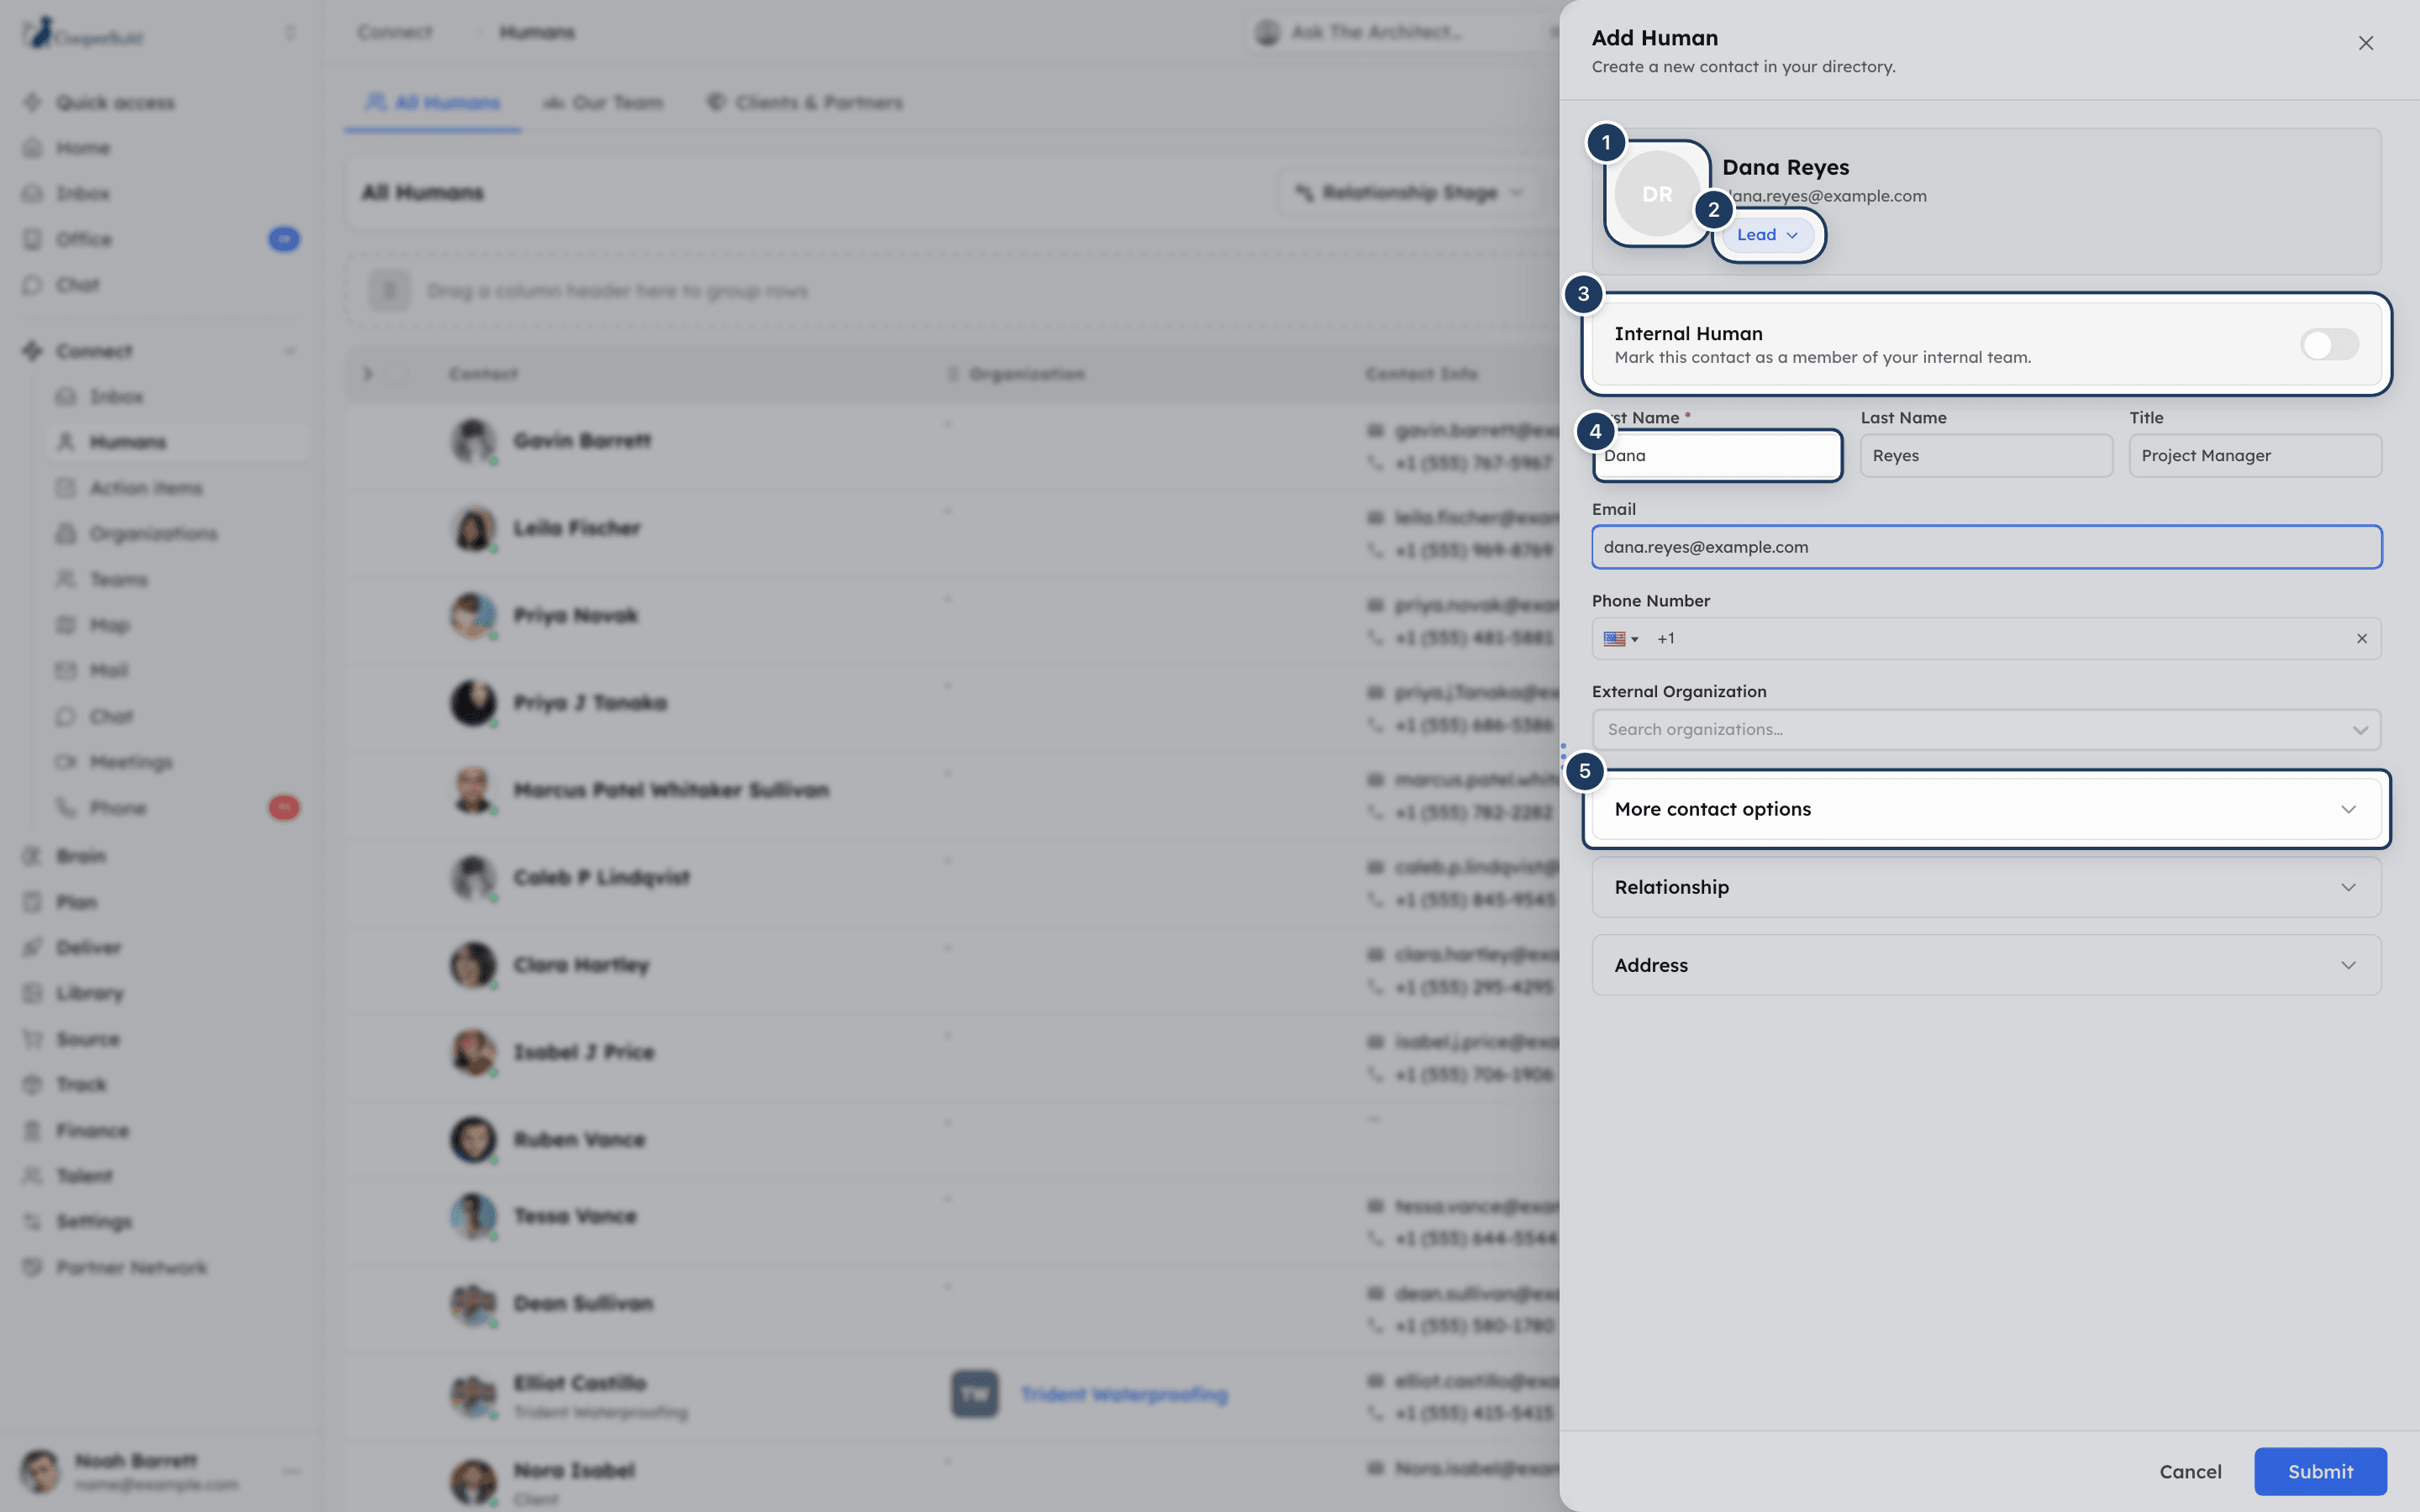
*Screenshot: The Add Human panel. 1: photo, 2: stage chip, 3: Internal Human switch, 4: required First Name, 5: collapsible sections.*
## Edit a human
1. Hover over the human's row and click the **⋯** menu at the start of the row.
2. Click **Edit**. The **Update Human** panel opens.
3. Change any field.
4. Click **Submit**.
After you save, the row updates in place and is highlighted briefly. If you edit your own human record, your name and profile picture in Cooper update too.
If you do not have permission to edit, the **Edit** option is hidden.
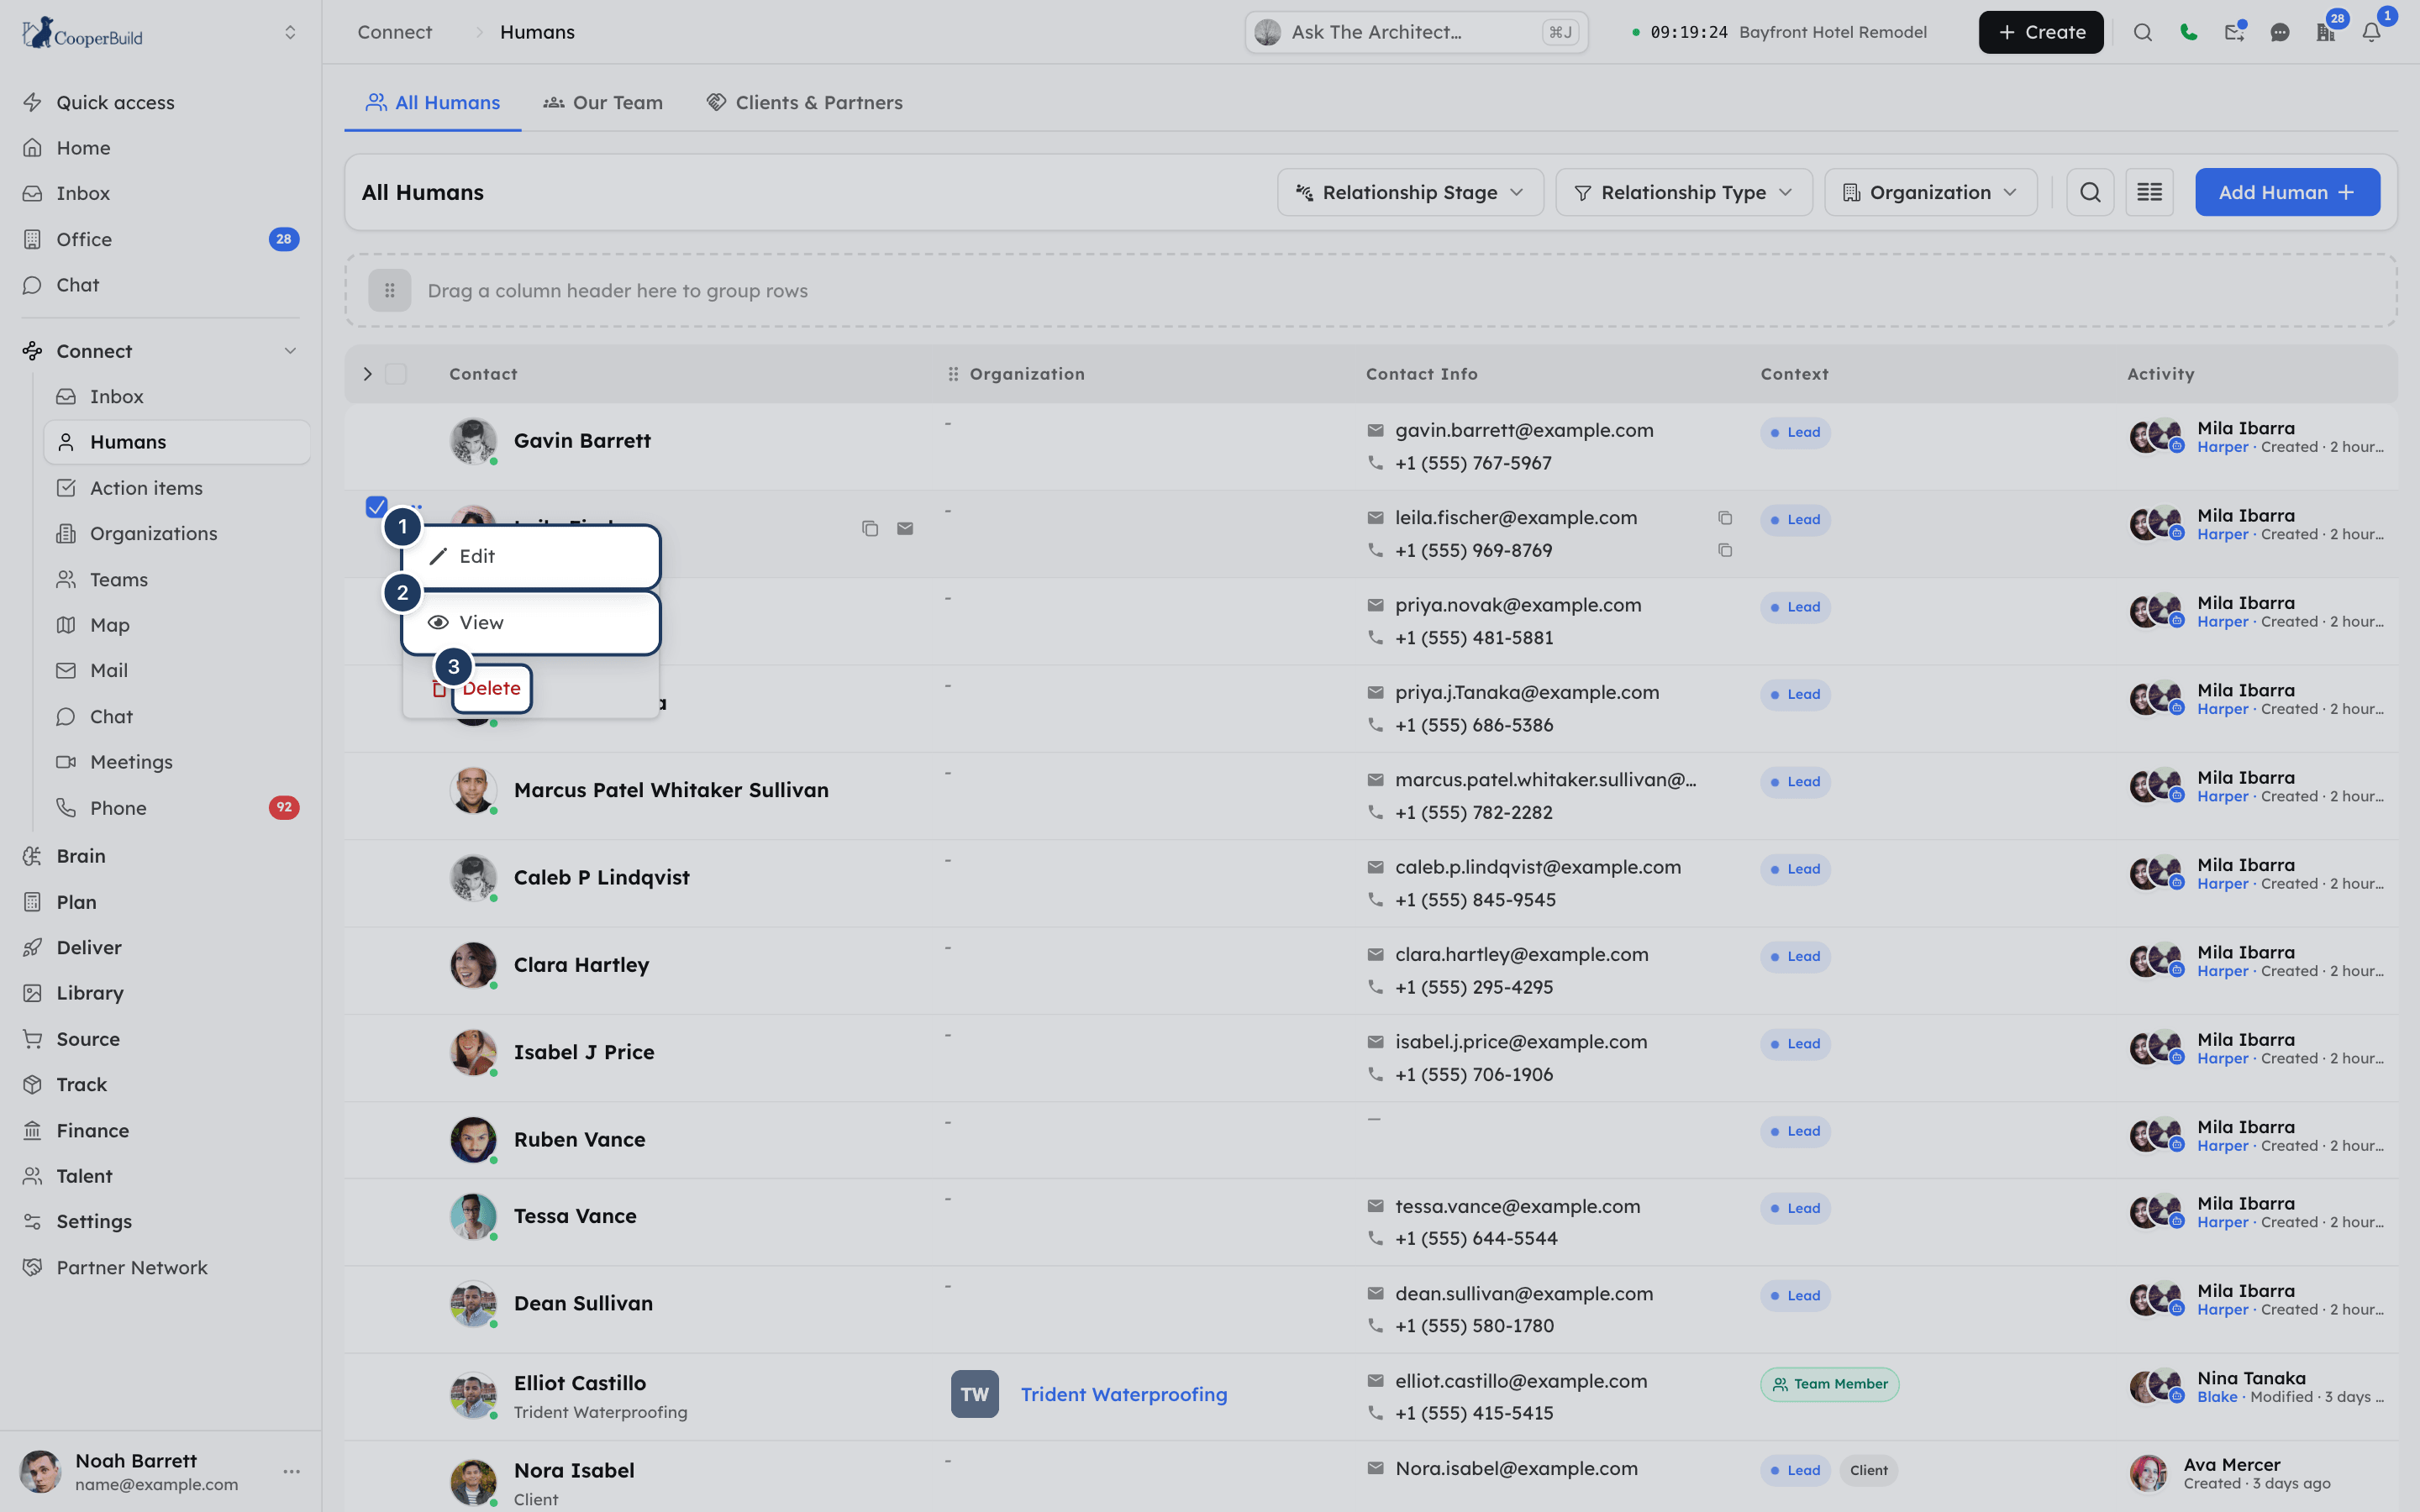
*Screenshot: The row menu. 1: Edit, 2: View, 3: Delete.*
> **Note: Stage comes from the organization**
>
> When a human belongs to an organization, Cooper shows the organization's relationship stage for that person. In the edit form the stage chip is locked, with the note "This human is associated with an organization and the stage cannot be changed." Change the stage on the [organization](https://docs.cooperbuild.ai/connect/organizations.md) instead.
## Delete a human
You need delete permission. Without it, the **Delete** option is hidden.
**Delete one human**
1. Open the **⋯** menu on the human's row.
2. Click **Delete**.
3. Confirm in the dialog.
**Delete several humans at once**
1. Tick the checkbox on each row you want to remove. To select every loaded row, tick the checkbox in the header.
2. Click **Delete** at the bottom of the list. The footer shows how many rows are selected. **Clear Selection** unticks them all.
3. Confirm in the dialog.
Deleting archives the human. The human disappears from Humans and from search, and their email address becomes free to use on a new record.
> **Warning: You cannot delete people who have a login**
>
> A human who is a user of your Cooper workspace cannot be deleted. Cooper shows "You dont have permission to delete this human as this is a system user." In a bulk delete, Cooper names the system users and deletes nothing. Remove or archive the person's access in your team settings first.
## Copy a human's contact details
- In the list, hover over the name and click the **Copy contact info** icon. The details are copied to your clipboard.
- In the detail panel, click the **Copy profile** icon next to the name. A formatted profile is copied to your clipboard.
- In the detail panel, hover over **Email**, **Phone** or another field and click its copy icon to copy just that value.
## Email, call or text a human
From the list:
- Click an email address, or the **Email from Cooper** icon, to open Cooper's email composer addressed to that person. When the email is sent, Cooper logs an **Email** activity on the human's record.
- Click a phone number, or the **Open in Cooper Phone** icon, to open the [Phone](https://docs.cooperbuild.ai/connect/phone.md) keypad with the number ready. The call starts only when you press call.
From the detail panel, use the **Email**, **Call** and **Text** buttons under the name. **Text** opens the **Messages** tab. **Text** is disabled when:
- The person has opted out of SMS. The tooltip says they must text START to resubscribe.
- You do not have permission to send messages from Humans.
## Invite a human to Cooper
You can turn a human into a user of your workspace.
1. In the list, hover over the human's name.
2. Click the **Invite to Cooper** icon. It appears only for humans who have an email address and are not users yet.
3. In the **Invite a teammate** panel, check **Email** and **Full name**, which are filled in from the human record.
4. Choose a **Role** and the **Access** type: **Web & mobile** or **Mobile only**.
5. Click **Send invite**.
The person gets an email to verify their address and set a password. They show as **Invited** in your team list until they accept. If the person is already a member, Cooper tells you so.
## View a human's details
Click a human's row, or choose **View** from the row's **⋯** menu. The detail panel opens on the right with the person's name, stage, relationship type, organization and title at the top. It has four tabs: **Overview**, **Timeline**, **Messages** and **Emails**.
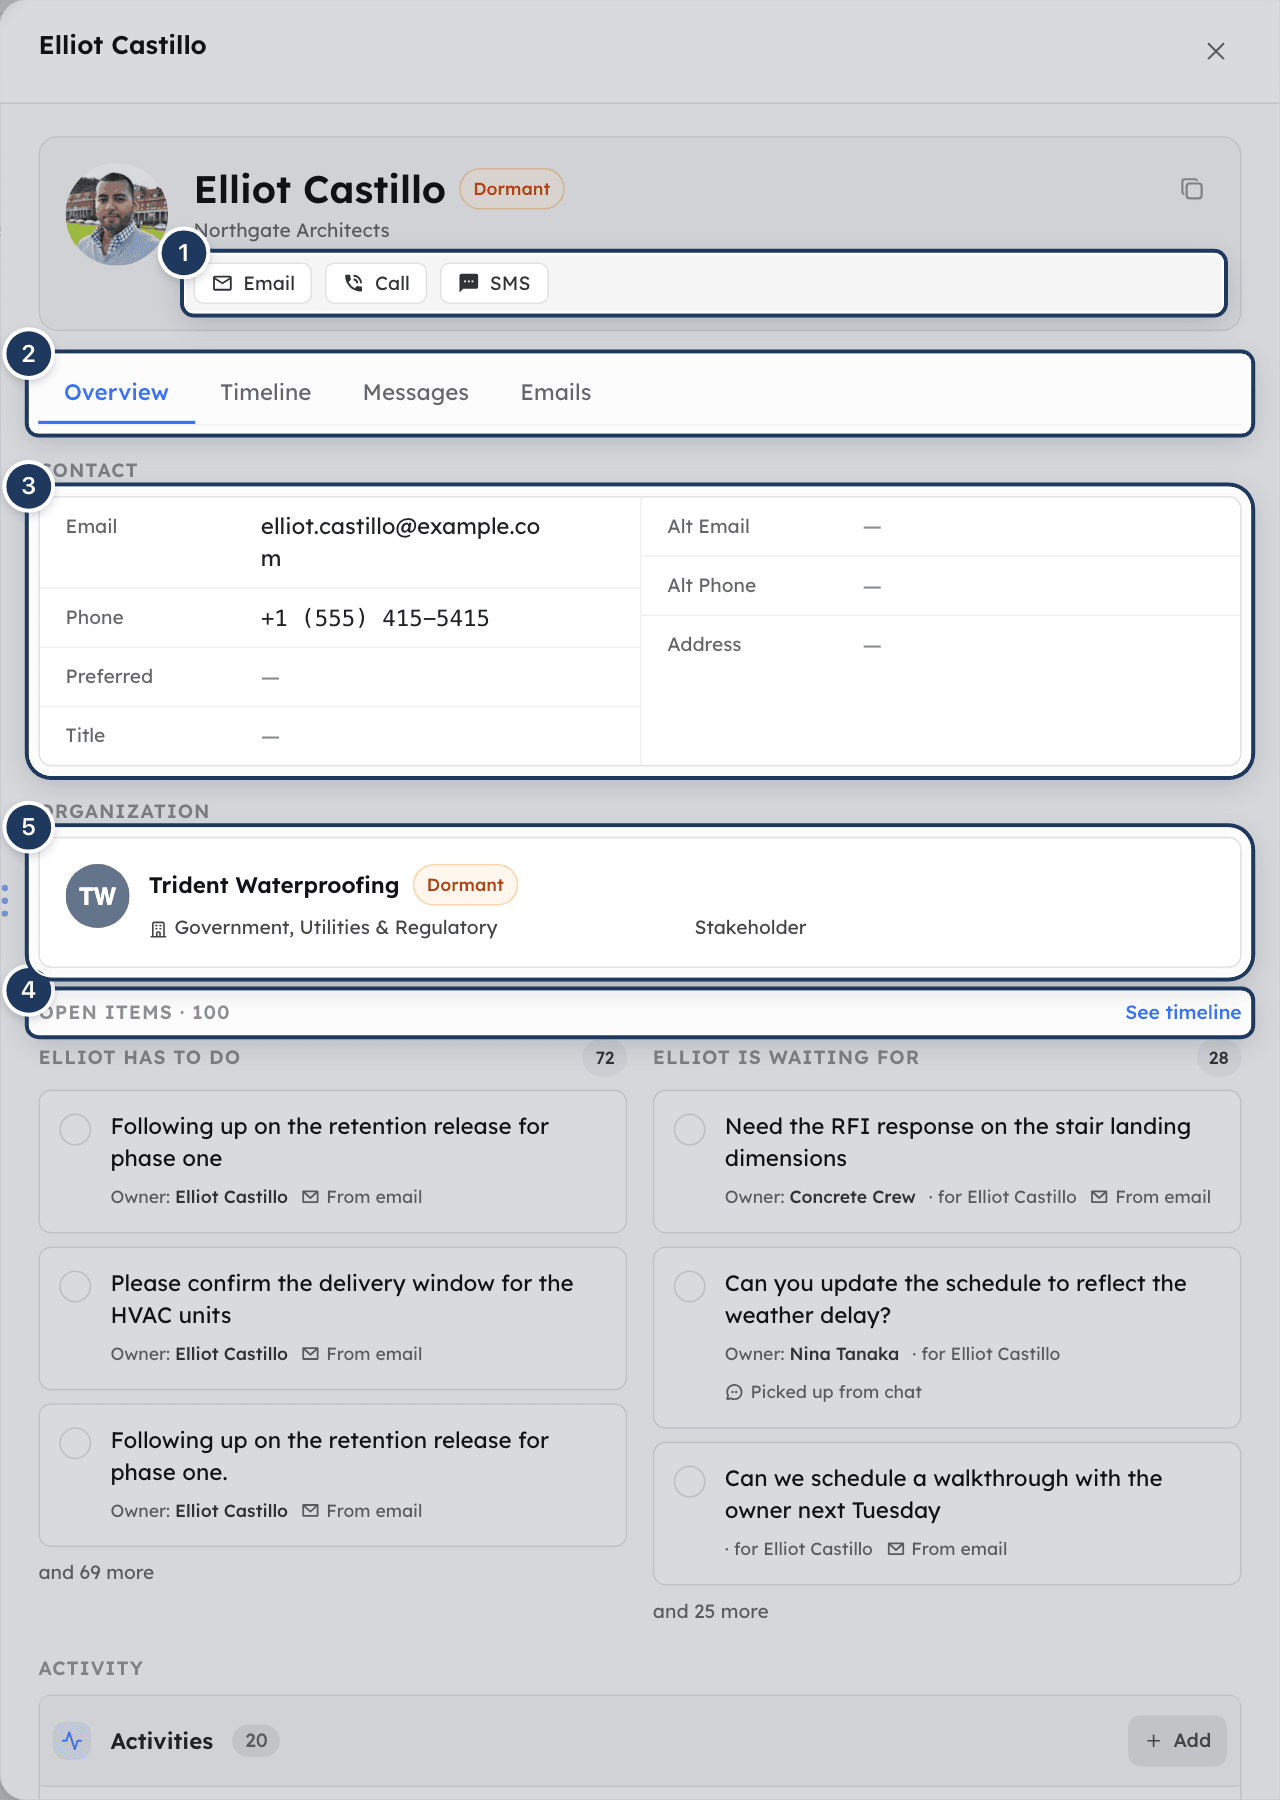
*Screenshot: The detail panel. 1: quick actions, 2: tabs, 3: contact details, 4: open items, 5: activities.*
### Overview tab
The **Overview** tab shows:
- **Contact**: **Email**, **Phone**, **Preferred**, **Title**, **Alt Email**, **Alt Phone** and **Address**.
- **Organization**: the linked organization with its stage and contact details.
- **Services**: the services this person provides.
- **Open items**: up to three open action items in each direction, with a **See timeline** link.
- **Activities**: logged meetings, calls, emails and other activities. See [Log an activity](#log-an-activity-with-a-human).
- **Created by** and **Modified by**, with how long ago.
### Timeline tab
The **Timeline** tab lists everything that happened with this person, newest first and grouped by day: money, projects, conversations, meetings, actions, documents and more.
- Click a category chip, such as **Money**, **Meetings** or **Documents**, to show only that category. The chips show counts. Click **All** to see everything again.
- Type in **Search** to find rows by their text.
- Switch **Include their company** on or off to include or leave out rows about the person's organization. It is on by default.
- Click **Details** on a row to expand it.
- More rows load as you scroll. You can also click **Load more**.
If nothing has happened yet, you see "Nothing yet with *name*."
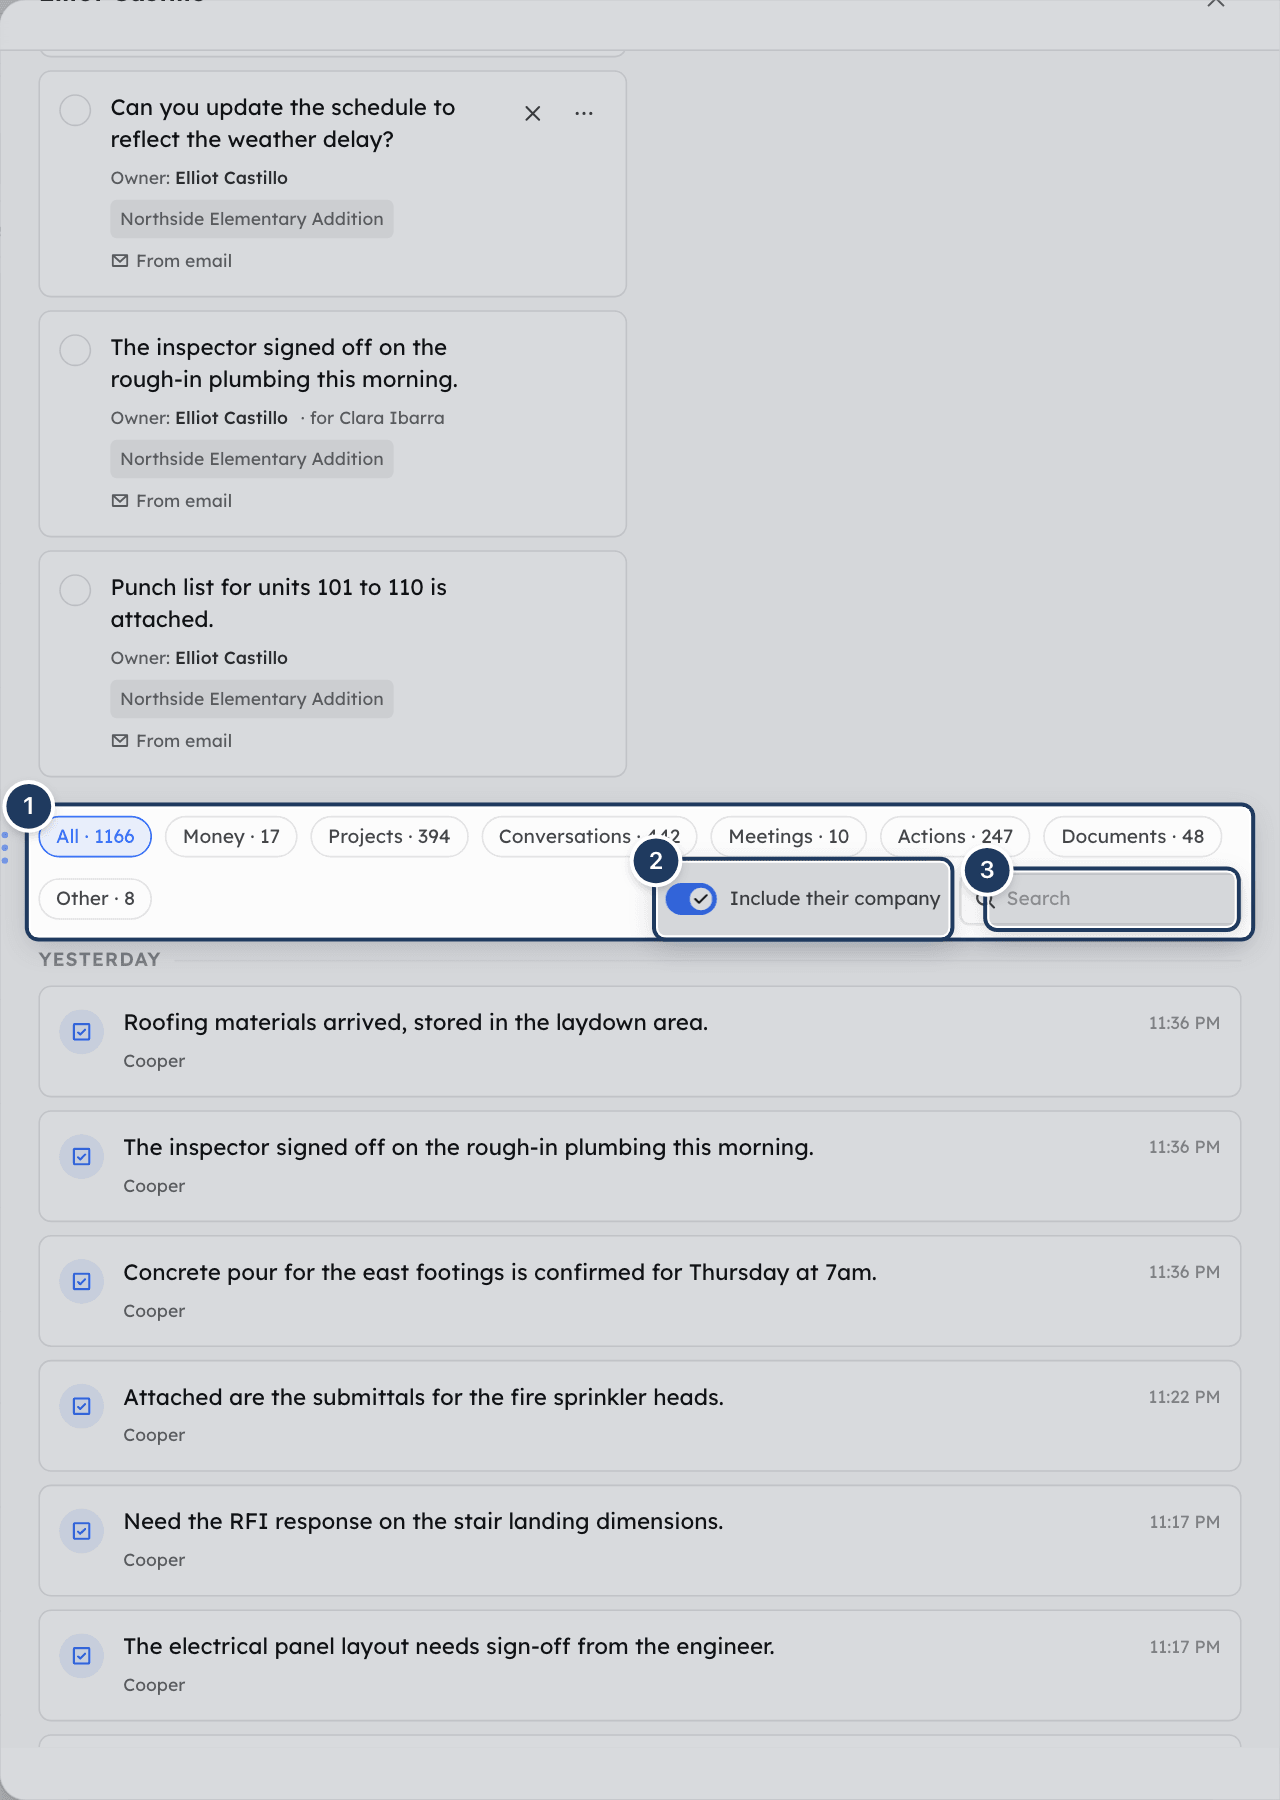
*Screenshot: The Timeline tab. 1: open items, 2: Add item, 3: category chips, 4: Include their company, 5: search.*
### Messages tab
The **Messages** tab shows your text conversation with the person on your company's Cooper phone numbers. Type in the **Text *name*…** box and press Enter to send. Use **From** to pick which of your lines sends the text.
- If texting is not set up for your company yet, you see "Texting isn't set up for this organization yet" with a link to see progress.
- If no line can send texts, you see "No phone line can send texts yet" with a link to set one up.
See [Phone](https://docs.cooperbuild.ai/connect/phone.md) for setting up lines.
### Emails tab
The **Emails** tab lists the email threads with this person from the mailboxes you have connected to Cooper. Click a thread to read it. You can start a new email to the person from here.
## Track what a human owes or is waiting for
The **Timeline** tab starts with **Open items**, the open [action items](https://docs.cooperbuild.ai/connect/action-items.md) that involve this person, in two columns:
- **_Name_ has to do**: items this person owns.
- **_Name_ is waiting for**: items somebody else owes this person.
To add one:
1. Click **Add item**. You need permission to edit Humans.
2. In **What needs doing**, describe the task, for example "Send John the updated drawings".
3. In **Who does it**, pick a teammate.
4. Optionally set **Due**.
5. Click **Add action item**.
The new item is linked to this person. Depending on your rights on an item, you can tick it done, reopen it, or use its **More** menu to **Set due date** or dismiss it as **Already done** or **No longer needed**. For everything else, open [Action items](https://docs.cooperbuild.ai/connect/action-items.md).
## Log an activity with a human
1. Open the human's **Overview** tab.
2. In **Activities**, click **Add**.
3. Pick the **Activity Type**: **Meeting**, **Call**, **Email**, **Task**, **Other**, **Follow Up** or **Converted**.
4. Set the **Date**, the **Participants** and, if you want, the **Duration**.
5. Type a **Description**. It is required.
6. To make it repeat, switch on **Recurring Activity** and choose a **Recurring Period**.
7. Optionally add **Attachments**, such as photos or paperwork.
8. Click **Save**.
To change or remove an activity, open its **⋯** menu and click **Edit** or **Delete**.
## Fields reference
| Field | Required | What it means |
|---|---|---|
| Photo | No | The person's picture. Click the avatar to upload an image. |
| Stage | No | **Lead** (default), **Prospect**, **Opportunity**, **Counterparty**, **Dormant** or **Inactive**. Locked when the human belongs to an organization. |
| Internal Human | No | Marks the person as a member of your own team. |
| First Name | **Yes** | 2 to 30 characters. Cannot start with a special character. |
| Last Name | No | Up to 30 characters. |
| Title | No | Job title, up to 100 characters. |
| Email | No | Must be a valid email address. Must not belong to another active human in your company. |
| Phone Number | No | Includes a country picker. Defaults to the United States. |
| External Organization | No | The company the person works for. |
| Alternate Email | No | A second email address. Must be valid. |
| Alternate Number | No | A second phone number. |
| Preferred Contact Method | No | Free text, for example Email, Phone or WhatsApp. |
| Relationship Type | No | One of the relationship types your admin set up. |
| Services | No | Labor services from your catalog that this person provides. |
| Street, City, State, Postal Code, Country | No | The person's address. **Country** starts as United States. |
The display name is built from the first and last name.
## Permissions
Access to Humans is set by your role, under **Connect** > **Humans**:
| Permission | What it allows |
|---|---|
| **Read** | Open Humans, search, filter and view details. |
| **Write** | Add humans, edit them, add action items from a person's page and send texts from the **Messages** tab. |
| **Delete** | Delete (archive) humans. |
Workspace owners have full access. An admin can also limit a role to certain relationship types or relationship stages. People in that role then see only the humans that match.
Only humans in your own company are visible or editable.
## Tips and best practices
- Search before you add someone. Each email address can belong to only one active human.
- Link every external contact to their organization. Their stage, organization filter and timeline then work from the organization too.
- Set the relationship type for clients and vendors. It feeds the **Relationship Type** filter and the row subtitle.
- Use the freshness dot on the photo to spot contacts you have not touched in a while.
- Log calls and meetings as activities so the **Timeline** tells the full story.
## Troubleshooting
### I can't see Humans in the sidebar
Your role does not have Read access to Humans, or your company's plan does not include it. Ask an admin to grant **Connect** > **Humans** > **Read** to your role.
### There is no Add Human button
Your role does not have Write access to Humans. Ask an admin for **Connect** > **Humans** > **Write**.
### 'An active human with email … already exists in this organization'
Another active human already uses that email address. The message names that person. Search for them and edit the existing record, or use a different email address.
### 'You dont have permission to delete this human as this is a system user'
The person has a login to your Cooper workspace. System users cannot be deleted from Humans. Manage their access from your team settings instead.
### I can't change the stage of a human
The human belongs to an organization, so the stage comes from the organization. Change the stage on the organization.
### Someone I know exists does not show up
Check that no filter is active. Look for chips under **Filtered by** and click **Clear all**. Check that you are on **All Humans** and not **Our Team** or **Clients & Partners**. Your role may also be limited to certain relationship types or stages.
### The Invite to Cooper icon is missing
The icon appears only when the human has an email address and is not already a user. Add an email address to the human first.
### The Text button is greyed out
Either the person has opted out of texts (they must text START to resubscribe), or your role cannot send messages from Humans.
## For AI agents
Agents work with humans through the CooperBuild MCP server.
| Tool | What it does | Key parameters |
|---|---|---|
| `search_humans` | Finds people. Available to every user and returns summary fields only. | `search` (name, email, phone, title or organization), `id`, `email`, `phone`, `orgName`, `externalOrgId`, `type` (`member`, `employee`, `client`, `vendor`, `lead`, `guest`, `contact`), `humanCategory`, `limit` (1–50, default 15), `includeAccess` |
| `person_status_brief` | One plain-language answer to "where are we with X": who they are, open items both ways, money position, last contact, next meeting. | `humanId` (preferred) or `query` |
| `person_timeline` | Everything that happened with one person or company, newest first, with category counts and open action items. This is the same data as the **Timeline** tab. | `humanId`, `externalOrgId` or `query`; `categories` (`MONEY`, `PROJECTS`, `CONVERSATIONS`, `MEETINGS`, `ACTIONS`, `DOCUMENTS`, `OTHER`); `since`; `until`; `includeCompany`; `search`; `limit` (max 50); `pageNo` |
| `crm_relationship_brief` | A summary of the relationship: last outbound touch versus last inbound engagement, open follow-ups and open action items. Read-only. | `humanId` or `externalOrgId` |
| `crm_interaction_list` | Lists logged meetings, calls, emails, texts and follow-ups row by row. | `humanId`, `externalOrgId`, `projectId`, `activityTypes`, `direction`, `lifecycle`, `followUpStatus` |
| `crm_interaction_log` | Logs one interaction. Previews first; pass `confirm: true` to save. | `activityType`, `direction` (required: `outbound`, `inbound`, `conversation` or `internal`), `summary`, `durationMinutes` |
| `invite_user` | Invites a person to the workspace. | See the tool schema. |
Rules and common errors:
- `person_timeline`, `person_status_brief`, `crm_relationship_brief` and `crm_interaction_list` need **Humans** Read. `crm_interaction_log` needs **Humans** Write.
- To find a colleague, use `search_humans` with `type: "member"`. That matches people with a workspace login. `type: "employee"` matches only humans marked internal.
- An empty `data` with a `note` from `search_humans` means a type filter removed the matches. The person exists.
- To check whether someone is already a user, call `search_humans` with `includeAccess: true`. Do not send an invitation to find out.
- An ambiguous name passed as `query` returns candidates. Ask the user which one they mean. Never guess.
- In `crm_interaction_log`, `durationMinutes` is in minutes. Logging an `inbound` interaction stops the person's scheduled campaign sends. The preview reports this under `cadenceStop`.
- There is no dedicated tool to create or edit a human. The generic record tools (`db_create`, `db_update`) on the `Human` model need **Humans** permission. Creating a human with an email already used by an active human fails with "An active human with email … already exists in this organization". Find the existing human with `search_humans` and use that one.
## Related
- [Organizations](https://docs.cooperbuild.ai/connect/organizations.md): the companies your humans work for. Stage and industries come from here.
- [Action items](https://docs.cooperbuild.ai/connect/action-items.md): what each person owes you and what you owe them.
- [Teams](https://docs.cooperbuild.ai/connect/teams.md): groups of humans you assign together.
- [Phone](https://docs.cooperbuild.ai/connect/phone.md): calls and texts with your humans on Cooper numbers.
---
# Organizations
> Organizations is Cooper's list of external organizations and companies (clients, vendors, subcontractors, suppliers and partners). Use it to add, find, edit and remove companies, link their people, rate their work, store their documents and check their compliance.
Source: https://docs.cooperbuild.ai/connect/organizations
Keywords: organizations, external organizations, companies, company directory, clients, customers, vendors, subcontractors, suppliers, partners, accounts, crm, firms, businesses
**Organizations** is the company directory in Cooper. Every external organization your company works with gets an organization record: clients, vendors, subcontractors, suppliers, partners and leads. Office admins, project managers, estimators and buyers use it to look up a company, keep its details current, see the people who work there, rate its work on projects, keep its documents in one place and check whether it is compliant.
Organizations hold company-level information. The people who work at an organization are [humans](https://docs.cooperbuild.ai/connect/humans.md) linked to it.
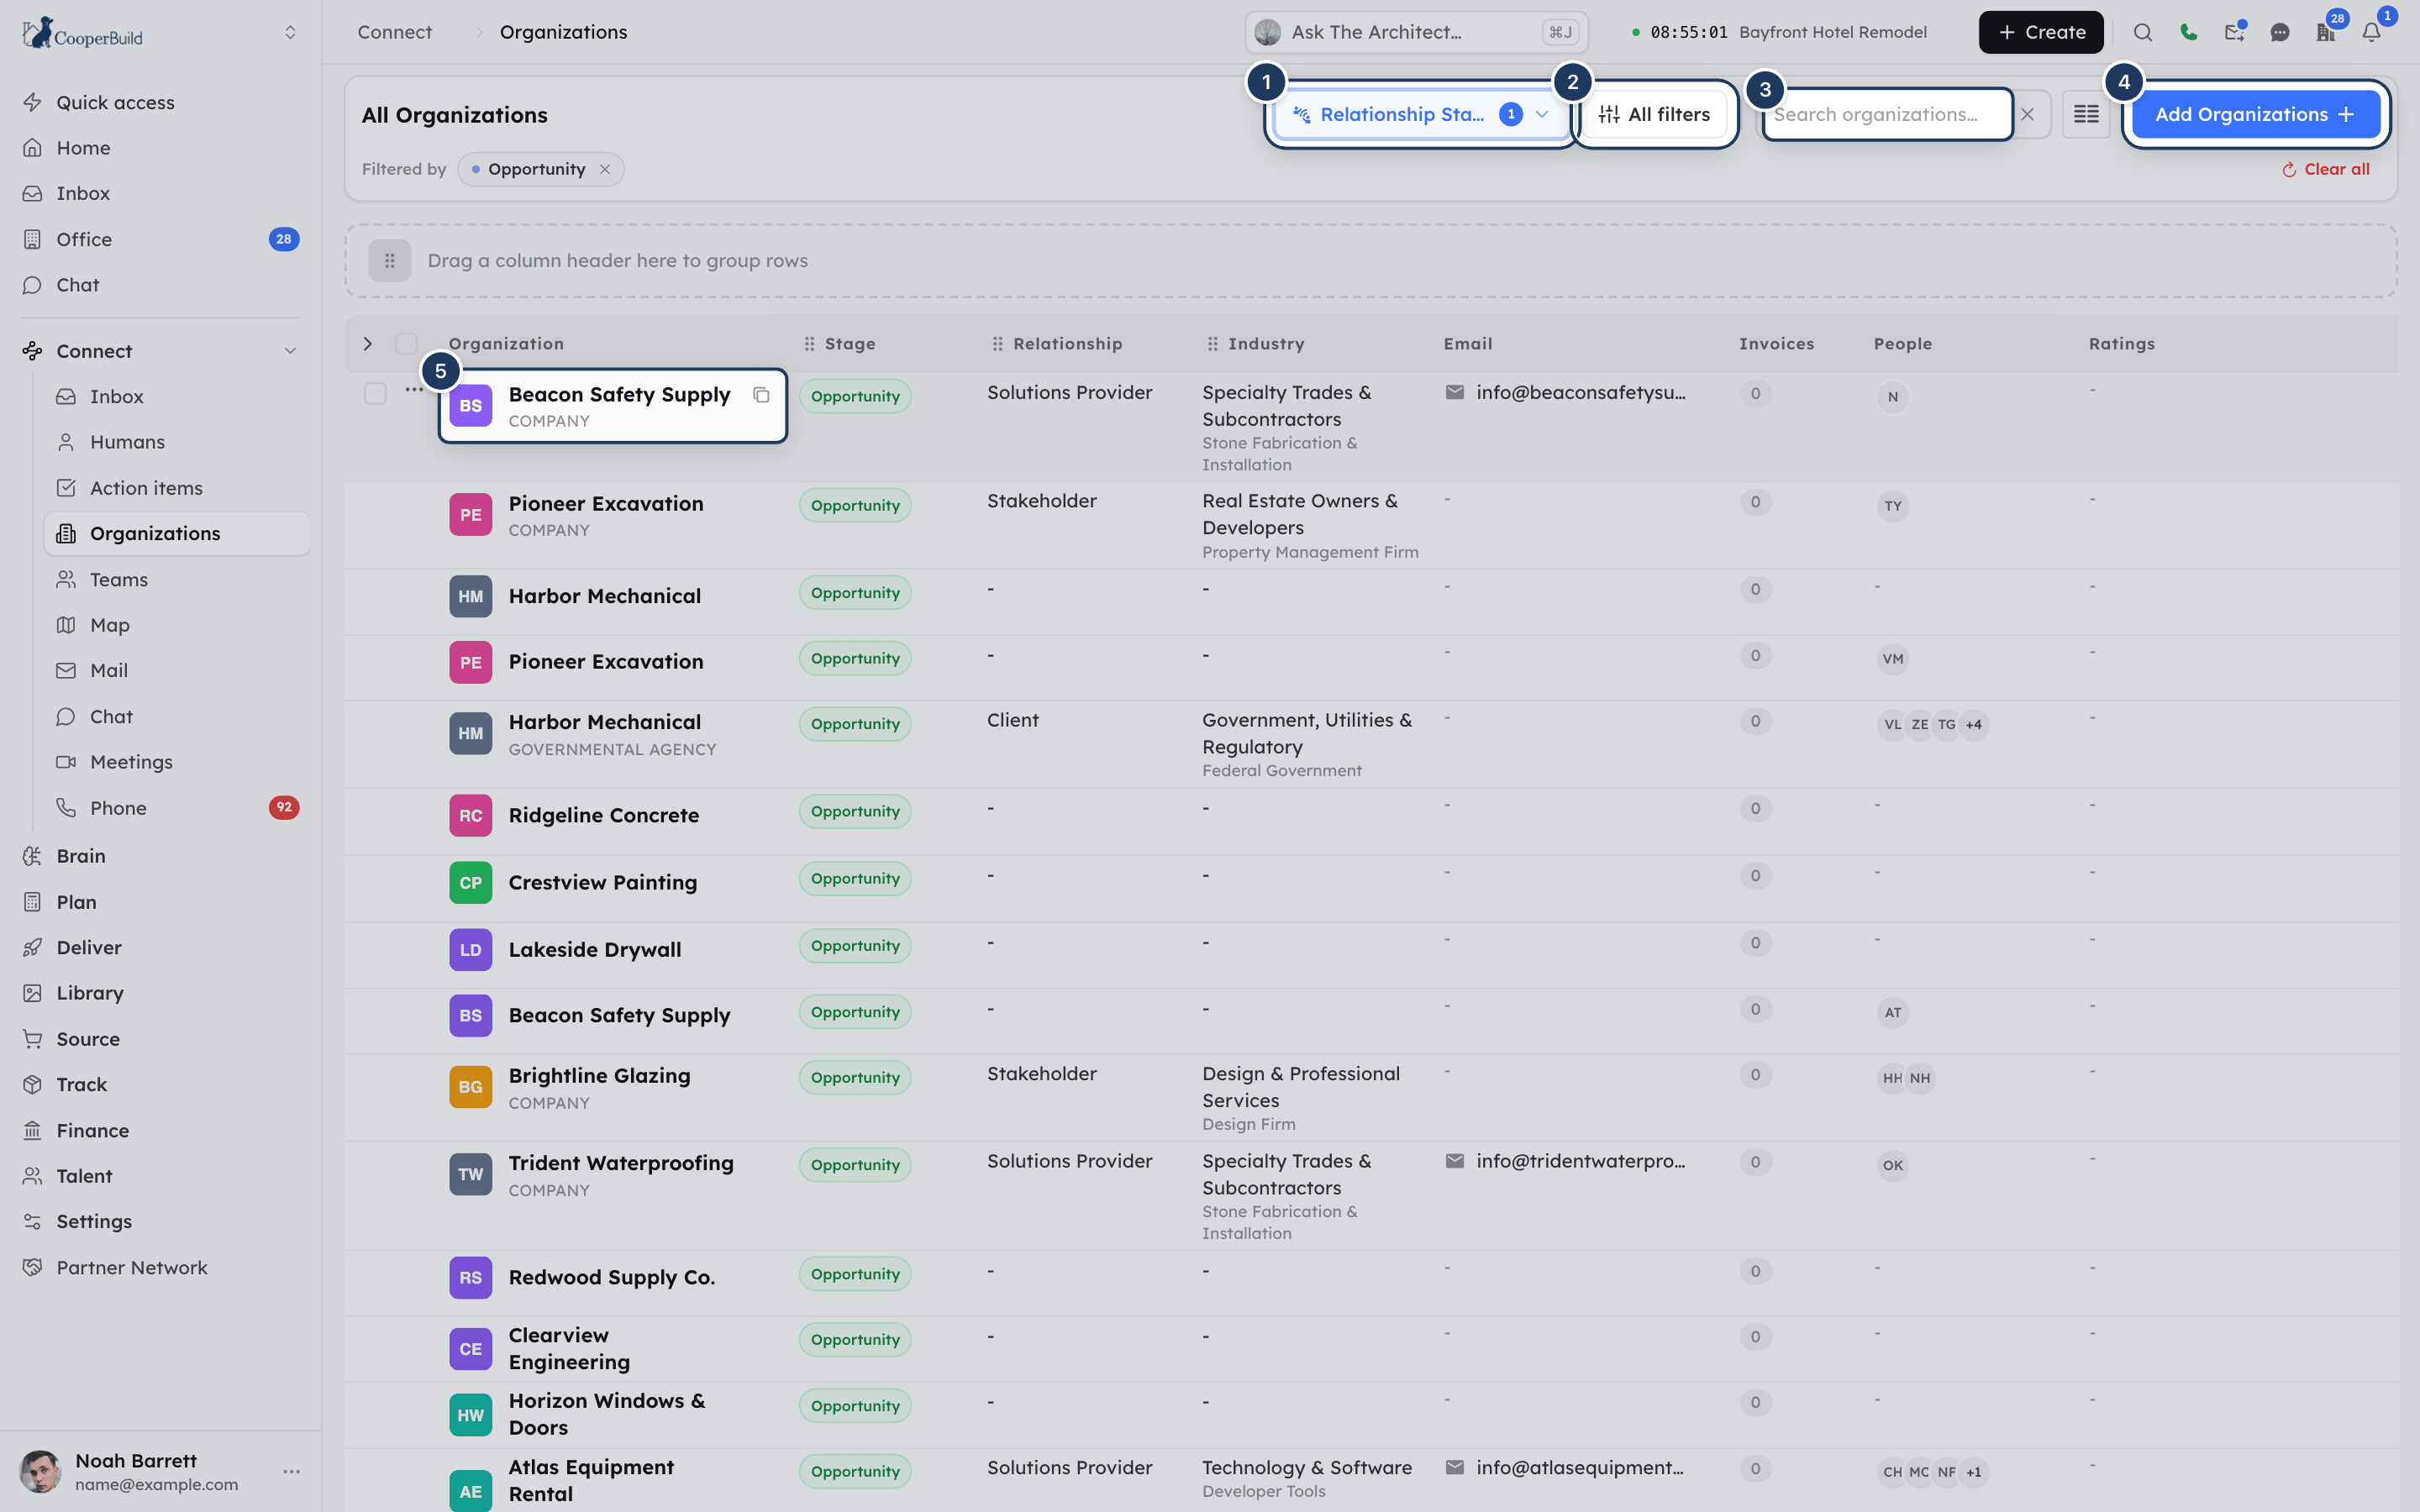
*Screenshot: The Organizations list. 1: Relationship Stage filter, 2: All filters, 3: search, 4: Add Organizations, 5: an organization's name (opens its panel).*
## Key concepts
| Term | Meaning |
|---|---|
| **Organization** | One external company. An organization has a name, a stage, a relationship type, an organization type and an industry, plus optional contact, address and finance details. |
| **Stage** | Where the relationship stands: **Lead**, **Prospect**, **Opportunity**, **Counterparty**, **Dormant** or **Inactive**. |
| **Relationship type** | How the company relates to you, such as Client or Subcontractor. Your admins define the list in [Connect settings](https://docs.cooperbuild.ai/connect/settings.md). |
| **Organization type** | What kind of company it is, such as Corporation. Defined in [Connect settings](https://docs.cooperbuild.ai/connect/settings.md). |
| **Industry** and **Sub-Industry** | The company's line of business. Each sub-industry belongs to one industry. Defined in [Connect settings](https://docs.cooperbuild.ai/connect/settings.md). |
| **People** | The [humans](https://docs.cooperbuild.ai/connect/humans.md) who work at the organization. |
| **Rating** | A score of 1 to 5 stars that your team gives the organization for its work on one project, with optional notes. |
| **Confidential document** | An organization document that only members of selected [teams](https://docs.cooperbuild.ai/connect/teams.md) can see. |
## Open Organizations
1. In the sidebar, open **Connect**.
2. Click **Organizations**.
The list opens at `/connect/organizations` with the title **All Organizations**.
You need the **Organizations** permission in the **Connect** module to see this page. If your company's plan does not include Organizations, Cooper shows a plan-locked screen instead. See [Permissions](#permissions).
## Read the Organizations list
Each row is one organization. The columns shown by default are:
| Column | What it shows |
|---|---|
| **Organization** | The logo or initials, the name and the organization type. Click the name to open the organization's panel. Hover the row to show the copy icon. |
| **Stage** | The relationship stage. |
| **Relationship** | The relationship type. |
| **Industry** | The industry. |
| **Email** | The company email. Click it to write an email in Cooper. A copy icon copies the address. |
| **Invoices** | How many invoices the organization has. Click the number to open the **Invoices** tab. |
| **People** | Avatars of the linked people. Click them to open the **People** tab. |
| **Ratings** | The project of the first rating, the average star rating and the number of ratings. Hover to see every rating with its notes and dates. Click to open the **Ratings** tab. |
Hidden columns you can turn on: **Phone**, **Website**, **Location**, **Tax ID**, **Chart of Account**, **Org Type**, and the modified-by and modified-time columns.
### Show or hide columns
1. Click the **Toggle Columns** button (the columns icon) next to the search box.
2. Tick or untick the columns you want.
Cooper remembers your choice.
### Group the list
Drag a column header onto the bar that says **Drag a column header here to group rows**. You can group by **Stage**, **Relationship**, **Industry** or **Org Type**. To stop grouping, click the **x** on the column chip in the **Grouped by** bar.
The list loads more organizations as you scroll. The footer shows how many organizations are showing out of the total.
## Search for an organization
Type in the **Search organizations…** box at the top of the list. The list shows organizations whose name contains your text.
## Filter the Organizations list
### Step 1: Filter by stage
Click **Relationship Stage** and select one or more stages, for example **Lead** and **Prospect**.
### Step 2: Filter by type or industry
Click **All filters**. Choose a **Relationship Type**, **Organization Type**, **Industry** or **Sub-Industry**. Each filter applies as soon as you choose it. **Sub-Industry** lists the subcategories of the chosen industry.
### Step 3: Review or clear filters
Active filters appear as chips in the **Filtered by** row. Click the **x** on a chip to remove one filter. Click **Clear all** to remove every filter. In the **All filters** panel, **Reset all** clears the panel's filters.
The page address updates with your search and filters. Bookmark or share the address to come back to the same filtered list.
## Add an organization
### Step 1: Open the form
Click **Add Organizations** at the top right of the list. The **New Organization** panel opens.
### Step 2: Fill in the organization details
Under **Organization**, enter the **Organization Name** and choose the **Stage**, **Relationship Type**, **Organization Type** and **Industry**. All five are required. **Sub-Industry** is optional and becomes available after you choose an industry.
### Step 3: Add a missing list value without leaving the form
If the relationship type, organization type, industry or subcategory you need is not in the dropdown, click **+ Add Relationship Type**, **+ Add Organization Type**, **+ Add Industry** or **+ Add Subcategory** at the bottom of that dropdown. A small form opens beside the panel. Fill it in and click the create button, for example **Create Industry**. The new value is selected for you.
### Step 4: Add contact, address and finance details
Optionally fill in **Email**, **Phone** (with country code), **Website URL**, the address fields (**Street**, **City**, **State / Province**, **Zip / Postal Code**, **Country**), **Tax ID**, **Chart of Account** and **Description**.
### Step 5: Save
Click **Create Organization**. Cooper shows "Organization created" and the organization appears in the list.
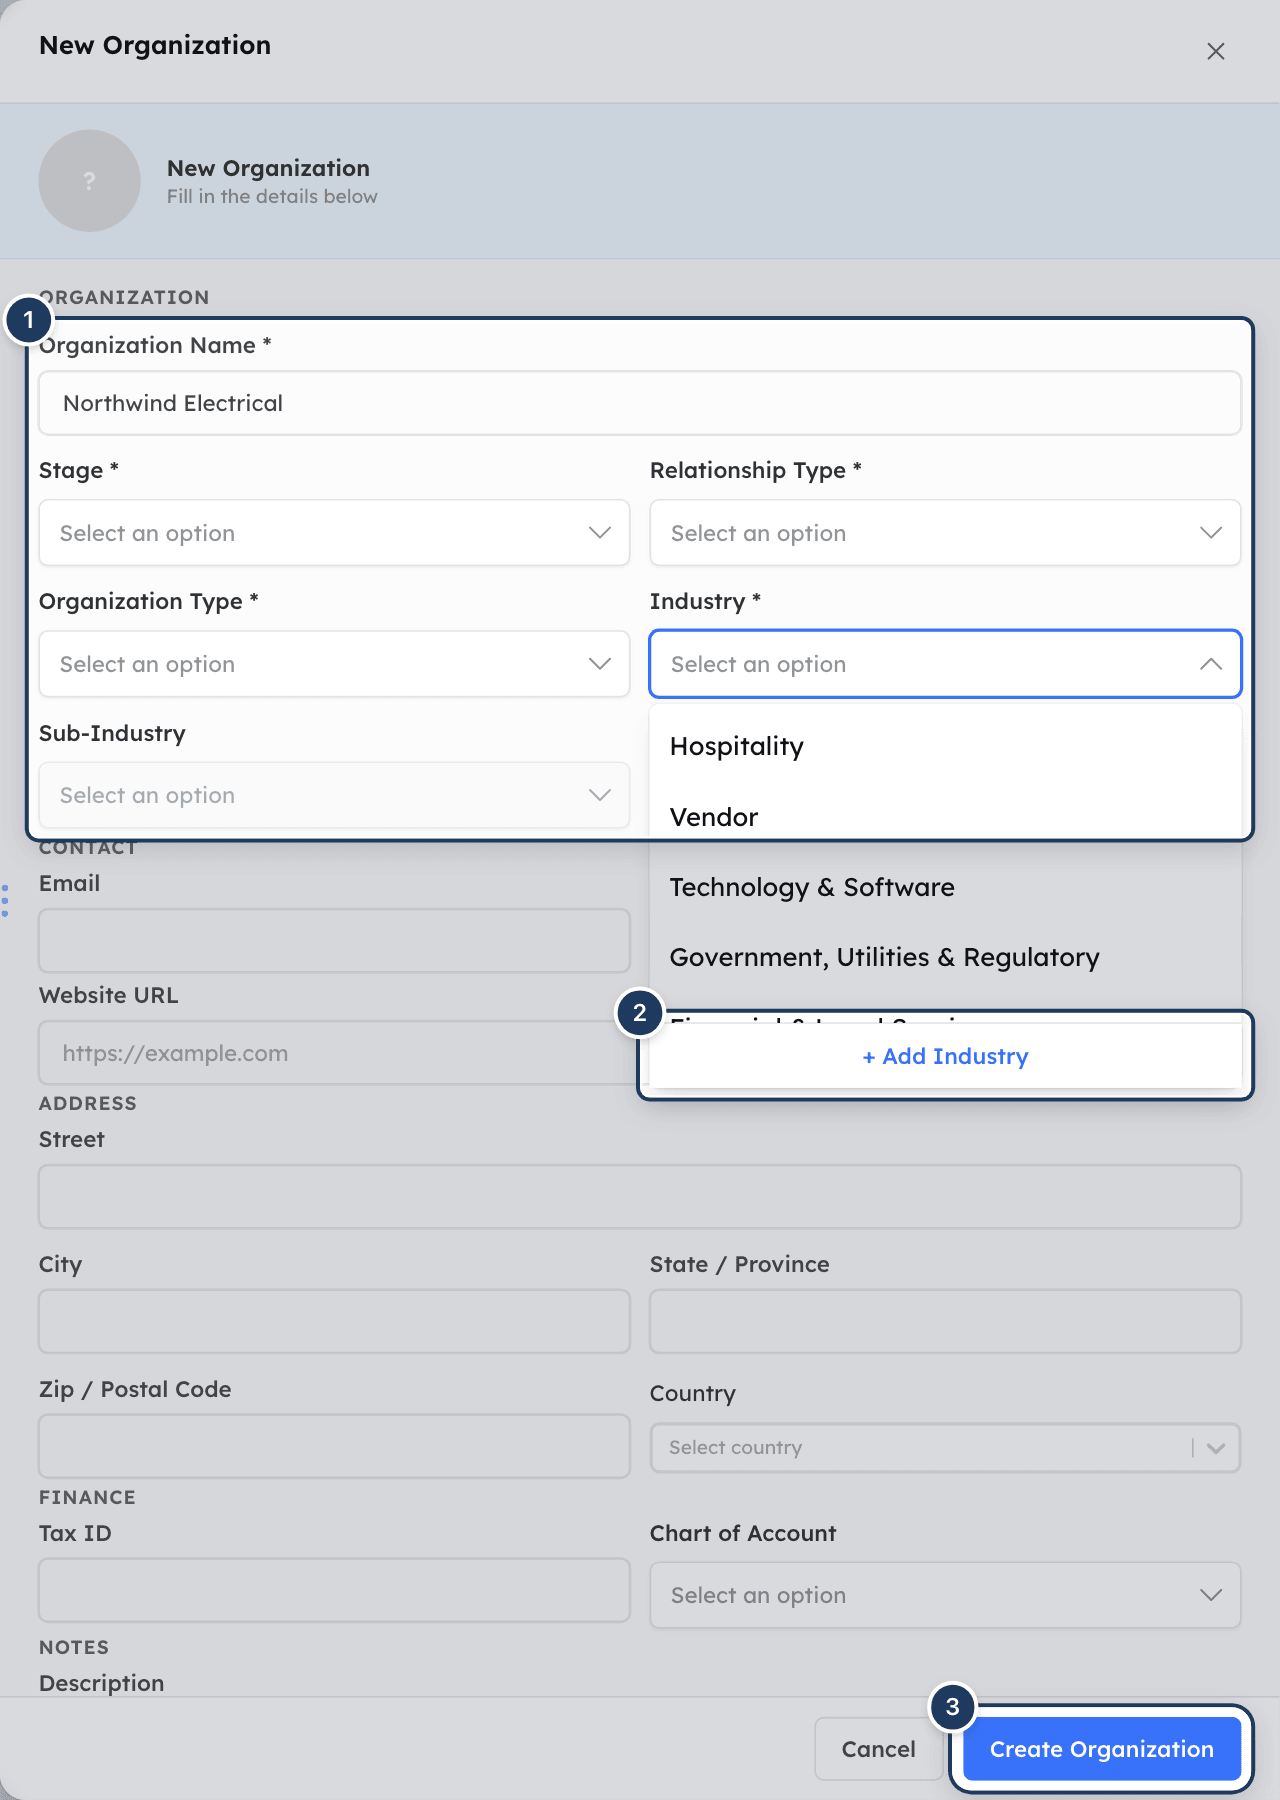
*Screenshot: Adding an organization. 1: required fields, 2: an Add New option inside a dropdown, 3: Create Organization.*
> **Note**
>
> You add people, ratings and documents after the organization exists. Open the organization and use the **People**, **Ratings** and **Documents** tabs.
## View an organization
Click the organization's name in the list. The organization panel opens on the right. The page address gains the organization's ID, so you can share a link that opens the same panel.
The top of the panel shows the logo, the name and two buttons: **Copy organization info** (the copy icon) and **Edit**.
The panel has these tabs:
| Tab | What it shows |
|---|---|
| **Details** | Name, stage, relationship type, organization type, industry, sub-industry, email, phone, website, address, tax ID and chart of account. |
| **People** | The humans linked to the organization, with email and call buttons. |
| **Ratings** | Project ratings for the organization. |
| **Invoices** | The organization's invoices with status, date, due date and total. Click **View Invoice** to open one. |
| **Documents** | Files stored on the organization, with confidential settings. |
| **Compliance** | The organization's compliance status, documents and evidence. |
| **Timeline** | Everything that happened with the organization, newest first. |
The **People**, **Ratings**, **Invoices** and **Documents** tab names show a count, for example **People (3)**.
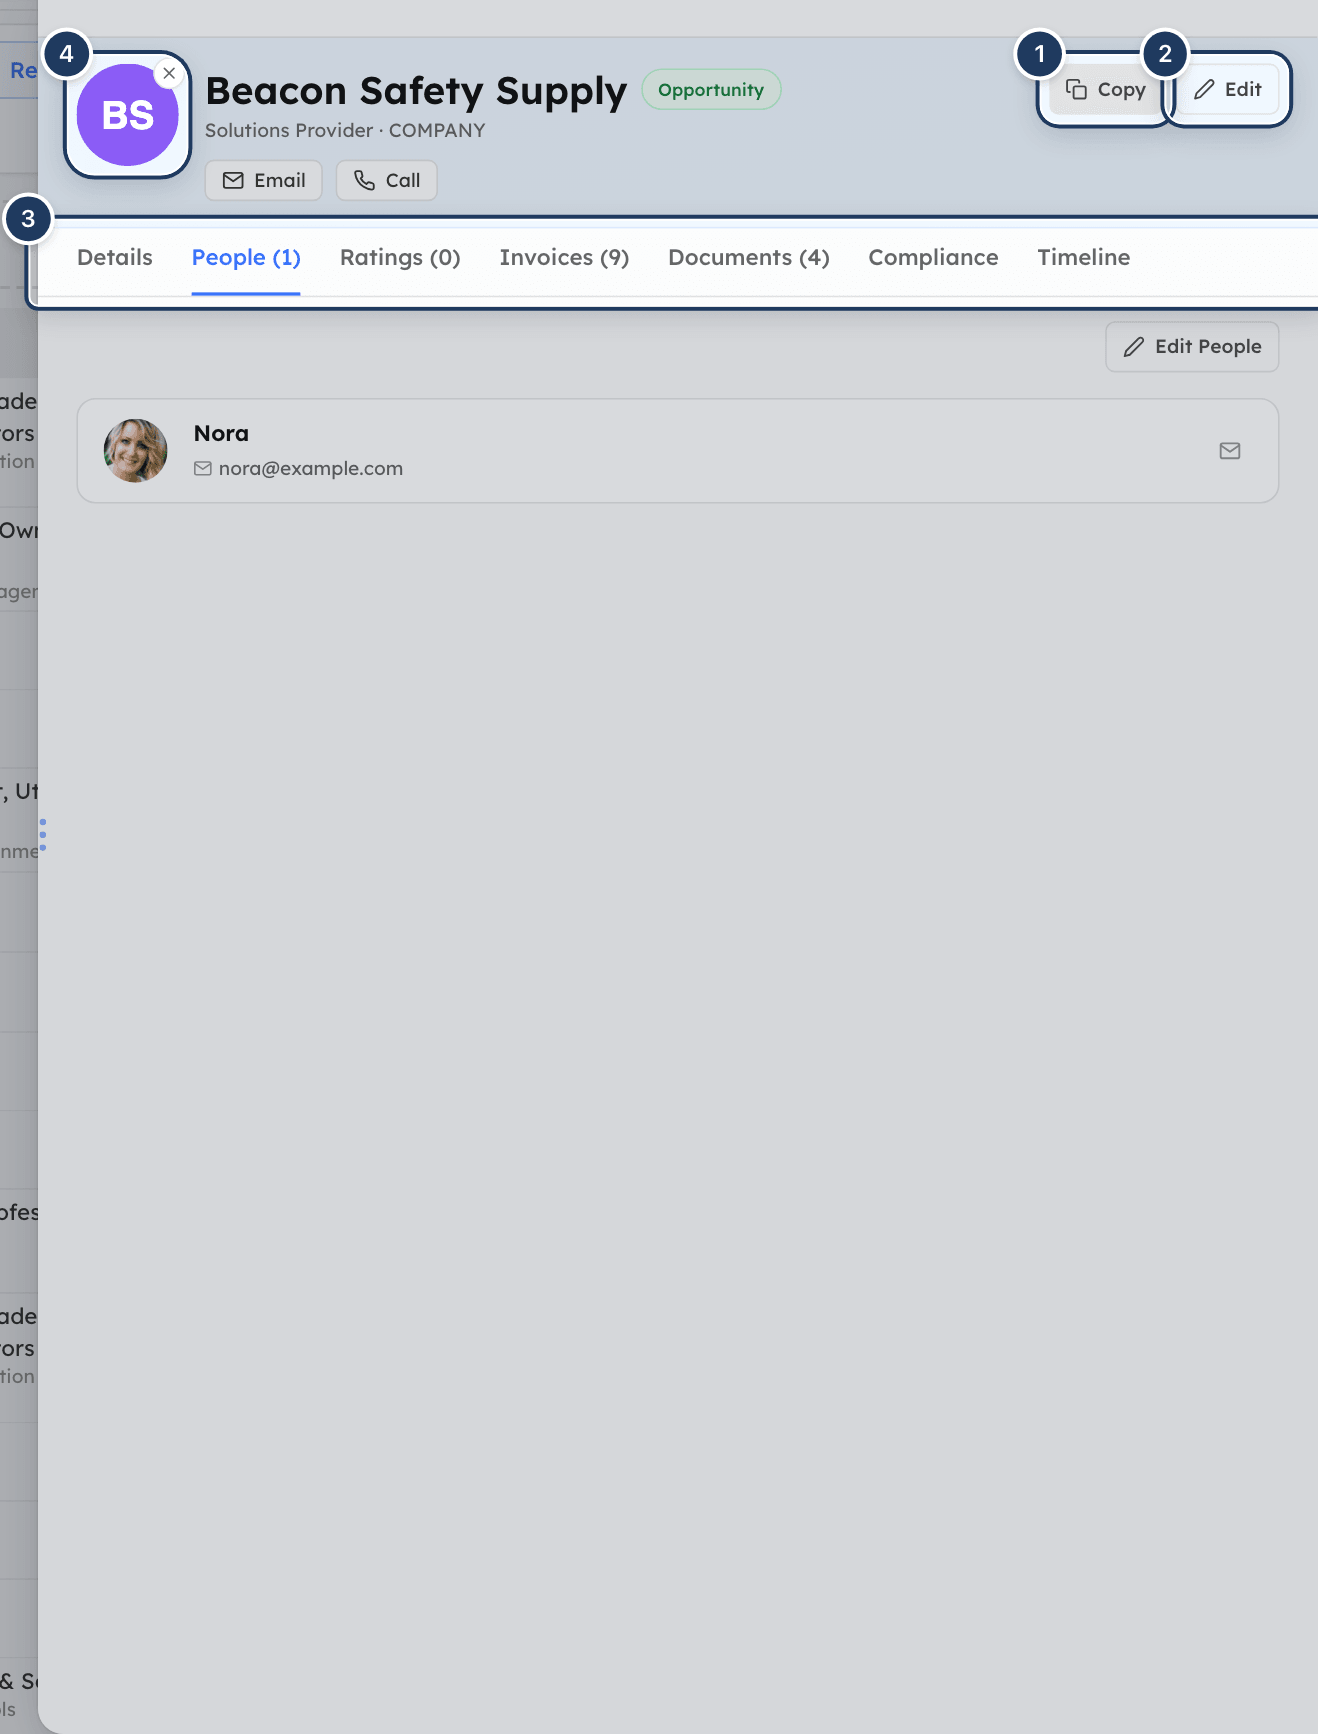
*Screenshot: An organization's panel. 1: Copy organization info, 2: Edit, 3: tabs, 4: logo (click to upload).*
## Edit an organization
### Step 1: Open the organization
Click the organization's name, or click the row's **...** menu and choose **View** or **Edit**.
### Step 2: Switch to edit mode
Click **Edit** at the top of the panel. The same form as **Add an organization** appears.
### Step 3: Save your changes
Change the fields and click **Save Changes**. Cooper shows "Organization updated". Click **Cancel** to go back without saving.
## Change an organization's logo
1. Open the organization.
2. Click the logo or initials in the panel header (tooltip **Upload photo**) and choose an image.
3. Cooper saves the image right away and shows "Photo updated".
To remove the logo, click **Remove photo**.
## Add or remove people at an organization
The people at an organization are [humans](https://docs.cooperbuild.ai/connect/humans.md). Linking a person here sets that human's organization.
### Step 1: Open the People tab
Open the organization and click the **People** tab.
### Step 2: Start editing
Click **Edit People**.
### Step 3: Link an existing human or create a new one
Click **+ Add Contact**. To link someone already in Humans, turn on **Link to existing person** and pick them in **Select person** (**Search by name...**). To create a new human, leave it off and fill in **First Name** (required), **Last Name**, **Title**, **Email** and **Phone**.
### Step 4: Remove a person
Click **Remove contact** (the x) on the person's card. This only unlinks the person. The human stays in Humans.
### Step 5: Save
Click **Save Changes**. Cooper shows "People updated".
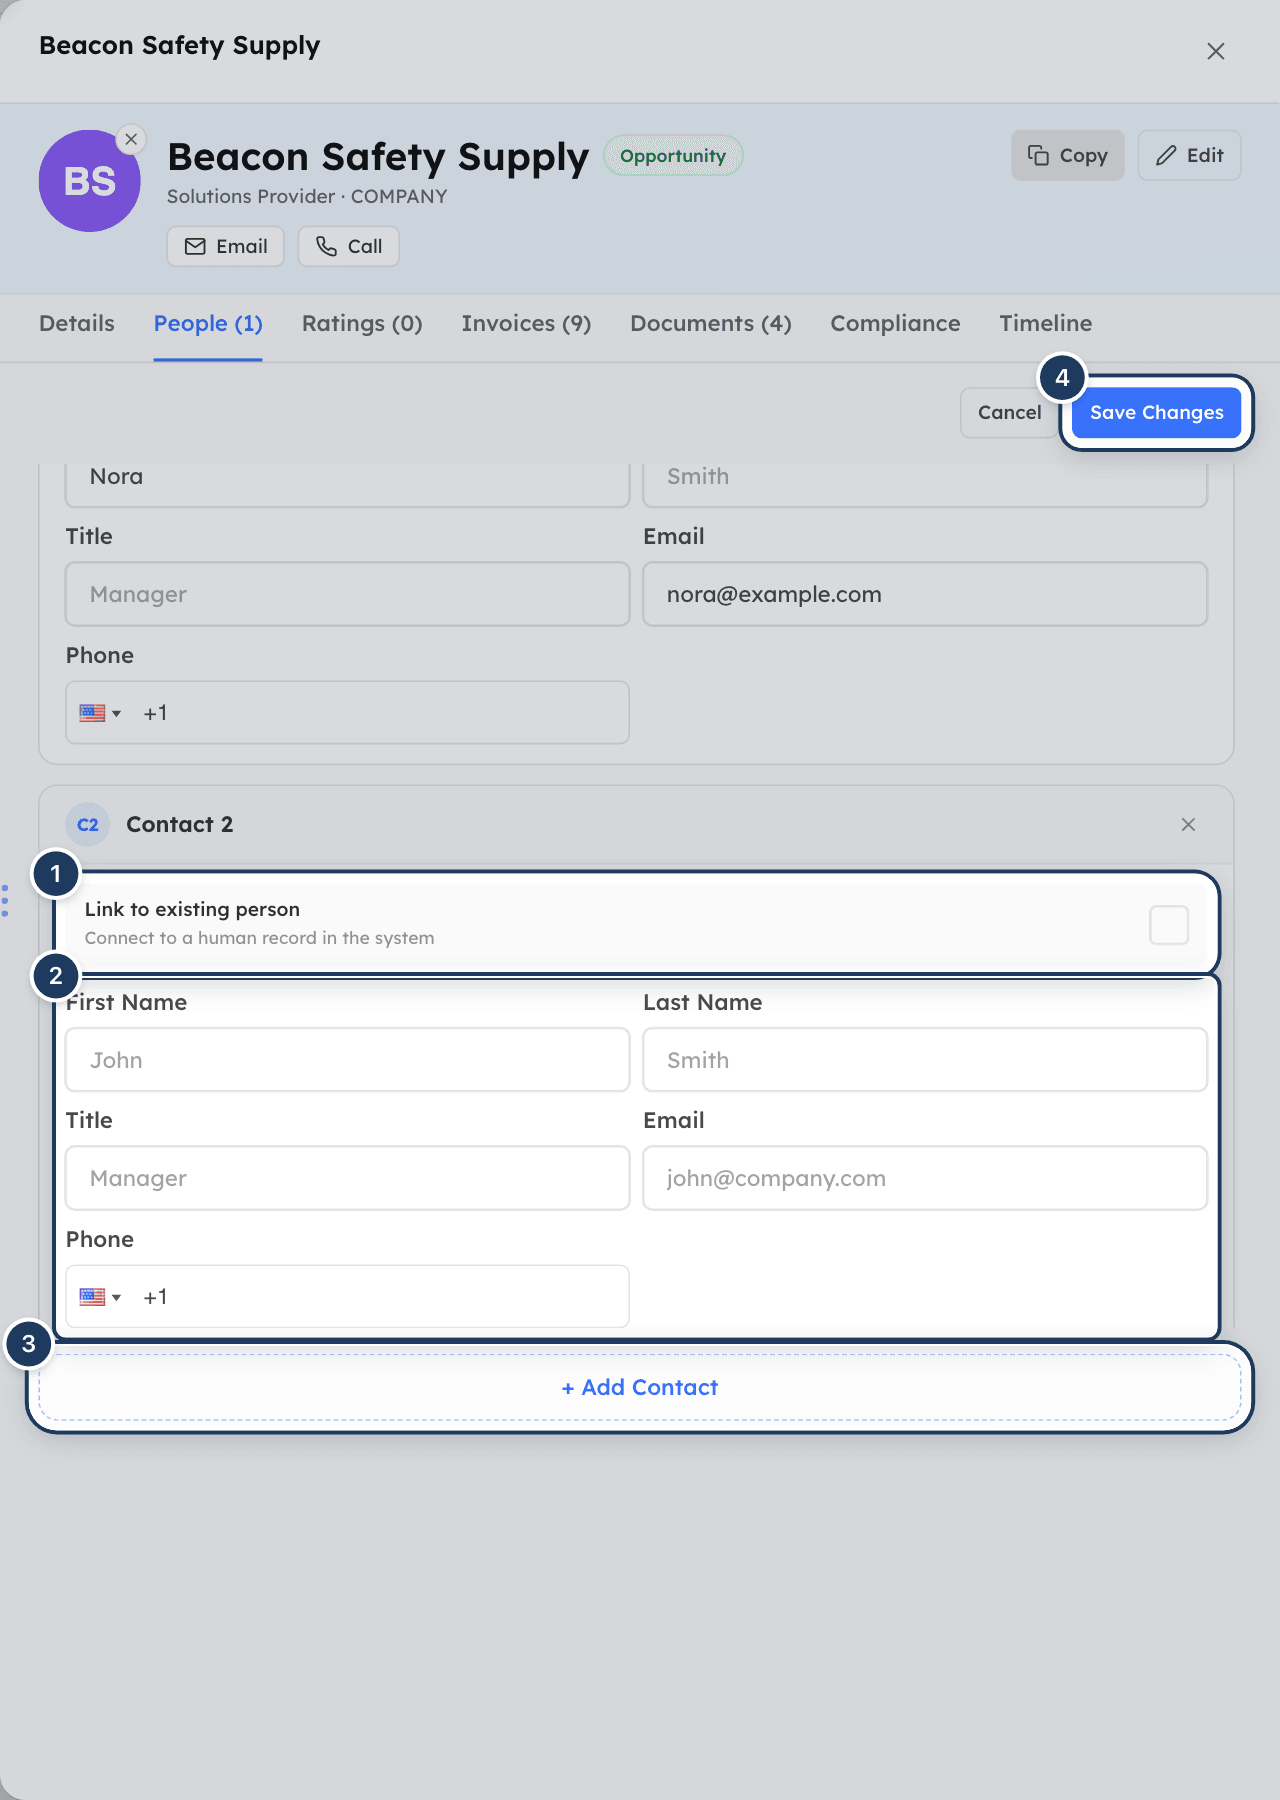
*Screenshot: Editing an organization's people. 1: Link to existing person, 2: new person fields, 3: + Add Contact, 4: Save Changes.*
From the **People** tab you can also email a person (**Email** button) or call them from Cooper Phone (**Call ... from Cooper Phone**).
> **Note**
>
> A person's relationship stage follows their organization's stage. To change it, change the organization's **Stage**.
## Rate an organization's work on a project
### Step 1: Open the Ratings tab
Open the organization and click the **Ratings** tab.
### Step 2: Start editing
Click **Edit Ratings**, then **+ Add Rating**.
### Step 3: Fill in the rating
Choose the **Project** (**Select project...**), click 1 to 5 stars under **Rating**, and add **Notes** if you want.
### Step 4: Save
Click **Save Changes**. Every rating needs a project and a star rating. If one is missing, Cooper shows "Please select a project and rating for each row".
Each saved rating shows the project, the stars, **Submitted By**, **Last Updated By** and the notes. To delete a rating, click **Delete rating** (the trash icon) on it and confirm. Deleting needs the Organizations **Delete** permission.
## Upload and manage organization documents
### Step 1: Open the Documents tab
Open the organization and click the **Documents** tab.
### Step 2: Add files
Click **Upload Files** to upload from your computer, or click **Import from your media library** to pick files already in Cooper's Library. You can upload images, videos, PDFs, Word, Excel, PowerPoint, text, CSV, Markdown and RTF files. Each file can be up to 2 GB.
### Step 3: Preview or remove a file
Click a document to preview it. Click **Remove** (the x) on a document to remove it from the organization. Cooper shows "Document removed".
### Make a document confidential
1. On the document card, click **Set confidential access** (or **Confidential:** if it is already confidential).
2. Turn on **Confidential**.
3. Choose one or more **Authorized Teams**. At least one team is required. If you choose none, Cooper shows "Please select at least one authorized team".
4. Click **Save**. Cooper shows "Confidential settings updated". Click **Cancel** to close without saving.
Only members of the authorized [teams](https://docs.cooperbuild.ai/connect/teams.md) can see a confidential document.
## Check an organization's compliance
Open the organization and click the **Compliance** tab. It shows the organization's compliance status with its **Compliance Documents** and **Compliance Evidence**. You can record compliance documents and notes here if you have the Organizations **Write** permission.
If the tab says "Could not load compliance status", click **Retry**.
## See an organization's history
Open the organization and click the **Timeline** tab. It lists everything that happened with the company, newest first, grouped by day. It shows open items at the top, split into **They owe us** and **We owe them**. Filter by category (**Money**, **Projects**, **Conversations**, **Meetings**, **Actions**, **Documents**, **Other**), type in **Search**, and click **Load more** to see older entries.
## Copy an organization's details
Hover an organization's row and click the copy icon (**Copy organization info**), or click the copy button in the panel header. Cooper copies the organization's details to your clipboard and shows "Organization copied to clipboard".
## Delete organizations
### Step 1: Choose what to delete
To delete one organization, click the row's **...** menu and choose **Delete**. To delete several, tick their checkboxes and click **Delete** in the footer.
### Step 2: Confirm
In the **Are You Sure?** window, click **Delete**. Cooper shows "Records have been deleted successfully."
Deleting an organization unlinks its people. The humans themselves stay in Humans.
## Use the full organization page
Some links in Cooper, such as service providers in the Equipment register, open an organization as a full page at `/connect/organizations/` instead of the panel. Click **Back** to return.
The full page shows **Documents & Attachments**, **Contacts**, **Services Offered**, **Address Information**, **Recent Activities** and **Invoices**. Click **Edit** to change the details. In edit mode you can also:
- Edit the organization fields under **Edit Organization Details**: **Organization Name**, **Organization Type**, **Industry**, **Industry Sub Category**, **Relationship Stage**, **Relationship Type**, **Work Email**, **Mobile Number**, **Tax ID**, **Website URL** and **Description**.
- Set **Default Payment Accounts (optional)**. Click **Add Default**, then pick a **Legal Entity** and a **Default Account**. Each legal entity can have only one default account. Cooper suggests these accounts when you create payments to this vendor.
- Click **Add Contact** to add people.
- Click **Add Service** to record a service the organization offers, with **Item Class**, **Item**, **Unit Rate** and **Lead Time (days)**.
- Click **Add Activity** to log an activity with an **Activity Type** (**Meeting**, **Call**, **Email**, **Visit**, **Follow-up**, **Converted** or **Other**), **Date**, **Duration (minutes)**, **Participants** and **Description**.
Click **Save Changes** to save or **Cancel** to discard.
## Fields reference
| Field | Required | What it means |
|---|---|---|
| **Organization Name** | Yes | The company's name. |
| **Stage** | Yes | The relationship stage: Lead, Prospect, Opportunity, Counterparty, Dormant or Inactive. |
| **Relationship Type** | Yes | How the company relates to you. Comes from the Relationship Types list. |
| **Organization Type** | Yes | What kind of company it is. Comes from the Organization Types list. |
| **Industry** | Yes | The company's industry. Comes from the Industries list. |
| **Sub-Industry** | No | A subcategory of the chosen industry. |
| **Email** | No | The company email. Must be a valid email address. |
| **Phone** | No | The company phone number, with country code. |
| **Website URL** | No | The company website, for example `https://example.com`. |
| **Street**, **City**, **State / Province**, **Zip / Postal Code**, **Country** | No | The company address. |
| **Tax ID** | No | The company's tax identification number. |
| **Chart of Account** | No | The chart of accounts account linked to this organization. |
| **Description** | No | Free-text notes about the organization. |
People fields (**People** tab): **First Name** (required for a new person, 2 to 30 characters), **Last Name**, **Title**, **Email** (must be valid if entered) and **Phone**.
Rating fields (**Ratings** tab): **Project** (required), **Rating** (required, 1 to 5 stars) and **Notes**.
## Permissions
Access is controlled by the **Organizations** permission in the **Connect** module of a role. An admin sets it in **Settings → Roles**.
| Action | Permission needed |
|---|---|
| See the Organizations list and panels | Organizations **Read** (or **Write**) |
| Add or edit organizations, people, ratings and documents; record compliance | Organizations **Write** |
| Delete organizations and ratings | Organizations **Delete** |
Without **Write**, the **Add Organizations**, **Edit**, **Edit People** and **Edit Ratings** buttons are hidden. Without **Delete**, **Delete** is hidden from the row menu.
An admin can also limit which organizations a role sees. In the role's Organizations access, restrict it to selected **Relationship types**, **Organization types** or **Industries**. People with that role then see only matching organizations.
Workspace owners can see and do everything.
## Tips and best practices
- Set up your relationship types, organization types and industries in [Connect settings](https://docs.cooperbuild.ai/connect/settings.md) before you import or add many organizations. The values you choose there drive filters, grouping and role restrictions.
- Keep the **Stage** current. Cooper shows the organization's stage for everyone who works there.
- Link people to organizations instead of typing company names into human records. The People column, the Timeline and AI agents then see the full picture.
- Use confidential documents for contracts, insurance certificates and bank details, and authorize only the teams that need them.
- Rate vendors and subcontractors at the end of each project. The **Ratings** column then helps you pick who to invite next time.
## Troubleshooting
### I can't see Organizations in the sidebar
Your role does not have the **Organizations** permission in the **Connect** module. Ask an admin to grant it in **Settings → Roles**. If you see a plan-locked screen instead, your company's plan does not include Organizations.
### The Add Organizations or Edit button is missing
Your role has Organizations **Read** but not **Write**. Ask an admin for Write access.
### I can't find the relationship type or industry I need
Click **+ Add Relationship Type**, **+ Add Organization Type**, **+ Add Industry** or **+ Add Subcategory** at the bottom of the dropdown in the organization form. An admin can also add values in [Connect settings](https://docs.cooperbuild.ai/connect/settings.md).
### Sub-Industry is greyed out
Choose an **Industry** first. Sub-Industry lists only the subcategories of the chosen industry.
### An organization is missing from the list
Check the **Filtered by** row and click **Clear all**. If it is still missing, your role may be limited to certain relationship types, organization types or industries. Ask an admin.
### I removed every person but they are still linked
Saving the **People** tab with no people left does not unlink anyone. To unlink the last person, open that person in [Humans](https://docs.cooperbuild.ai/connect/humans.md) and change their organization.
### Upload failed: Some files exceed the 2 GB limit
Each file must be 2 GB or smaller. Split or compress the file and upload it again.
### I can't see a document on an organization
The document is confidential and you are not in one of its authorized teams. Ask someone in an authorized team, or an admin, to add your team.
## For AI agents
Agents work with organizations through the CooperBuild MCP server.
| Tool | What it does | Key parameters |
|---|---|---|
| `search_external_orgs` | Finds organizations with combined semantic and text search. Available to every user and returns summary fields only (id, name, email, phone, description, relationshipStage, relationshipStageLabel, status). | `search` (name, description, email, industry, city or role, for example "electrical sub NYC"), `organizationType` (an organization type ID), `relationshipStage` (`Lead`, `Prospect`, `Opportunity`, `Counterparty`, `Dormant`, `Inactive`), `limit` (1–50, default 20). Call with `{}` to list all organizations. |
| `person_timeline` | The company timeline, the same data as the **Timeline** tab. | `externalOrgId`; optional `categories`, `since`, `until`, `search`, `limit`, `pageNo` |
| `crm_relationship_brief` | Summarizes the relationship across every known contact at the company. Read-only. | `externalOrgId` |
| `crm_interaction_list` | Lists logged interactions with the company. | `externalOrgId` plus filters |
| `compliance_check`, `compliance_documents`, `compliance_applicability`, `compliance_blocks_payment`, `compliance_dashboard` | Read and record vendor compliance, the same data as the **Compliance** tab. | See each tool's schema. |
Rules and common errors:
- `search_external_orgs` needs no permission. Raw database tools (`db_find`, `db_update` and so on) on the `ExternalOrg` model need the Organizations permission.
- The compliance tools are gated on Organizations. Any compliance write needs Organizations **Write**.
- `person_timeline`, `crm_relationship_brief` and `crm_interaction_list` need **Humans** Read.
- The stage "Active" is retired. `search_external_orgs` still accepts it and treats it as `Opportunity`. Never write "Active" to an organization; the record rejects it.
- Creating or updating an organization requires `organizationName`, `organizationType` (ID) and `industries` (ID). Missing ones fail with "Field 'Organization Name' is required.", "Field 'Organization Type' is required." or "Field 'Industries' is required."
- Relationship type, organization type, industry and sub-industry are IDs from the Connect settings lists. Look them up first. See [Connect settings](https://docs.cooperbuild.ai/connect/settings.md).
- Filtering by an invalid ID fails with "Invalid ID value in advancedFilters.…". Pass a valid 24-character ID.
- Deleting an organization unlinks its humans. It does not delete them.
## Related
- [Humans](https://docs.cooperbuild.ai/connect/humans.md): the people who work at your organizations.
- [Teams](https://docs.cooperbuild.ai/connect/teams.md): group organizations into vendor lists, bid lists and subcontractor pools, and control who sees confidential documents.
- [Connect settings](https://docs.cooperbuild.ai/connect/settings.md): manage relationship types, organization types, industries and subcategories.
- [Action items](https://docs.cooperbuild.ai/connect/action-items.md): what an organization owes you and what you owe them.
- [Phone](https://docs.cooperbuild.ai/connect/phone.md): call an organization's people from Cooper.
---
# Teams
> Teams (also called groups) are named sets of people, organizations or both, such as a project team, a RACI group, a department-style functional team or a vendor bid list. Use them to assign work, control who sees confidential files, invite people in bulk and link people to projects.
Source: https://docs.cooperbuild.ai/connect/teams
Keywords: teams, groups, raci, raci matrix, responsible accountable consulted informed, project team, functional team, department, org unit, vendor list, bid list, subcontractor pool, distribution list, committee, members
A **team** is a named set of members that you reuse across Cooper. Members can be [humans](https://docs.cooperbuild.ai/connect/humans.md), [organizations](https://docs.cooperbuild.ai/connect/organizations.md), or a mix of both. Office admins, project managers and estimators use teams to keep project crews, departments, RACI groups and vendor lists in one place, so they can assign them, link them to projects and share confidential files with them without picking people one by one.
On the page itself Cooper calls teams **groups**: the list is titled **All Groups** and the button says **Add New Group**. This page uses "team" and "group" for the same thing.
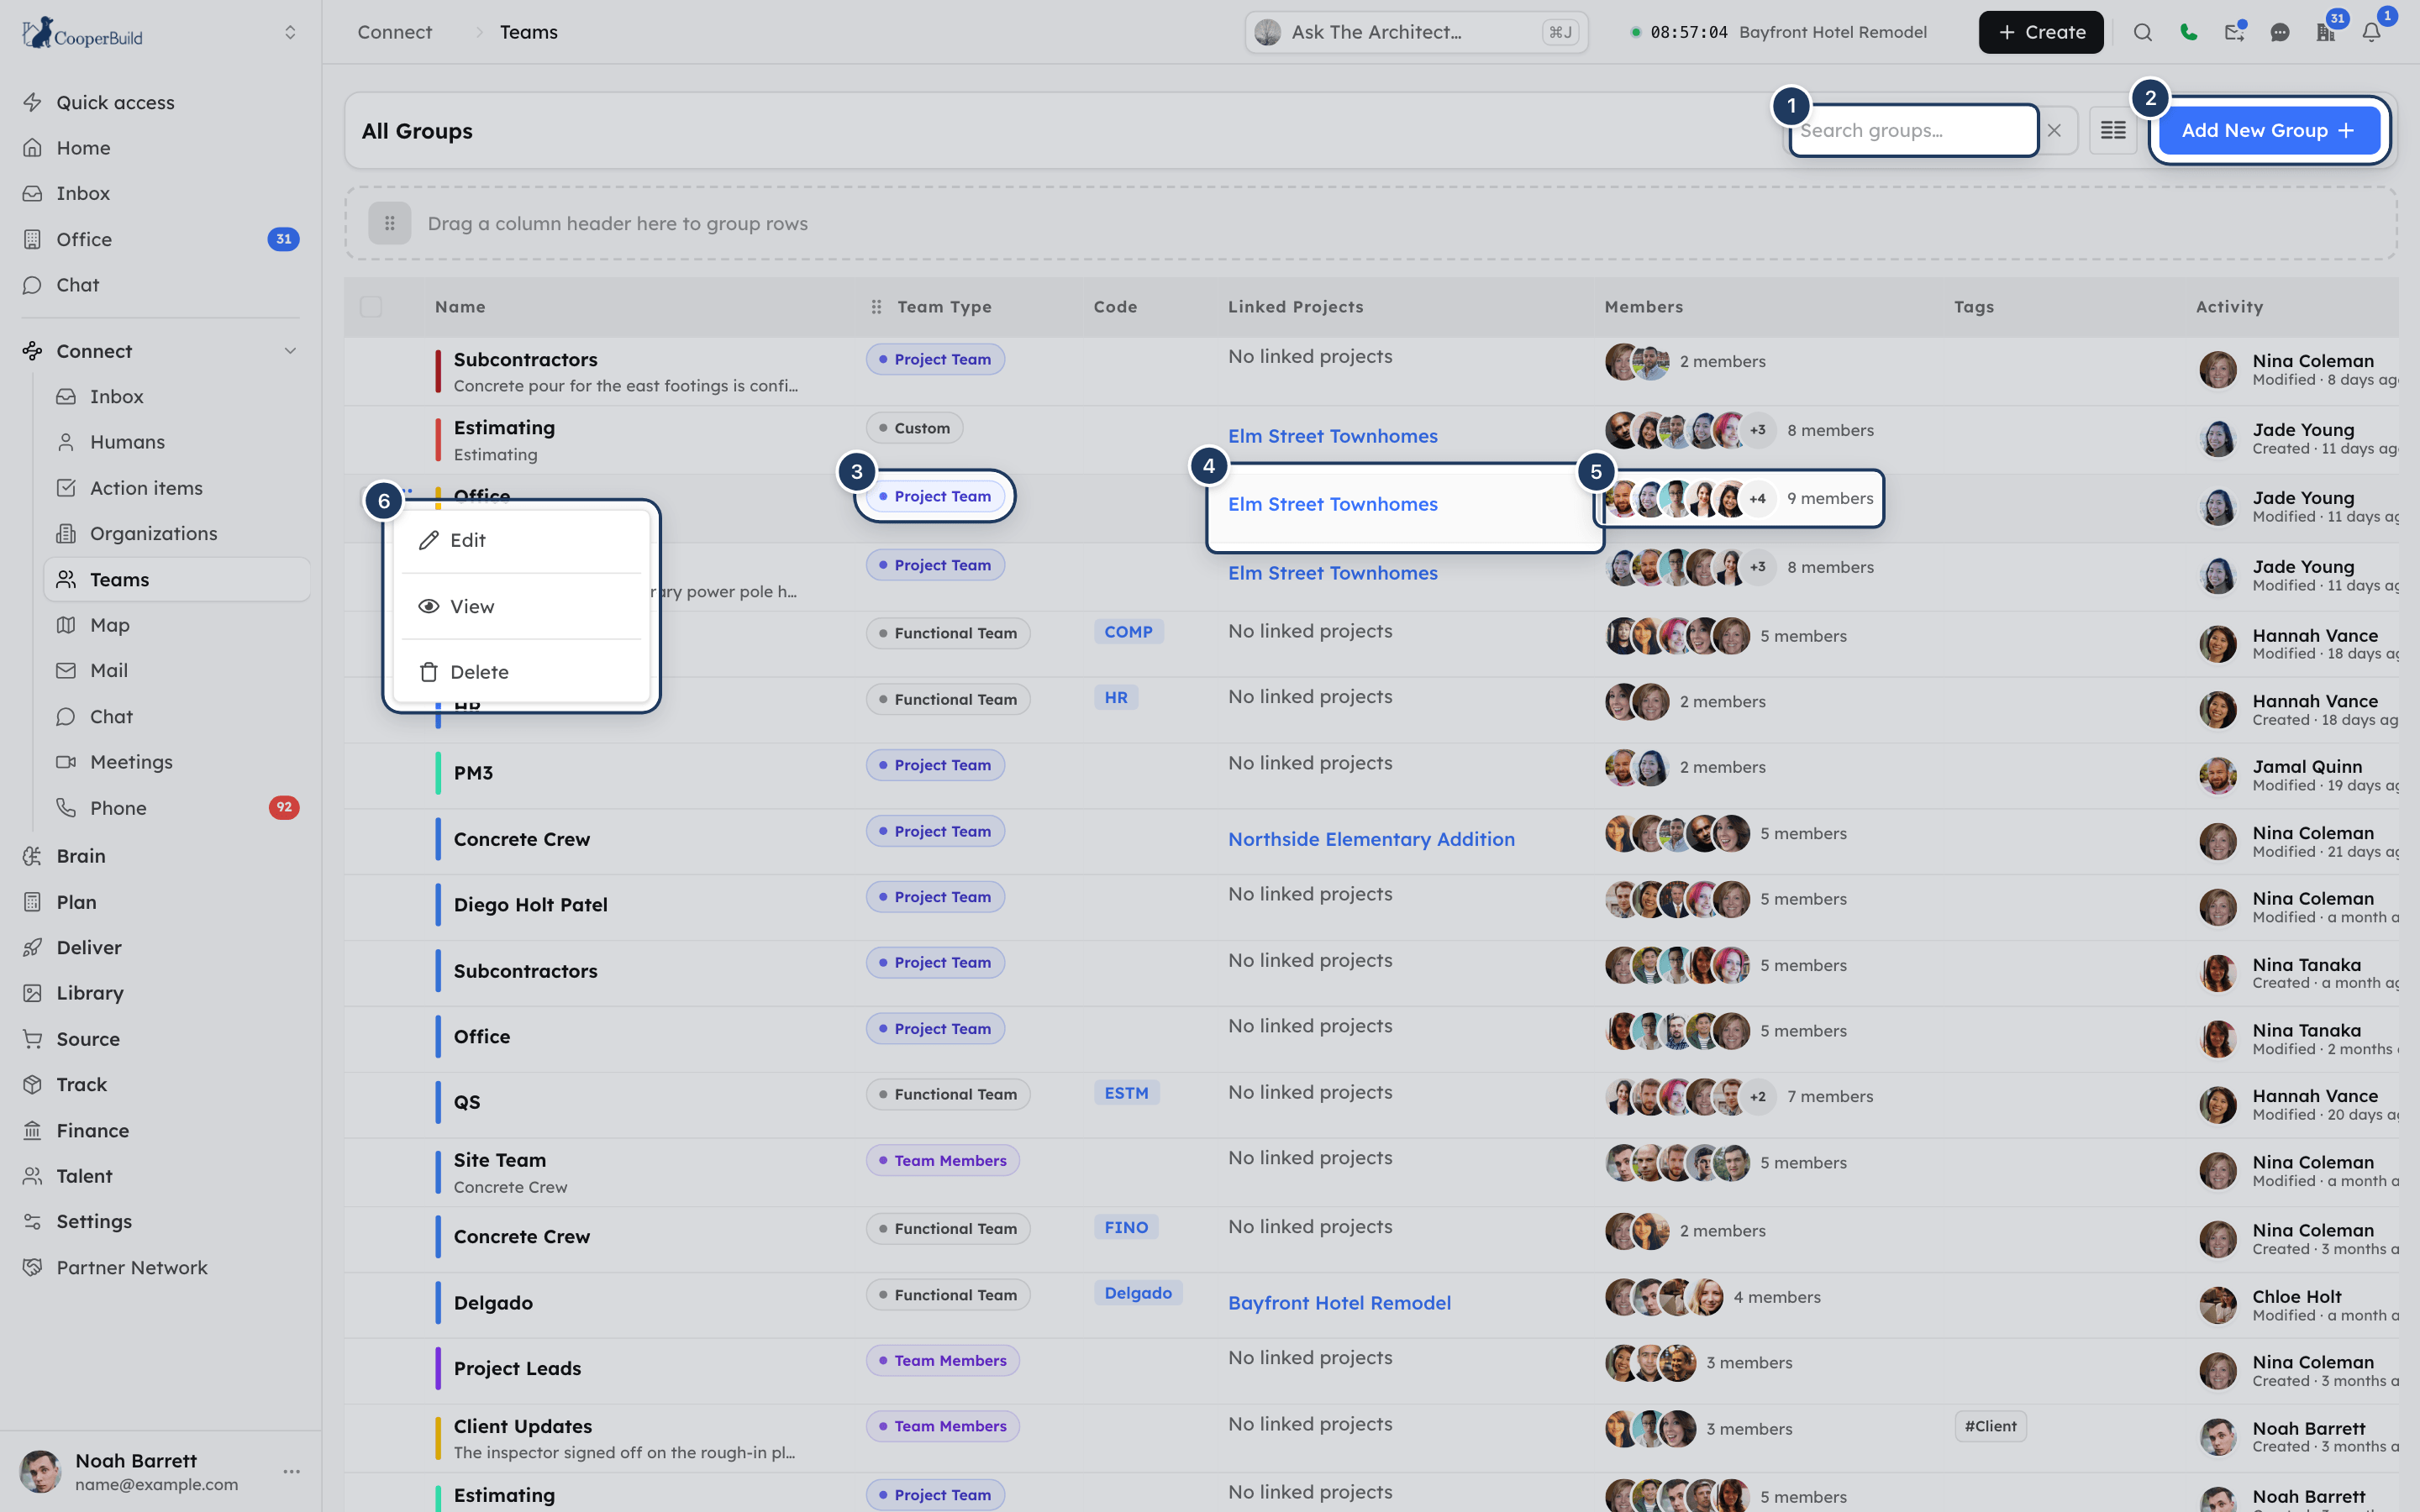
*Screenshot: The Teams list. 1: search, 2: Add New Group, 3: Team Type, 4: Linked projects, 5: Members, 6: the row menu.*
## Key concepts
| Term | Meaning |
|---|---|
| **Team** (group) | A named set of members with a team type, an optional description, tags and a color. |
| **Team type** | What the team is for. The type decides which fields the form shows. See [Team types](#team-types). |
| **Audience** | Who can be a member: **People**, **Organizations** or **Mixed**. |
| **RACI** | A team where each person has a role on the work: **Responsible** (does the work), **Accountable** (owns the outcome, one person), **Consulted** (gives input) or **Informed** (kept up to date). |
| **Functional team** | A department-style team, such as Operations, that has an **Org Unit**: a unique code, a manager, a cost center, a cost code prefix and accounting defaults. Functional teams can own projects and budgets. |
| **Team role** | A Cooper role (permission set) attached to a **Team Members** or **Functional Team** team. Members invited to Cooper from the team get this role. |
| **Linked project** | A project the team takes part in. |
| **Owned project** | A project that a functional team owns. |
## Team types
| Team type | Audience | Use it for |
|---|---|---|
| **Project Team** | People | The crew working on a project. |
| **Functional Team** | People | A department or business unit, such as Operations or Estimating. Adds the **Org Unit** section. |
| **Committee** | People | A standing group, such as a safety committee. |
| **RACI** | People | Responsibility assignments, with a RACI role per person. |
| **Team Members** | People | A set of colleagues you want to invite to Cooper together, with one role. |
| **Vendor List** | Organizations | Vendors you buy from. |
| **Subcontractor Pool** | Organizations | Subcontractors you can call on. |
| **Supplier Tier** | Organizations | Suppliers grouped by tier. |
| **Preferred Vendors** | Organizations | Vendors you prefer. |
| **Bid List** | Organizations | Companies you invite to bid. |
| **Distribution List** | Mixed | People and companies who receive the same documents. |
| **Partner Network** | Organizations | Partner companies. |
| **Custom** | People | Anything else. |
The audience in this table is the default. For every type except **RACI**, **Team Members** and **Functional Team** you can change it under **Who's in this Team?**.
## Open Teams
1. In the sidebar, open **Connect**.
2. Click **Teams**.
The list opens at `/connect/groups` and shows every team type.
**Talent → Teams** (`/talent/teams`) shows only functional teams. There the page is titled **All Teams**, the button says **Add New Team**, and the form has no team type selector because every team you add there is a functional team.
You need the **Teams** permission in the **Connect** module to see either page. See [Permissions](#permissions).
## Read the Teams list
| Column | What it shows |
|---|---|
| **Name** | The team's color bar, name and description. |
| **Team Type** | A colored pill with the type. An **Orgs** or **Mixed** chip shows when the members are organizations or a mix. |
| **Code** | The org unit code, for functional teams. |
| **Linked projects** | Up to three linked projects, each a link to the project. More shows as "... more — open team to view all". Otherwise "No linked projects". |
| **Members** | Member avatars and a count, such as "4 members". Click it to see **All Team Members** with phone numbers and a **Copy** button. |
| **Tags** | The first three tags. Hover **+N** to see the rest. |
To search, type in **Search groups…**. To group the list by team type, drag the **Team Type** column header onto the bar that says **Drag a column header here to group rows**.
## Add a team
### Step 1: Open the form
Click **Add New Group**. The **Add Group** panel opens.
### Step 2: Name the team and choose its type
Under **Basic Info**, enter the **Group Name** and choose the **Team Type**. Both are required.
### Step 3: Choose who can be a member
Under **Who's in this Team?**, choose **People**, **Organizations** or **Mixed**. Cooper preselects the audience that fits the type. This choice is not shown for RACI, Team Members and Functional Team types, which hold people only.
### Step 4: Add members
Under **Members**, search with **Search people by name...** or **Search organizations by name...** and click each result to add it. Click a selected card's remove button to take it out. For a RACI team, see [Set up a RACI team](#set-up-a-raci-team).
### Step 5: Add optional details
Click **More Details** to add **Tags**, a **Description** and a color. Type a tag and press **Enter**. Tags can contain letters only. Pick one of the six preset colors or use the color picker for any color.
### Step 6: Save
Click **Save**. Cooper confirms and the team appears in the list.
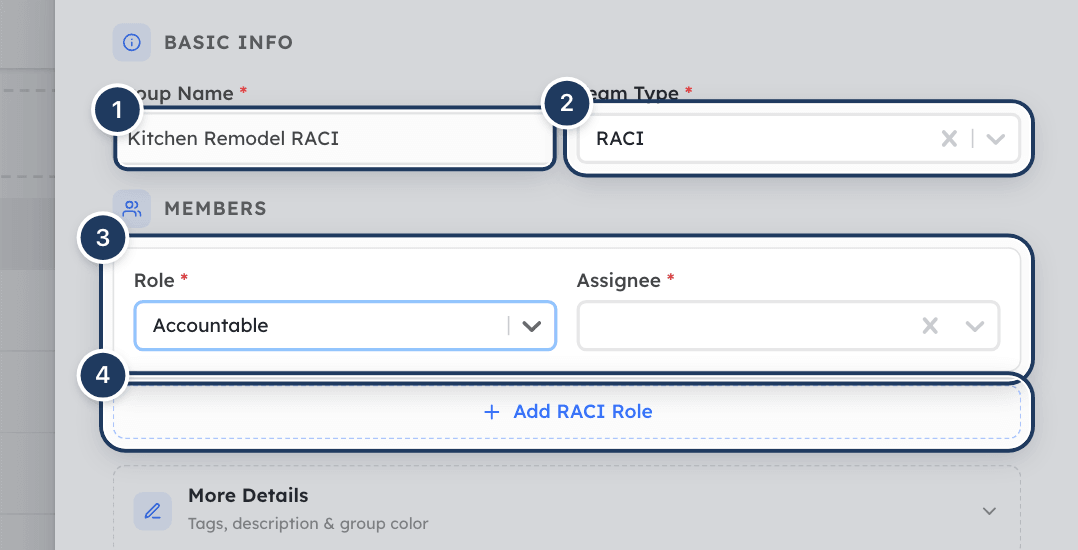
*Screenshot: Adding a RACI team. 1: Group Name, 2: Team Type, 3: a RACI role row, 4: Add RACI Role, 5: Save.*
## Set up a RACI team
### Step 1: Choose the RACI type
In the **Add Group** panel, set **Team Type** to **RACI**.
### Step 2: Add a role
Under **Members**, choose a **Role** (**Responsible**, **Accountable**, **Consulted** or **Informed**).
### Step 3: Assign people to the role
For **Accountable**, pick one person in **Assignee**. For the other roles, pick one or more people in **Assignees**.
### Step 4: Add the other roles
Click **Add RACI Role** for each further role. Each role can appear only once, so a team has at most four role rows. Click **Remove** to delete a row.
### Step 5: Save
Click **Save**.
You can load a saved RACI team into a task, a project or an equipment record with **Load from Existing Group** (or **Load from a RACI group**) instead of picking the four roles again.
## Set up a functional team
### Step 1: Choose the Functional Team type
Set **Team Type** to **Functional Team**, or add the team from **Talent → Teams**.
### Step 2: Fill in the org unit
Under **Org Unit**, enter a **Code**, for example `OPS`. The code is required and must be unique in your workspace. Optionally choose a **Manager** and enter a **Cost Code Prefix**, **Cost Center**, **Default Email**, **Secondary Email** and **Default Phone**. The cost code prefix must also be unique.
### Step 3: Set accounting defaults (optional)
Under **Accounting Defaults**, choose a **Legal Entity**, **Default Expense Account**, **Internal Charge Clearing Account** and **Prepaid Rent Account**.
### Step 4: Choose a team role (optional)
In **Team Role** (or **Group Role**), pick the Cooper role members get when you invite them to the app.
### Step 5: Add people and save
Add members under **Members** and click **Save**.
## View a team's details
Click the row's **...** menu and choose **View**. The **Group Details** panel (**Team Details** on Talent → Teams) shows:
- The team name, type, org unit code and audience (**People**, **Organizations** or **Mixed**).
- Counts of **Members**, **People**, **Organizations** and **Tags**.
- **Description**, **Org Unit** (**Code**, **Manager**, **Cost Center**) and **Tags**.
- **Members**. RACI teams list members under their role. Other teams list **People** and **Organizations** separately.
- **Linked projects**, and for functional teams, **Owned projects**.
- Who created the team and when it was last updated.
Click **Edit** in the panel to change the team.
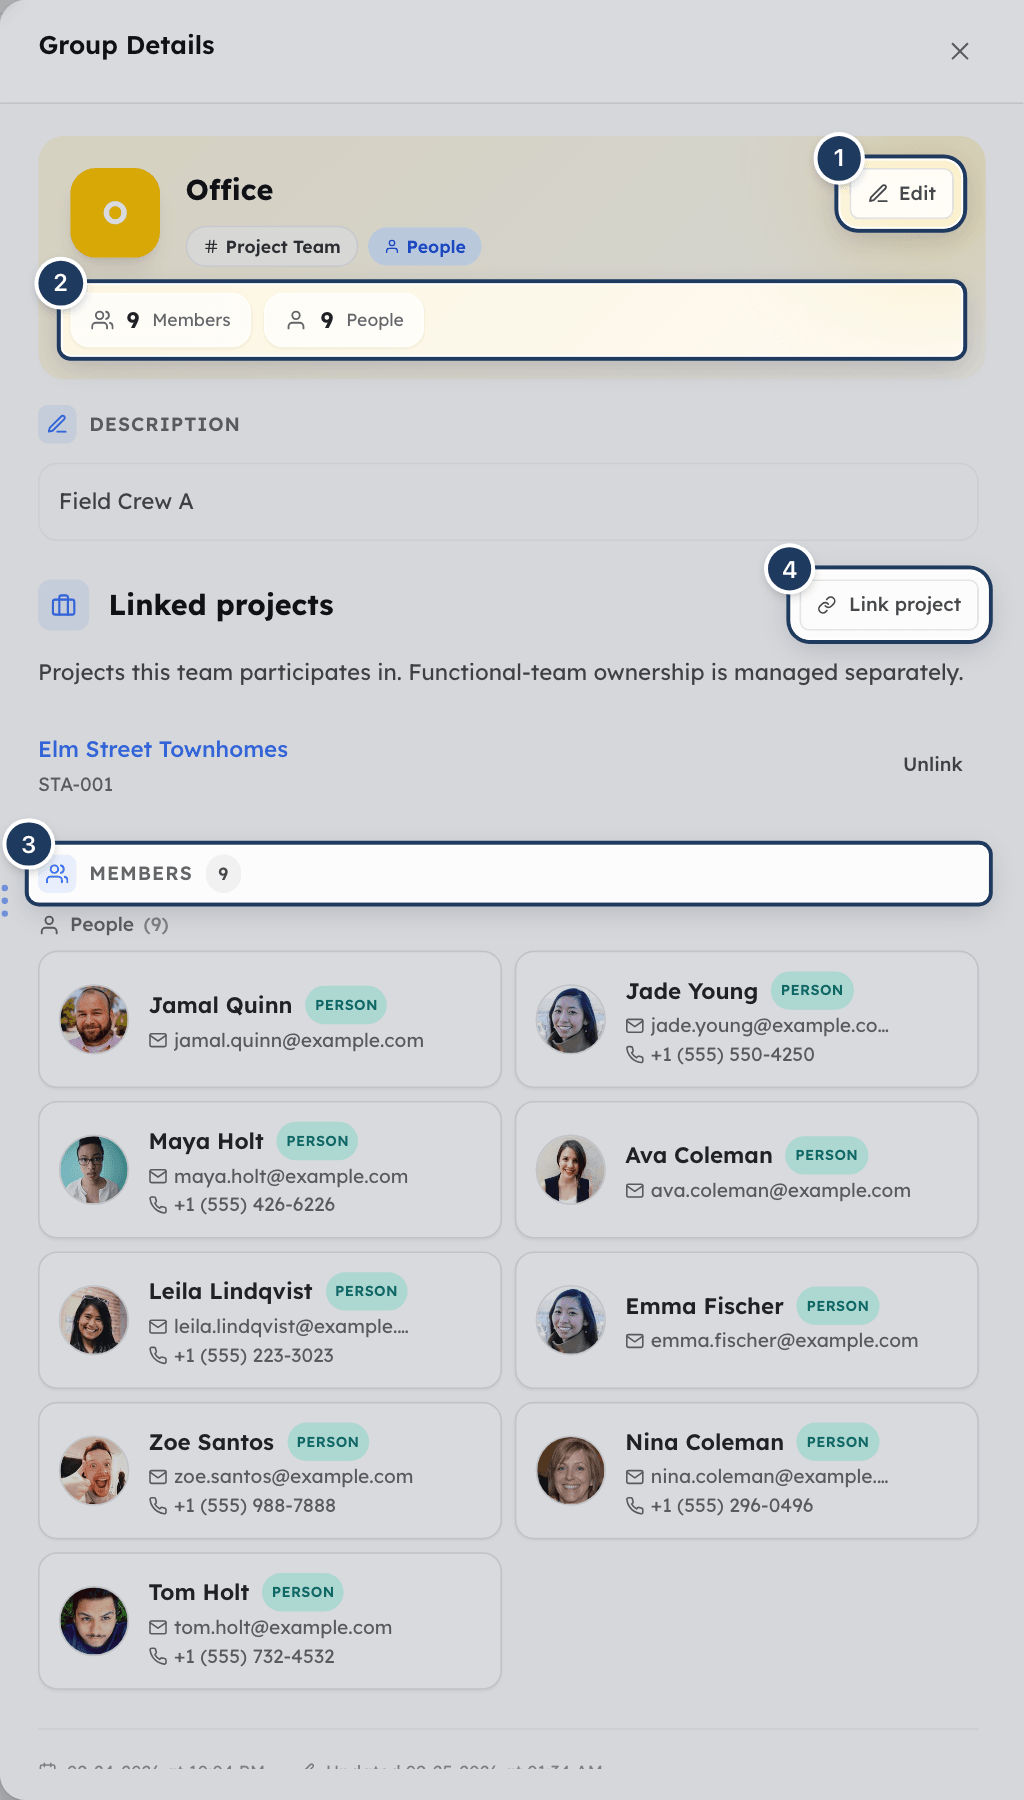
*Screenshot: A team's details. 1: Edit, 2: member counts, 3: Members, 4: Link project.*
## Edit a team
1. Click the row's **...** menu and choose **Edit**. The **Update Group** panel opens.
2. Change the fields. Changing the type to or from **RACI** clears the members, because RACI members carry roles.
3. Click **Update**.
If you change the **Team Role** of a **Team Members** or **Functional Team** team, Cooper also gives the new role to every member who has a Cooper login in your workspace.
## Link a team to a project
### Step 1: Open the team
Open the team's details with **View**.
### Step 2: Link the project
Under **Linked projects**, click **Link project**. In the **Link project to ...** panel, search for the project, select it and click **Link project**. Cooper shows "Project linked to team".
To unlink, click **Unlink** next to the project, then **Unlink team**. The team and its members stay. Cooper shows "Team unlinked from project".
You can also do this from a project: its Teams area has **Create Group**, which creates a project team already linked to the project with you as a member, and **Link Existing Team**.
## Assign project ownership to a functional team
1. Open the functional team's details.
2. Under **Owned projects**, click **Assign ownership**.
3. In the **Assign Projects** panel, search with **Search projects...** and tick the projects. Each project shows whether it is **Already owned by this team**, **Owned by** another team, or has **No owning team**.
4. Click **Assign**. Cooper shows how many projects it assigned.
Assigning a project to a team updates the project's cost center to the team's prefix.
## Invite a team to Cooper
You can invite all the people in a **Team Members** or **Functional Team** team to your workspace at once.
### Step 1: Open the invite panel
Click the row's **...** menu and choose **Invite to App**.
### Step 2: Check the members and role
The panel lists the people who will be invited and the team role they will get. If the team has no role, Cooper shows "This group has no role assigned. Edit the group and select a role before inviting members to the app."
### Step 3: Set access
Under **Access Settings**, optionally choose **Assigned Projects** (**Search and select projects...**). Tick **Scope feed to member permissions** if the invited people should only see activity they have permission for.
### Step 4: Send
Click **Invite N to App**. Cooper shows "Invitations sent successfully."
Inviting needs the same access as adding a user in **Settings → Users** (Users **Write**), or being the workspace owner.
## Delete teams
1. Click the row's **...** menu and choose **Delete**. To delete several, tick their checkboxes and click **Delete** in the footer.
2. In the **Are You Sure?** window, click **Delete**.
Cooper archives deleted teams. A deleted functional team frees its org unit code and cost code prefix, so you can reuse them.
## Where teams are used in Cooper
- **Projects**: link teams to projects, and assign functional teams as project owners.
- **Tasks, projects and equipment**: load a RACI team's roles with **Load from Existing Group** or **Load from a RACI group**.
- **Confidential files**: organization documents and Library folders can be limited to selected teams. See [Organizations](https://docs.cooperbuild.ai/connect/organizations.md).
- **Chat**: the people picker has a **Teams** view, so you can add a whole team to a chat. Only members with a Cooper login join. See [Chat](https://docs.cooperbuild.ai/connect/chat.md).
- **Finance**: functional teams appear in team pickers and **Team** filters, for example for team budgets and credit card accounts.
- **Budget requests**: you pick the requesting team.
- **Inviting people**: **Invite to App** invites a whole team with one role.
## Fields reference
| Field | Required | What it means |
|---|---|---|
| **Group Name** (**Team Name**) | Yes | The team's name. |
| **Team Type** | Yes | The kind of team. Hidden on Talent → Teams, where it is always Functional Team. |
| **Group Role** (**Team Role**) | No | Team Members and Functional Team only. The Cooper role members get when invited. |
| **Who's in this Team?** | No | **People**, **Organizations** or **Mixed**. Not shown for RACI, Team Members and Functional Team. |
| **Members** | No | The people and organizations in the team. |
| **Role** (RACI) | Yes, per row | **Responsible**, **Accountable**, **Consulted** or **Informed**. Each role once. |
| **Assignee** / **Assignees** (RACI) | Yes, per row | One person for Accountable; one or more for the other roles. |
| **Code** (Org Unit) | Yes, for functional teams | A short unique code, such as `OPS`. |
| **Manager** | No | The person who manages the functional team. |
| **Cost Code Prefix** | No | A unique prefix, such as `01-`. |
| **Cost Center** | No | The team's cost center, such as `CC-100`. |
| **Default Email**, **Secondary Email**, **Default Phone** | No | Contact details for the team. |
| **Legal Entity**, **Default Expense Account**, **Internal Charge Clearing Account**, **Prepaid Rent Account** | No | Accounting defaults for the functional team. |
| **Tags** | No | Labels, letters only. |
| **Description** | No | What the team is for. |
| **Color** | No | The color bar shown next to the team. |
## Permissions
Access is controlled by the **Teams** permission in the **Connect** module of a role. An admin sets it in **Settings → Roles**.
| Action | Permission needed |
|---|---|
| See teams | Teams **Read** (or **Write**) |
| Add and edit teams, assign project ownership | Teams **Write** |
| Delete teams | Teams **Delete** |
| Link or unlink a team and a project | Teams **Write**, or Write on Deliver projects or Plan projects |
| **Invite to App** | Users **Write** in Settings, or workspace owner |
Without **Write**, **Add New Group** and **Edit** are hidden. Workspace owners can do everything.
## Tips and best practices
- Use **Functional Team** for real departments and give each a short, stable code. Finance features rely on the code and cost code prefix.
- Save common RACI assignments as RACI teams and load them into tasks instead of rebuilding them.
- Keep vendor and subcontractor lists as organization teams (**Vendor List**, **Bid List**, **Subcontractor Pool**) so estimators can reuse them.
- Before you use **Invite to App**, set the team role and check that every person has an email address.
- Use tags and colors to make related teams easy to spot in the list.
## Troubleshooting
### I can't see Teams in the sidebar
Your role does not have the **Teams** permission in the **Connect** module. Ask an admin to grant it in **Settings → Roles**.
### Error: Org unit code is required for functional teams
Every functional team needs a **Code** under **Org Unit**. Enter one, such as `OPS`.
### Saving a functional team fails because the code is taken
Org unit codes and cost code prefixes must be unique in your workspace. Choose another code, or delete the old team that uses it.
### Error: This member type is already added
Each RACI role can appear once in a team. Add more people to the existing role row instead.
### My tag doesn't get added
Tags can contain letters only. Remove numbers, spaces and symbols, then press **Enter**.
### Invite to App is missing or the invite button is disabled
**Invite to App** appears only for **Team Members** and **Functional Team** teams. The invite button stays disabled until the team has a role and at least one person. If Cooper says you don't have permission, ask an admin for Users **Write**.
### I can't find the Who's in this Team? choice
RACI, Team Members and Functional Team types hold people only, so the choice is hidden.
## For AI agents
There is no dedicated MCP tool for teams. Agents read and change teams with the generic record tools on the `Group` model (`db_find`, `db_create`, `db_update`), gated by the **Teams** permission.
Key fields on a `Group` record:
- `name` (required) and `groupType`, one of `project-team`, `functional-team`, `committee`, `raci`, `team-members`, `vendor-list`, `subcontractor-pool`, `supplier-tier`, `preferred-vendors`, `distribution-list`, `bid-list`, `partner-network`, `custom`.
- `memberKind`: `human`, `externalOrg` or `mixed`.
- `members`: each item has `memberId`, `memberModel` (`Human` or `ExternalOrg`) and, for RACI, `memberType` (`responsible`, `accountable`, `consulted`, `informed`). Accountable takes one person.
- `orgUnit`: only for `functional-team`. `orgUnit.code` is required and unique per workspace.
- `status`: `Active`, `Draft` or `Archived`. Deleting a team sets `Archived`.
Common errors:
- "orgUnit.code is required for functional teams": add `orgUnit.code`.
- "orgUnit is only allowed for group types: functional-team": remove `orgUnit` for other types.
- "Role not found for this organization" when inviting: set the team's `role` to a role that exists in the workspace.
- Do not confuse teams with `account_group_browse` / `account_group_manage` (chart-of-accounts groups) or `chat_group_manage` (chat groups). Those tools do not manage teams.
## Related
- [Humans](https://docs.cooperbuild.ai/connect/humans.md): the people you add to teams.
- [Organizations](https://docs.cooperbuild.ai/connect/organizations.md): companies you add to vendor lists and bid lists, and documents you restrict to teams.
- [Chat](https://docs.cooperbuild.ai/connect/chat.md): add a whole team to a conversation.
- [Connect settings](https://docs.cooperbuild.ai/connect/settings.md): the lookup lists used across Connect.
---
# Action items
> Action items are the small things somebody still owes, such as a document to send, an approval to give or a payment to make. Cooper picks them up from your chats, email, texts, calls, meeting notes and records, and you can add them by hand.
Source: https://docs.cooperbuild.ai/connect/action-items
Keywords: action items, to-do, todo, follow-ups, follow up, commitments, owed, waiting on, reminders, nudge, snooze, delegate, morning brief, tasks
An **action item** is one thing somebody still owes. "Muhsan to send the site pictures", "Waiting on John to approve the proposal" and "Pay ABC Supply by Friday" are all action items. Each one says who has to do it, who is waiting on it, and when it is due.
Cooper watches your chats and inbox and turns requests into action items. Records add them too: an unanswered RFI or an unpaid payment request becomes an item for the right person. You can also add items by hand. The **Action items** board shows what you have to do, what others owe you and what Cooper suggests, and lets you finish, snooze, hand off or chase each item.
Action items are not project tasks. Project tasks live on a project's schedule. An action item can be linked to a project task, and then finishing either one closes the other.
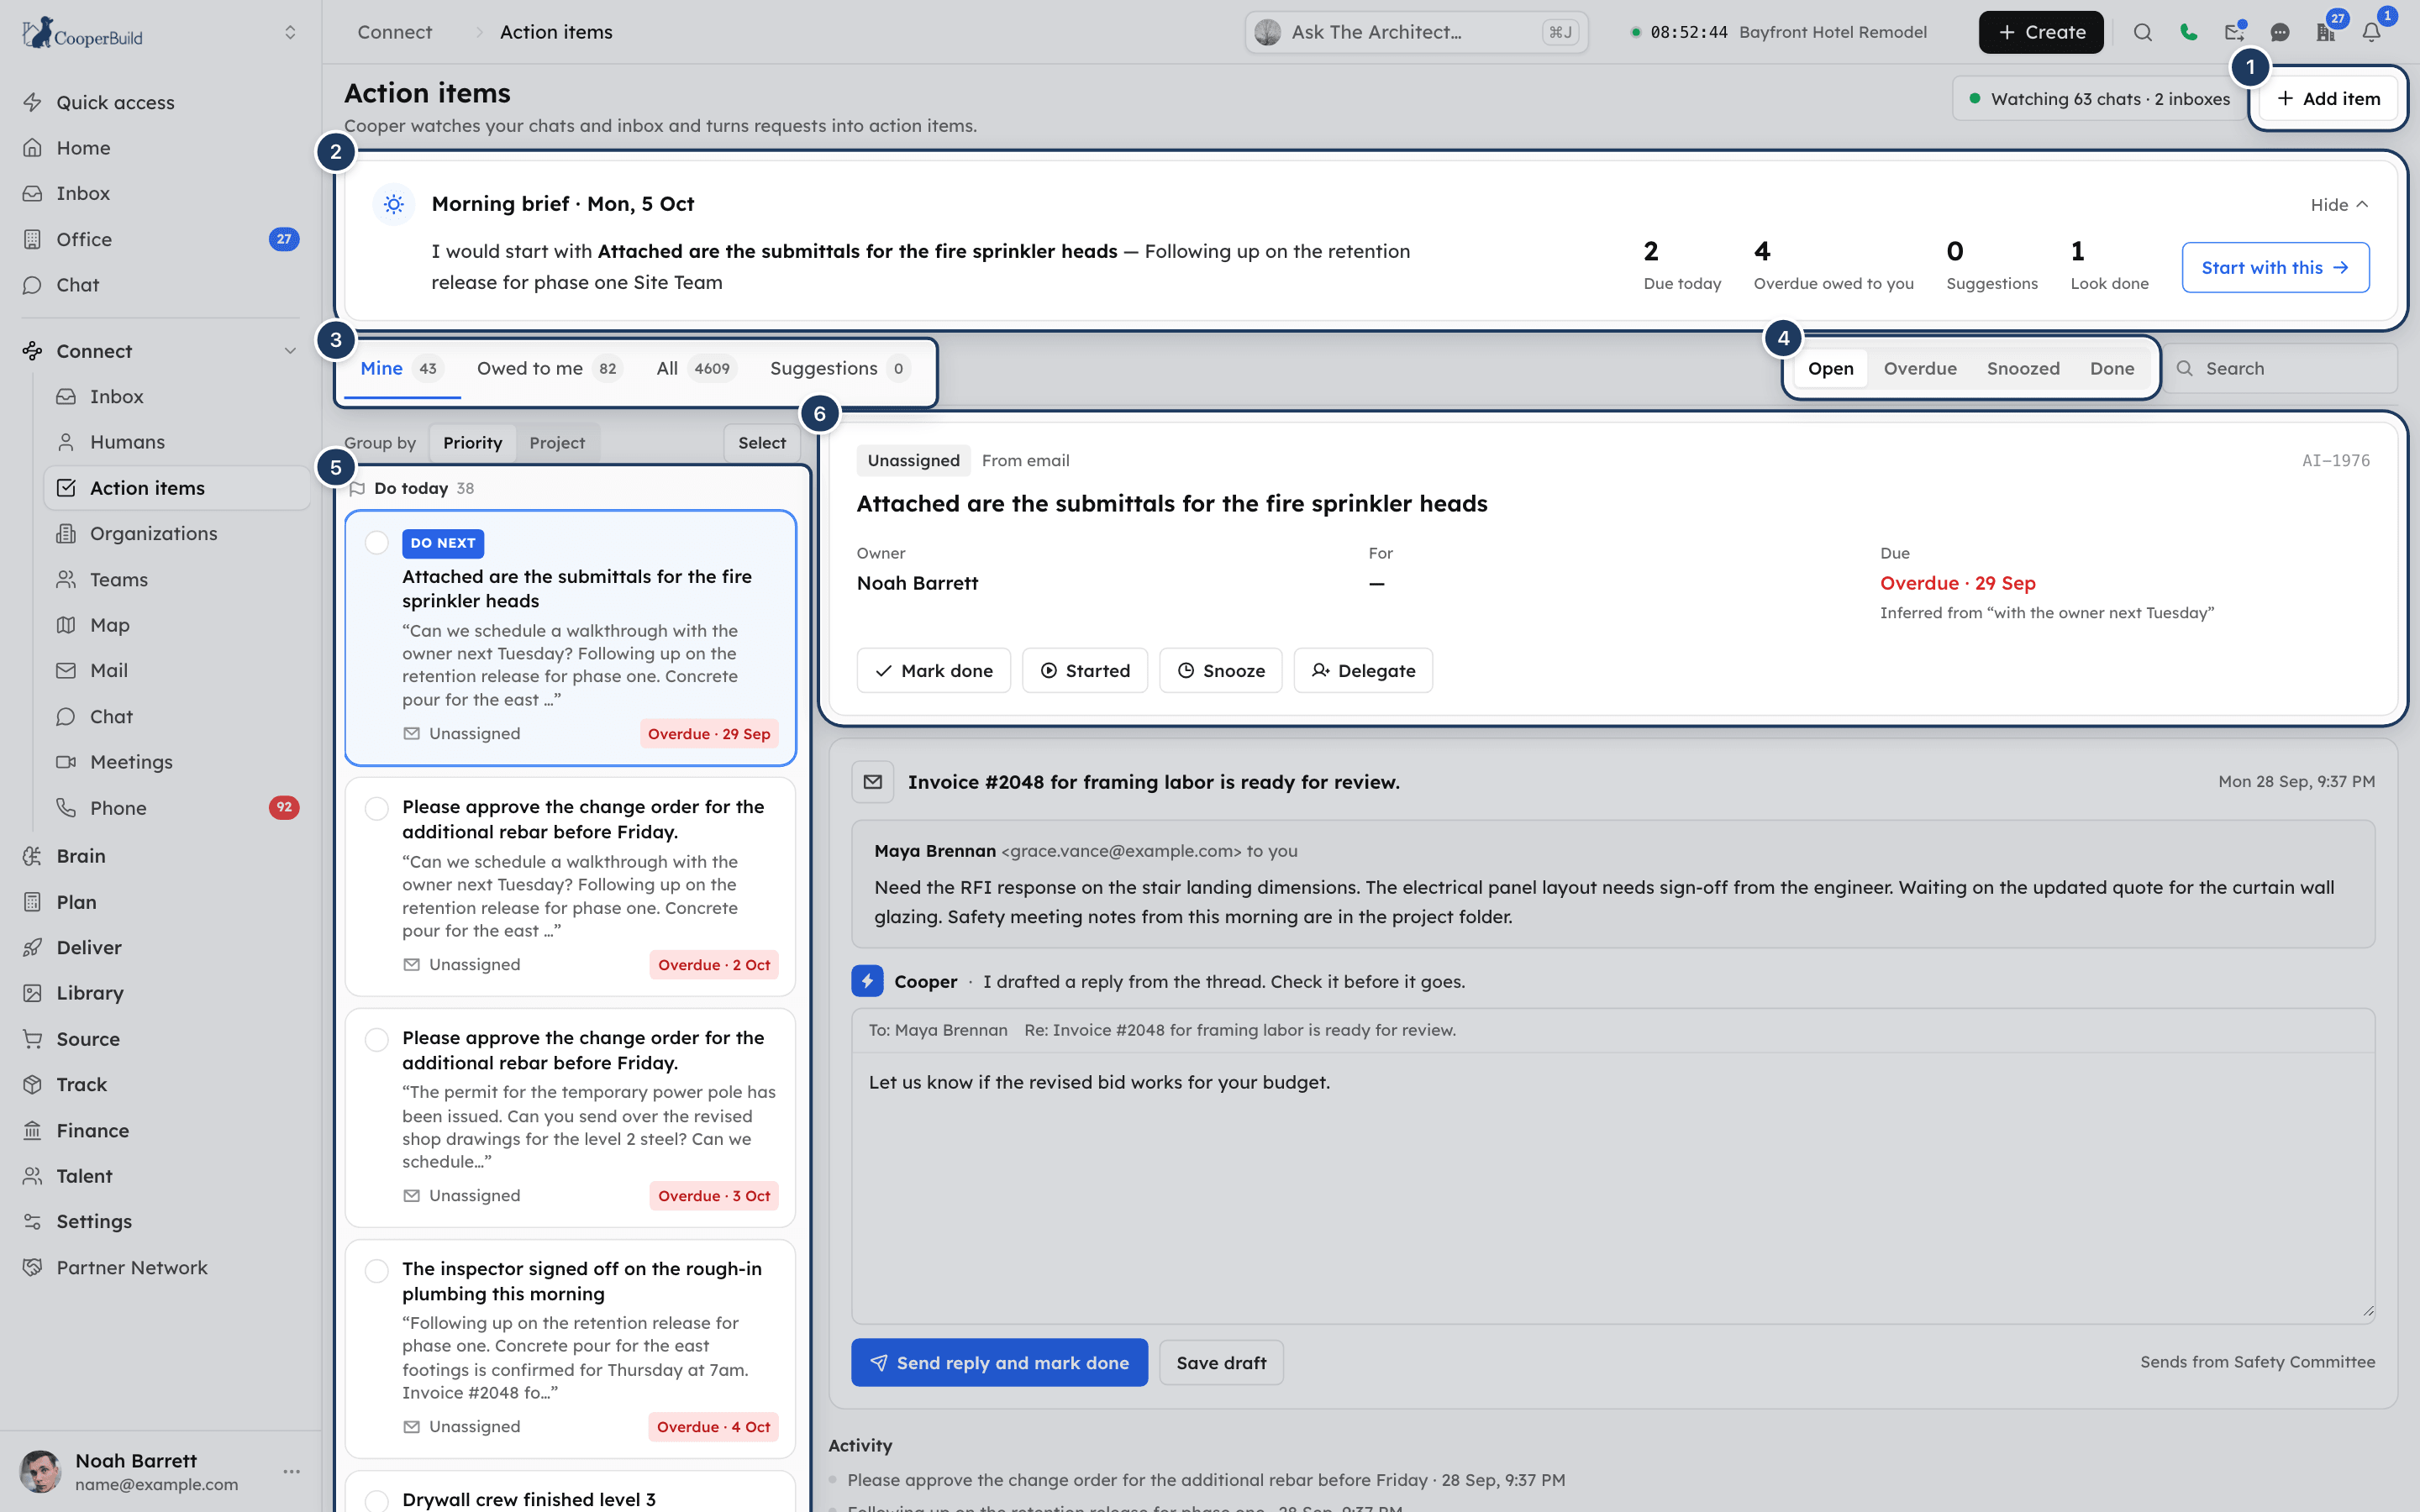
*Screenshot: The Action items board. 1: Add item, 2: morning brief, 3: list tabs, 4: Open / Overdue / Snoozed / Done, 5: the list, 6: the selected item.*
## Key concepts
| Term | Meaning |
|---|---|
| **Owner** | The person who has to do it. Shown as **Owner** on the item. |
| **For** | The person waiting on it, if anyone. |
| **Direction** | **They owe us** (an outside person owes your company), **We owe them** (your team owes an outside person) or **Inside the team** (both people are on your team). Cooper works this out from the owner and the person waiting. |
| **Due** | An optional due date. A date Cooper read from a message ("by Friday") shows **Inferred from "…"** under it. |
| **Source** | Where the item came from: **From a record**, **From chat**, **Picked up from chat**, **From email**, **From a text**, **From a call**, **From meeting notes**, **Added by hand** or **Added by an agent**. |
| **State** | **Open**, **Done** or **Dismissed**. Snoozed items are open but hidden until their snooze ends. |
| **Suggestion** | A check Cooper ran on something said in chat. For example, someone says "RFI #5 is answered" while Cooper still shows RFI #5 open. Nothing changes until you approve. |
| **Looks done** | An open item that a later message suggests is already finished. |
| **Reference** | Every item has a short reference such as **AI-1042**, shown at the top right of its details. |
## Open Action items
1. In the sidebar, open **Connect**.
2. Click **Action items**.
The page lives at `/connect/action-items`. Every member sees the items they own, are waiting on or created. To see everyone's items, your role needs **Connect** > **Action items** > **Read**. See [Permissions](#permissions).
The header shows how many chats and inboxes Cooper reads for you, for example **Watching 14 chats · 2 inboxes**.
## Where action items come from
Cooper creates action items in these ways:
- **Chat**: Cooper reads new messages in your chats for requests and promises. It also notices when a message says something was done and closes the item. When it is less sure, it posts a card in the chat asking you to confirm.
- **Email**: Cooper reads mail in the inboxes you connected. A reply that suggests an item is finished marks the item **Looks done**.
- **Texts and calls**: Cooper reads text threads and call summaries the same way.
- **Meeting notes**: actions in meeting notes that have an owner and a date become action items. Dismissing one on either side dismisses both.
- **Records**: rules over your records create items and close them when the record changes. They cover proposals and pay applications waiting on client approval, payment requests and vendor payment requests waiting on payment, vendor quotes waiting on a quote, purchase orders waiting on acknowledgement, RFIs waiting on an answer, submittals waiting on review, upcoming meetings, and leave requests and timesheets waiting on approval. A nightly pass catches anything missed.
- **By hand**: from the board, from a person's page in [Humans](https://docs.cooperbuild.ai/connect/humans.md), from the **+** > **Action** menu in a chat, or from a line in a call transcript.
- **Agents**: Cooper's AI agents, or any assistant connected through the CooperBuild MCP server, can add items. These show **Added by an agent**.
The same request said twice, for example in a meeting and again in chat, becomes one item when the owner, project and wording match.
## Find your items with tabs and views
**Tabs** choose whose items you see. Each tab shows a count.
| Tab | What it shows |
|---|---|
| **Mine** | Items you own: things you have to do. This is where the board opens. |
| **Owed to me** | Items you are waiting on from someone else. |
| **All** | Every item you are allowed to see. |
| **Suggestions** | Checks Cooper ran on chat messages that involve you. |
**Views** narrow by state. Use the switch next to the search box.
| View | What it shows |
|---|---|
| **Open** | Open items that are not snoozed. |
| **Overdue** | Open items past their due date. |
| **Snoozed** | Items snoozed for later. |
| **Done** | Finished and dismissed items, grouped by project. |
Type in **Search** to match the item's text, the owner's name or the name of the person waiting.
The list shows up to 100 items. If there are more, the bottom of the list says **Showing 100 of _total_ — search to narrow it down**.
## Read the list
In the **Open**, **Overdue** and **Snoozed** views you can group the list two ways with **Group by**:
- **Priority** (default):
- **Do today**: overdue, due today, or no due date.
- **This week**: due in the next seven days.
- **Later**: everything after that.
- **Project**: one group per project. Items with no project go under **No project**.
Inside **Do today**, overdue items come first, then items due today, then undated items, then Cooper's suggestions, then items that look done. The first plain item gets a **Do next** badge.
Each card shows:
- The item's text.
- One line on why it matters now, such as "Dana has waited 3 days." or a quote from the message it came from.
- Where it lives (the project, or **Unassigned**), who it is for, and a due chip: **Today**, **Tomorrow**, a date, or **Overdue · _date_** in red.
- A badge where one applies: **Do next**, **Suggested** or **Looks done**.
Click a card to open its details on the right. Dates follow your company's time zone.
## Use the morning brief
The **Morning brief** at the top of the board suggests where to start, for example "I would start with Send the revised drawings — Dana has waited 3 days." It also shows four counts: **Due today**, **Overdue owed to you**, **Suggestions** and **Look done**.
- Click **Start with this** to jump to the suggested item.
- Click **Hide** to collapse the brief for the rest of the day in this browser. Click **Show** to bring it back.
If nothing is waiting on you, the brief says "Nothing is waiting on you right now."
Each morning Cooper also posts a brief in a chat thread of your own named **Cooper**. You hear from it only when something is open for you. You can reply in that thread, for example "done with the timesheet", and Cooper closes the matching item.
## Add an action item
### Step 1: Open the form
Click **Add item** at the top right of the board. The **Add an action item** panel opens.
### Step 2: Say what needs doing
In **What needs doing**, write it the way you would in chat, for example "Send John the updated drawings". Put the person's name in the field below, not in the sentence. The limit is 500 characters.
### Step 3: Pick who does it
Choose a teammate in **Who does it**.
### Step 4: Add the optional details
- **For**: the person waiting on it.
- **Project**: an active project.
- **Due**: a date from today onward.
### Step 5: Save
Click **Add action item**, or press Enter in **What needs doing**. Click **Cancel** to close without saving.
The owner gets a notification: "New action item for you: …". If an identical open item already exists for the same owner and project, Cooper keeps the existing one and tells you "That one already exists".
You can also add items from:
- **A person's page**: in [Humans](https://docs.cooperbuild.ai/connect/humans.md), open the person, go to **Timeline** and click **Add item**. The item is linked to that person.
- **A chat**: click **+** in the message box and choose **Action**. The **New action** panel opens. The item is posted as a card in the chat.
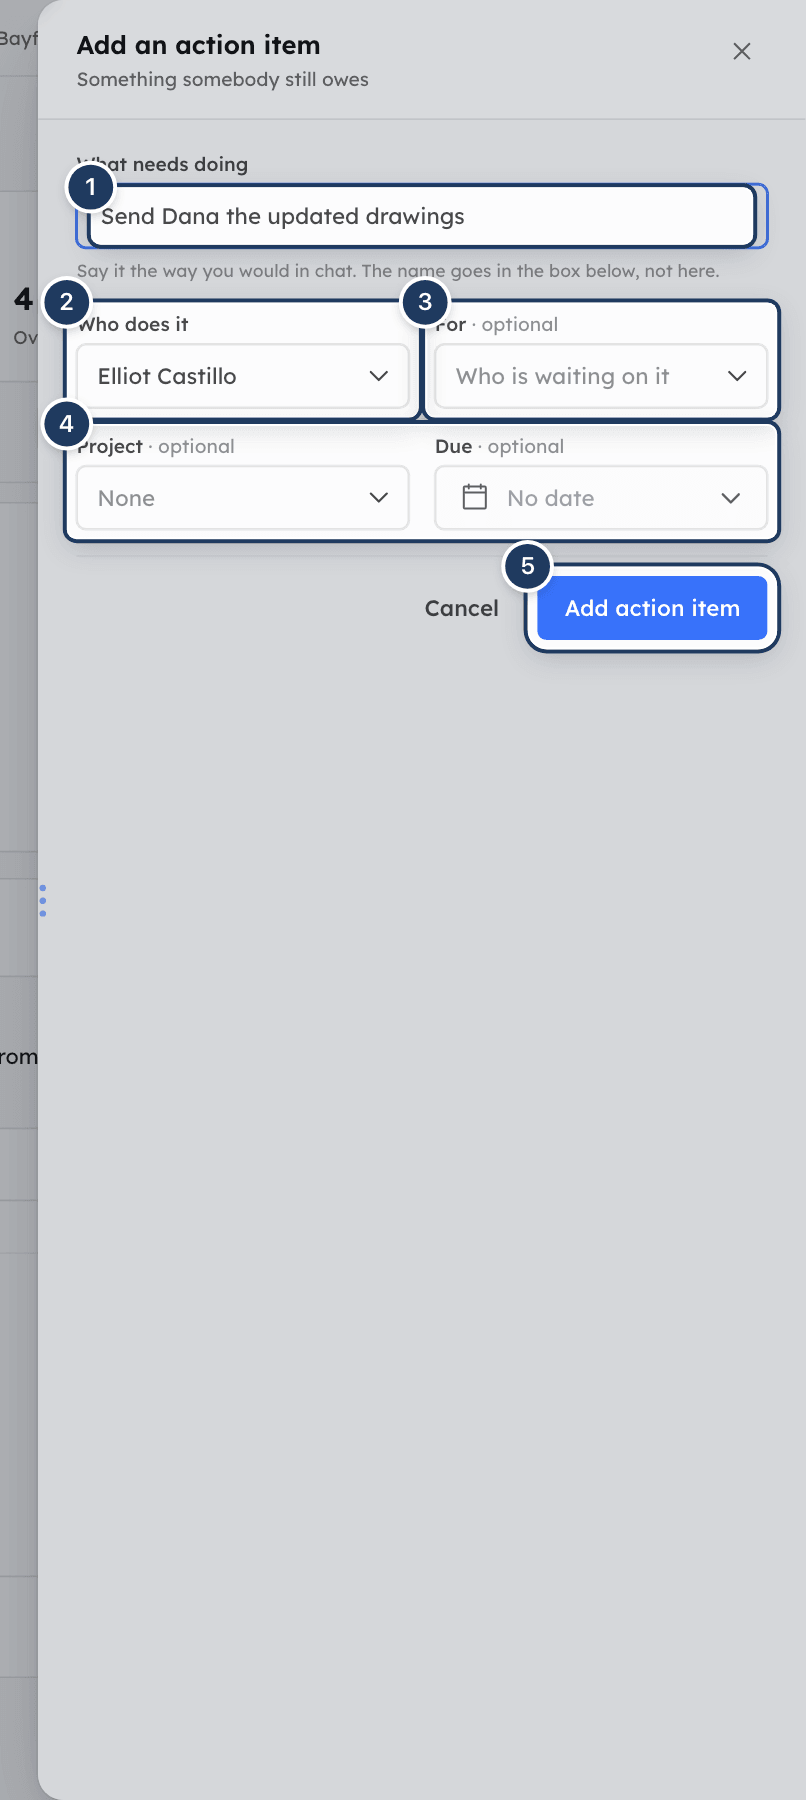
*Screenshot: Add an action item. 1: What needs doing, 2: Who does it, 3: For, 4: Project and Due, 5: Add action item.*
## Mark an action item done
Do one of the following:
- Click the round tick on the item's card.
- Select the item and click **Mark done** in its details.
- Select the item and press **E**.
The person waiting is notified that it is finished. Done items move to the **Done** view and show who finished them and when.
To undo, open the item in the **Done** view and click **Reopen**.
Suggestions cannot be ticked done. You act on them through their suggestion card. See [Review Cooper's suggestions](#review-coopers-suggestions).
## Mark an action item as started
When you own an item, or created it, and have begun work, click **Started** in its details. The person waiting is notified. The item stays open. Click **Not started** to undo.
Only the owner and the creator see this button. The person waiting cannot mark it started for you.
## Snooze an action item
Snoozing hides an item from **Open** and **Overdue** until a time you choose.
1. Select the item.
2. Click **Snooze**, or press **S**.
3. Pick a time:
- **Later today**: 4:00 PM, or three hours from now if it is already past 3:30 PM.
- **Tomorrow**: 8:00 AM tomorrow.
- **Next week**: 8:00 AM next Monday.
- **Until someone replies**: only for items that came from a chat. The item returns when a new message arrives.
A snoozed item shows "Snoozed until …" in its details. Click **Unsnooze** to bring it back now. Snoozed items are in the **Snoozed** view. Due-date reminders are not sent while an item is snoozed.
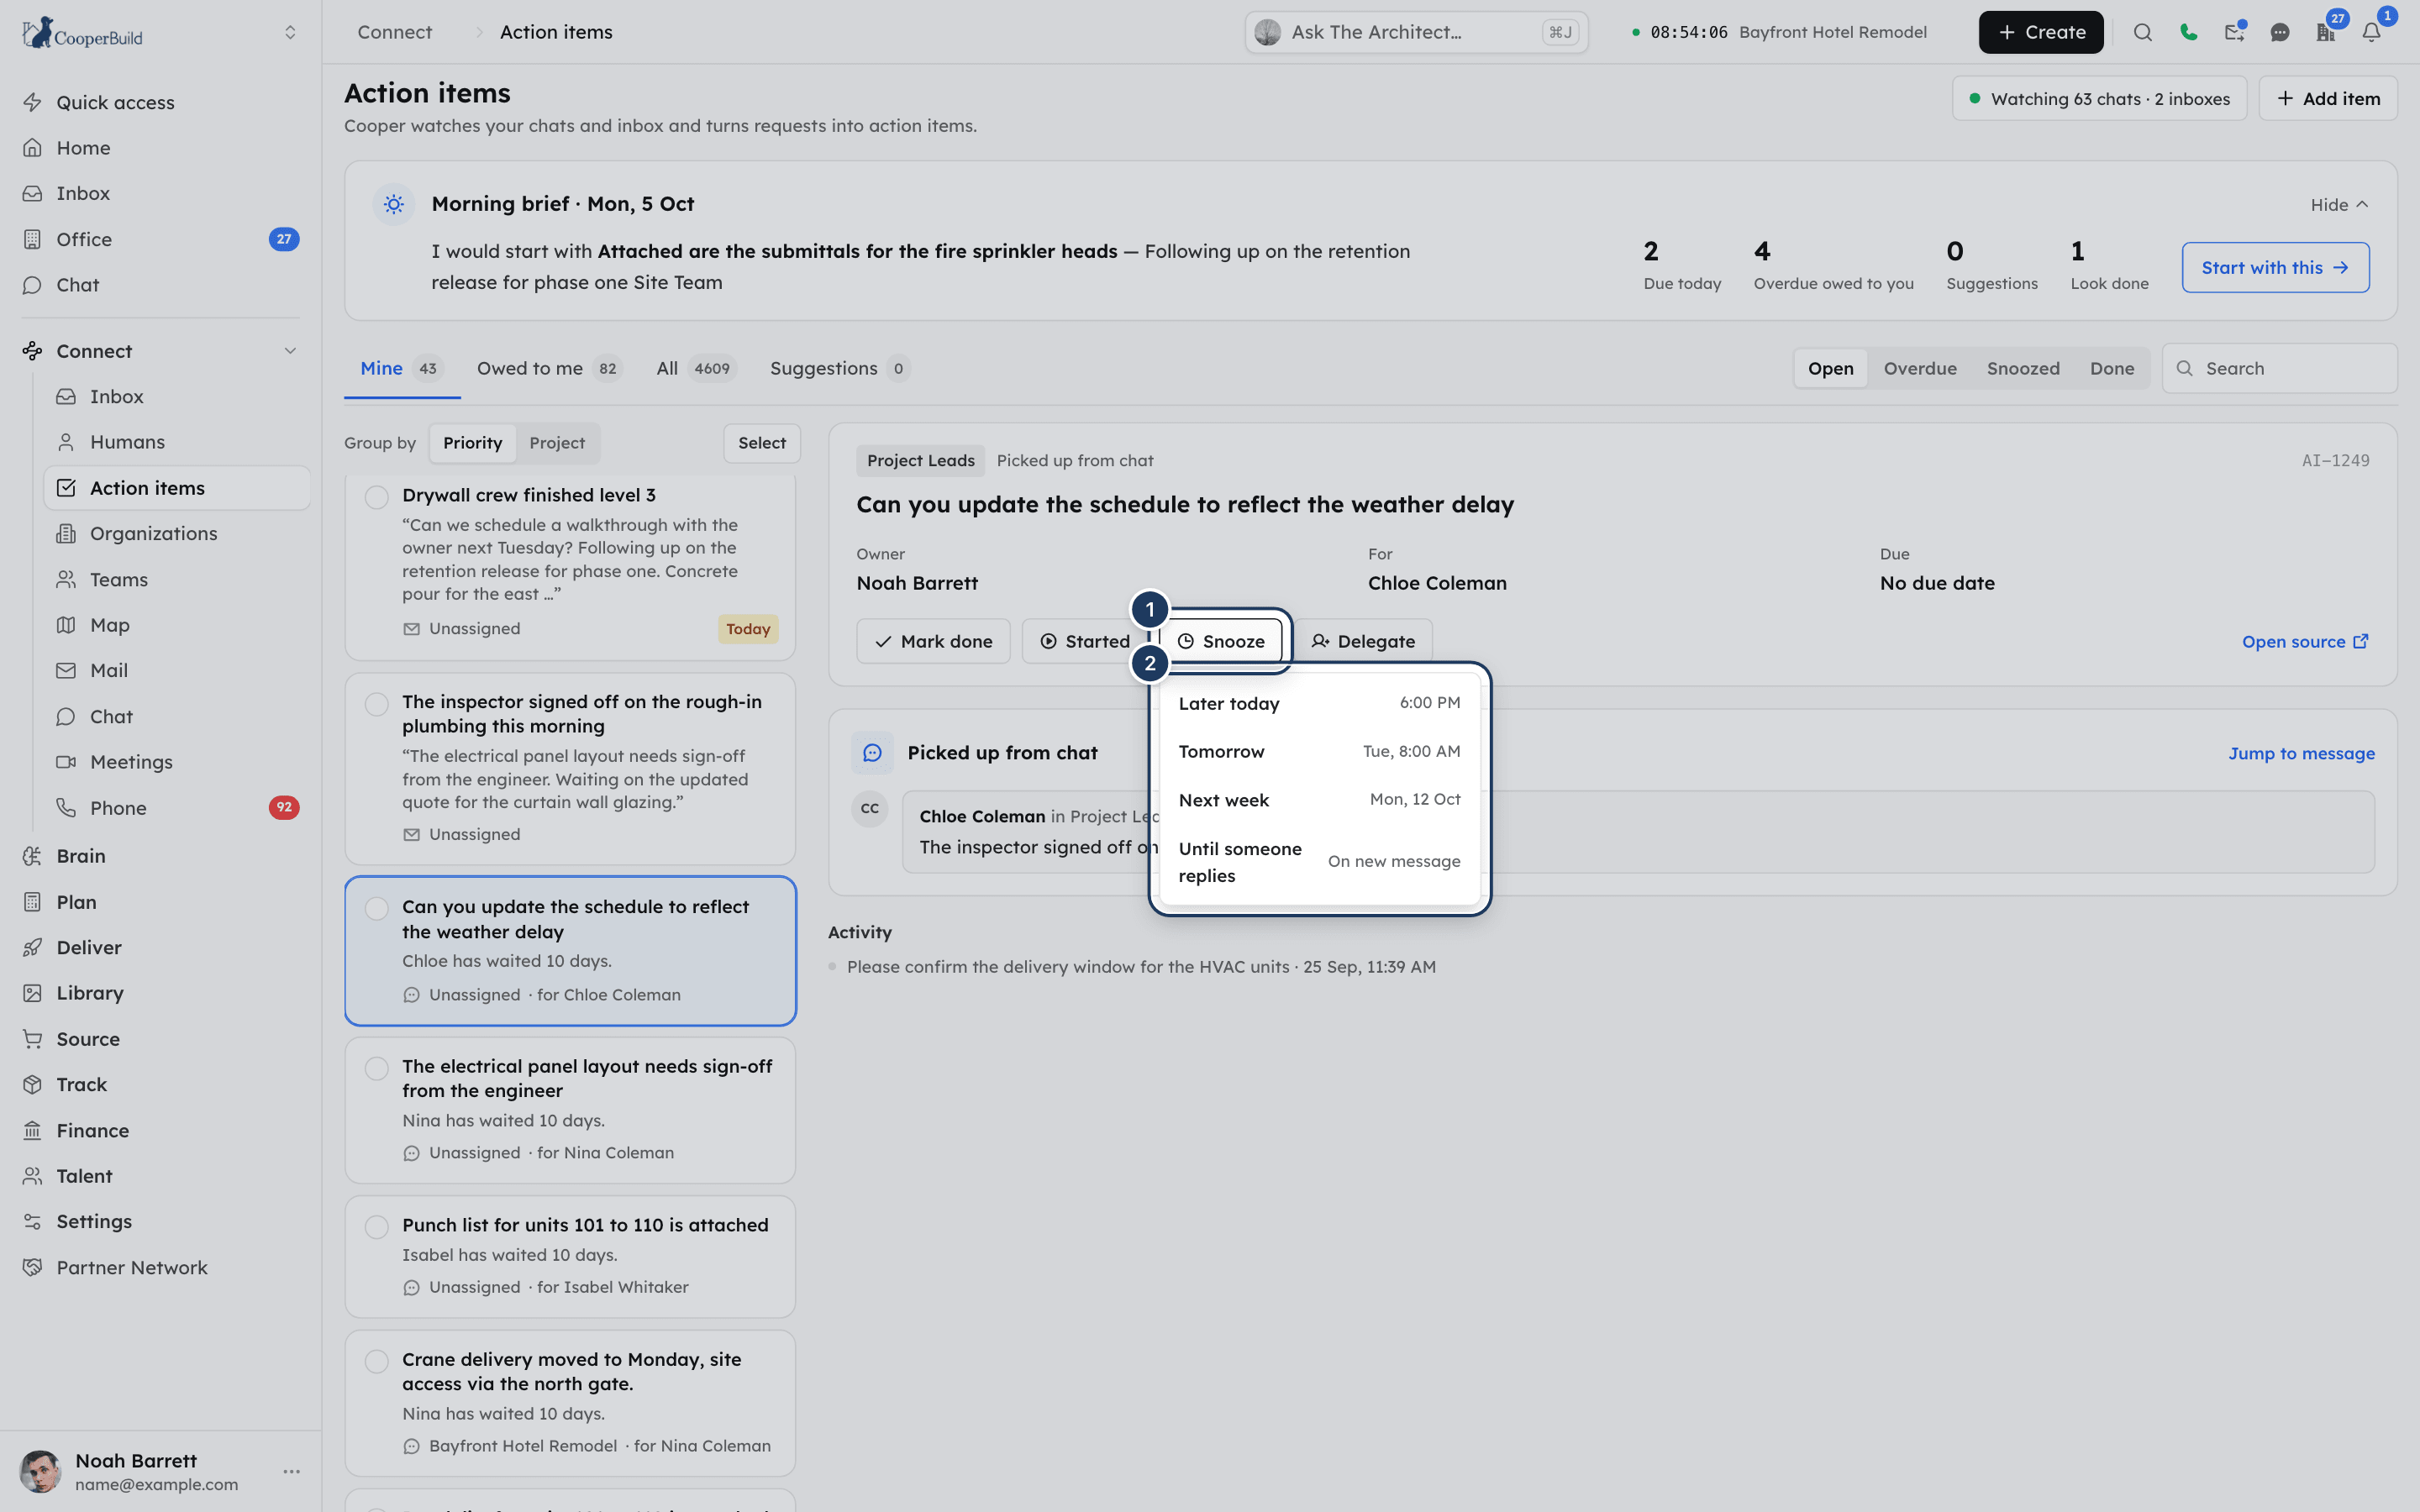
*Screenshot: Snooze choices. 1: Snooze, 2: the times on your company clock.*
## Delegate an action item
1. Select the item.
2. Click **Delegate**, or press **D**.
3. Type in **Find someone** and pick a teammate.
The new owner gets a notification: "Handed to you: …". If you owned the item, you become the person waiting on it, so it moves to your **Owed to me** tab.
## Nudge the person who owes it
When somebody else owns an open item, its details show **Nudge _name_** with a short follow-up Cooper drafted.
1. Edit the message if you like.
2. If both are available, choose **Chat** or **Email**.
3. Click **Send nudge**.
A chat nudge posts in the chat the item came from, if you are a member of it. Otherwise it goes to your direct messages with the person. An email nudge is sent from your connected mailbox to the person's email address, with the subject "Following up: …". The line under the button tells you where it goes. Nudges are sent as you.
## Reply to the email an item came from
When an item came from an email, its details show the email. If the email came into a mailbox you can send from, Cooper drafts a reply for you to check.
1. Read and edit the reply.
2. Click **Send reply and mark done** to send it in the same email thread and close the item.
3. Or click **Save draft** to keep it for later.
If the email came into someone else's mailbox, you see "Only the mailbox this came into can reply from here."
## Jump to where an item came from
- **Open source** opens the chat message, or the project inbox, the item came from.
- For items from chat, the **Picked up from chat** card shows the original message. Click **Jump to message** to open it in the chat. You must be a member of that chat.
- The **Activity** list at the bottom of the details shows the item's history, such as when it was created, started, reassigned or finished.
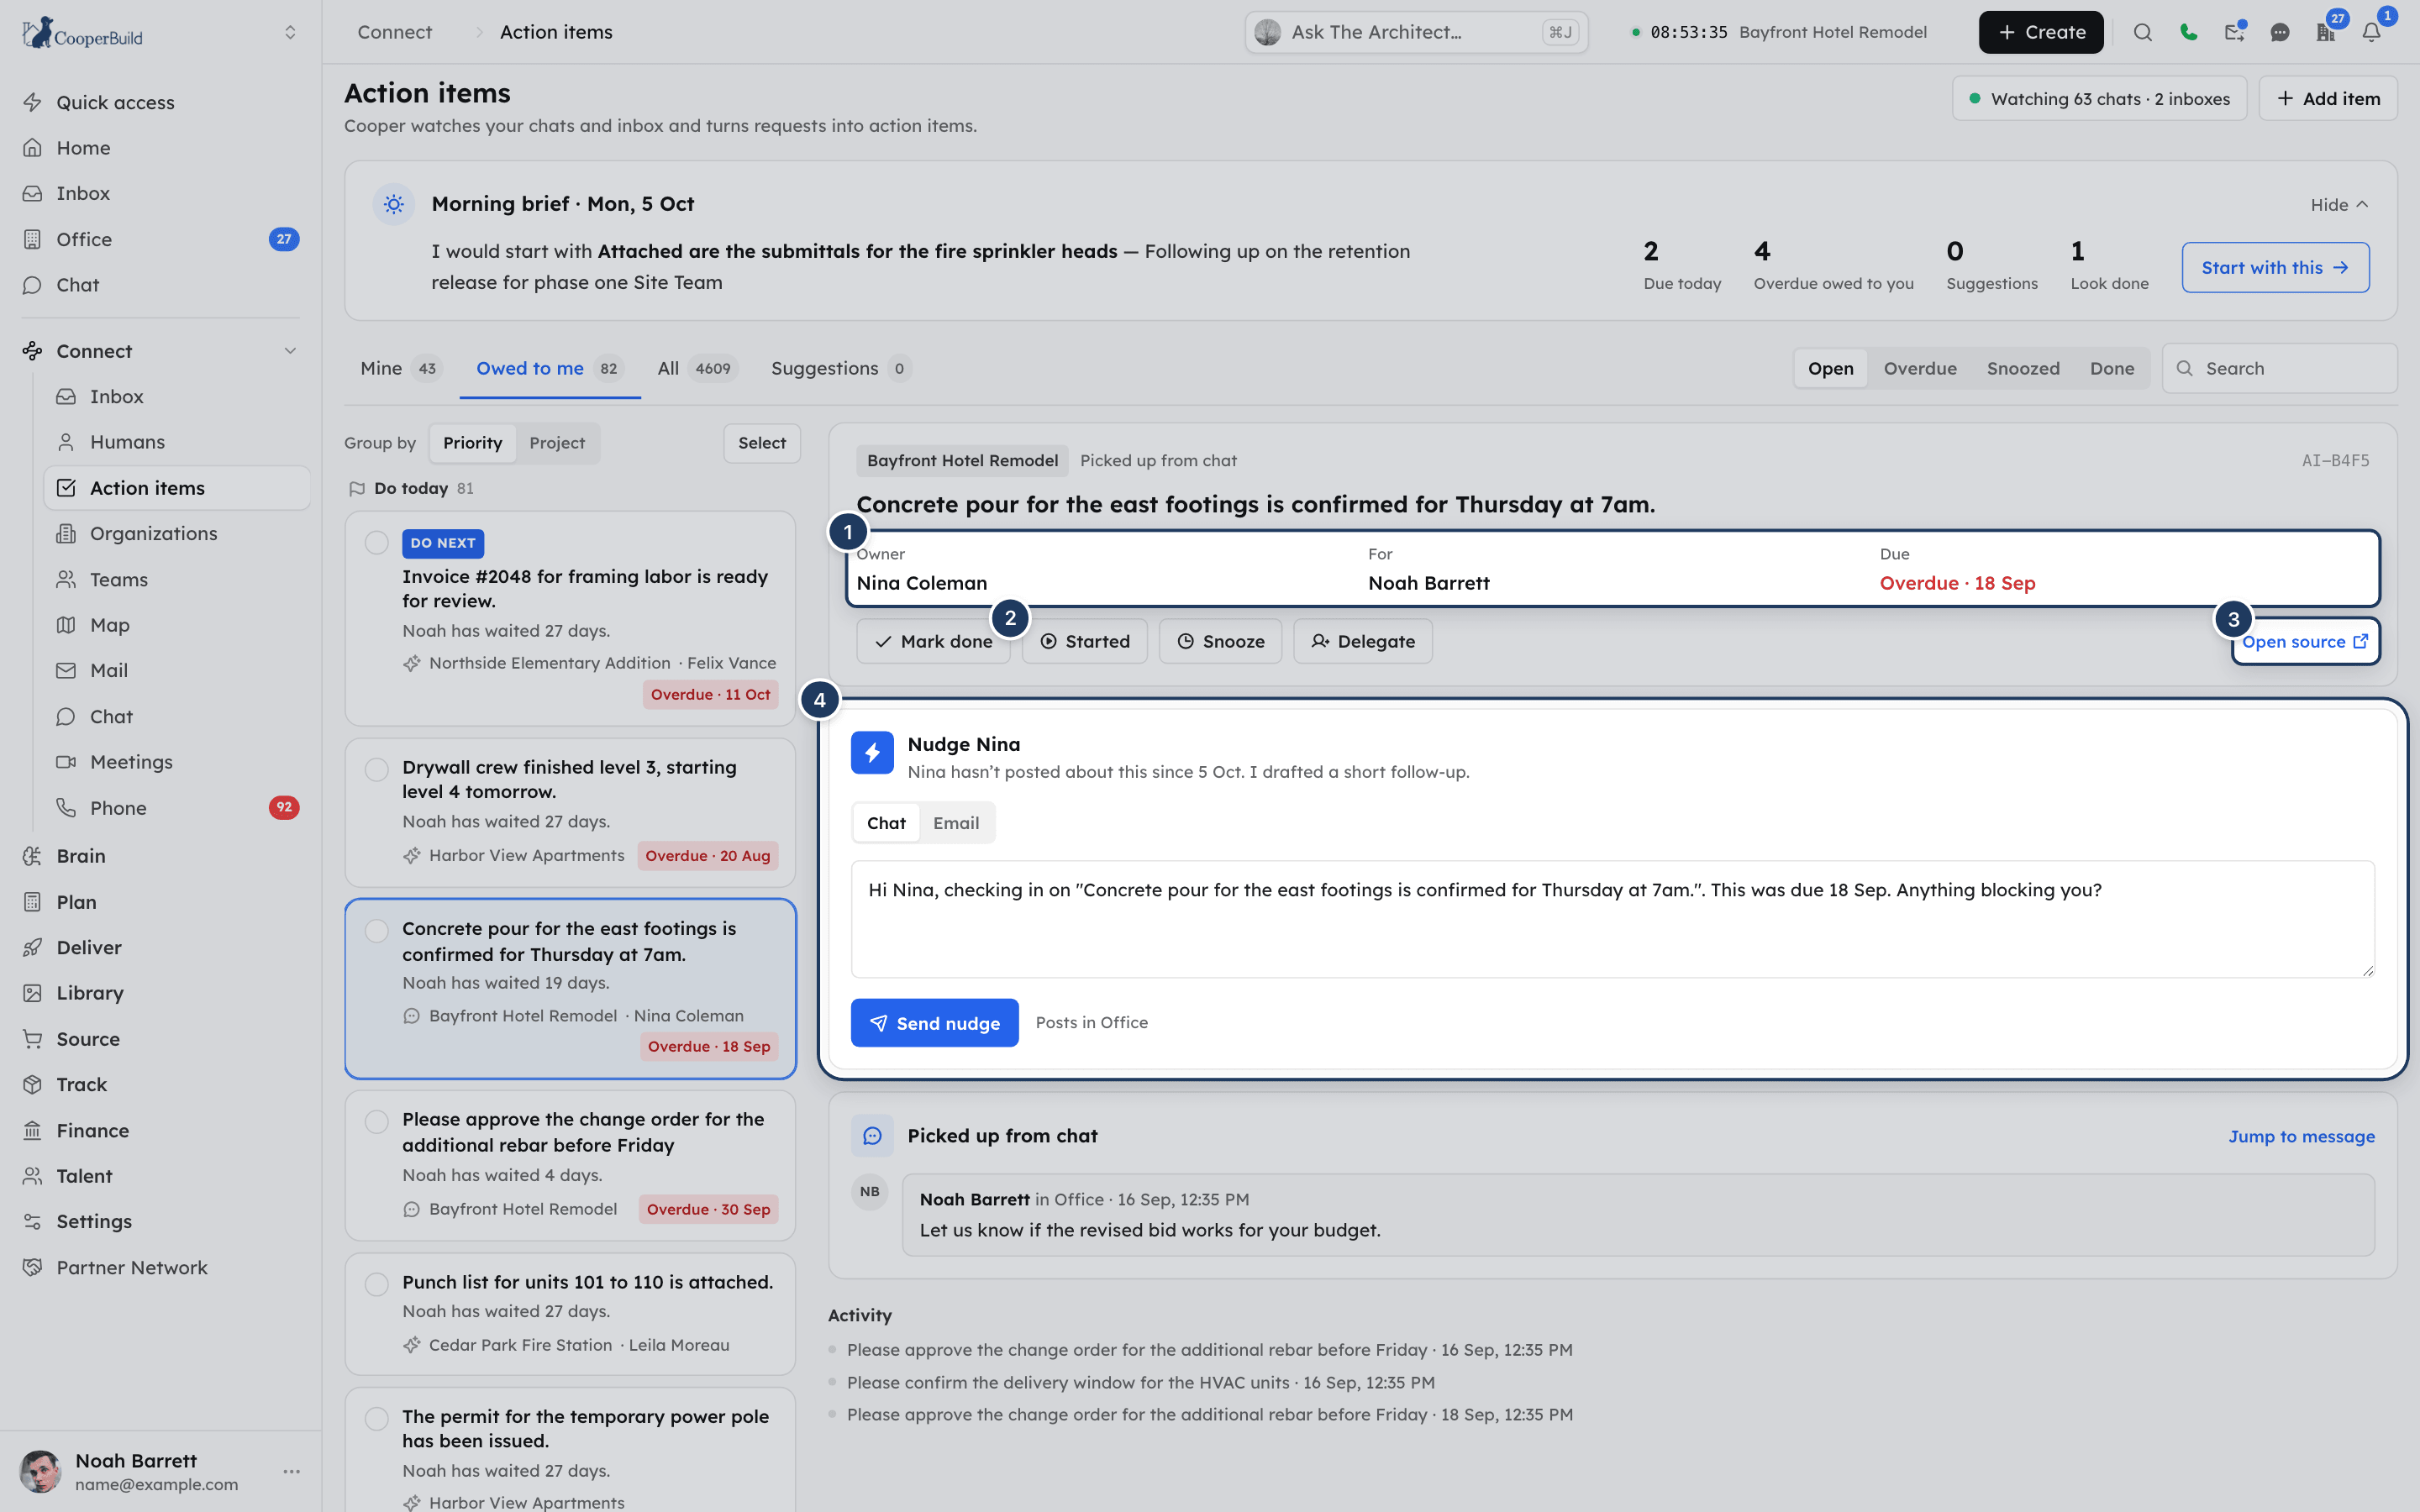
*Screenshot: Item details. 1: Owner, For and Due, 2: Mark done, Started, Snooze, Delegate, 3: Open source, 4: Nudge.*
## Review Cooper's suggestions
When someone says in chat that a record-keeping step happened, Cooper checks the record. Examples are "RFI #5 response received", "the glazing submittal is approved" or "task done". If Cooper does not show it yet, it creates a suggestion. Suggestions have a dashed border, a **Suggested** badge and the heading **Cooper found this in chat**.
A suggestion card shows what was said, what the record shows, and the steps on offer. Examples are closing the RFIs with the answer from the message, marking a submittal approved, or adding a follow-up. Possible states include **Cooper shows it**, **Not in Cooper yet**, **Cooper shows something else**, **Not found in Cooper** and **Which one was meant?**
- Approve a step to apply it. Nothing is submitted until you approve.
- Use **Edit response** to change an RFI answer before closing it.
- Use **Pick the right one** when Cooper found more than one possible record.
- Use **Not now** to leave it.
A suggestion closes by itself once the record shows the change. Some steps need permission in that area. For example, closing RFIs needs permission to answer RFIs.
## Select several action items
1. Click **Select** above the list, or press **X**.
2. Tick the items you want.
3. Click **Mark done** or **Snooze until tomorrow** in the bar at the bottom.
Cooper reports how many succeeded, for example "Marked done: 3 of 3". Click **Done** to leave select mode. Suggestions are left out of bulk actions.
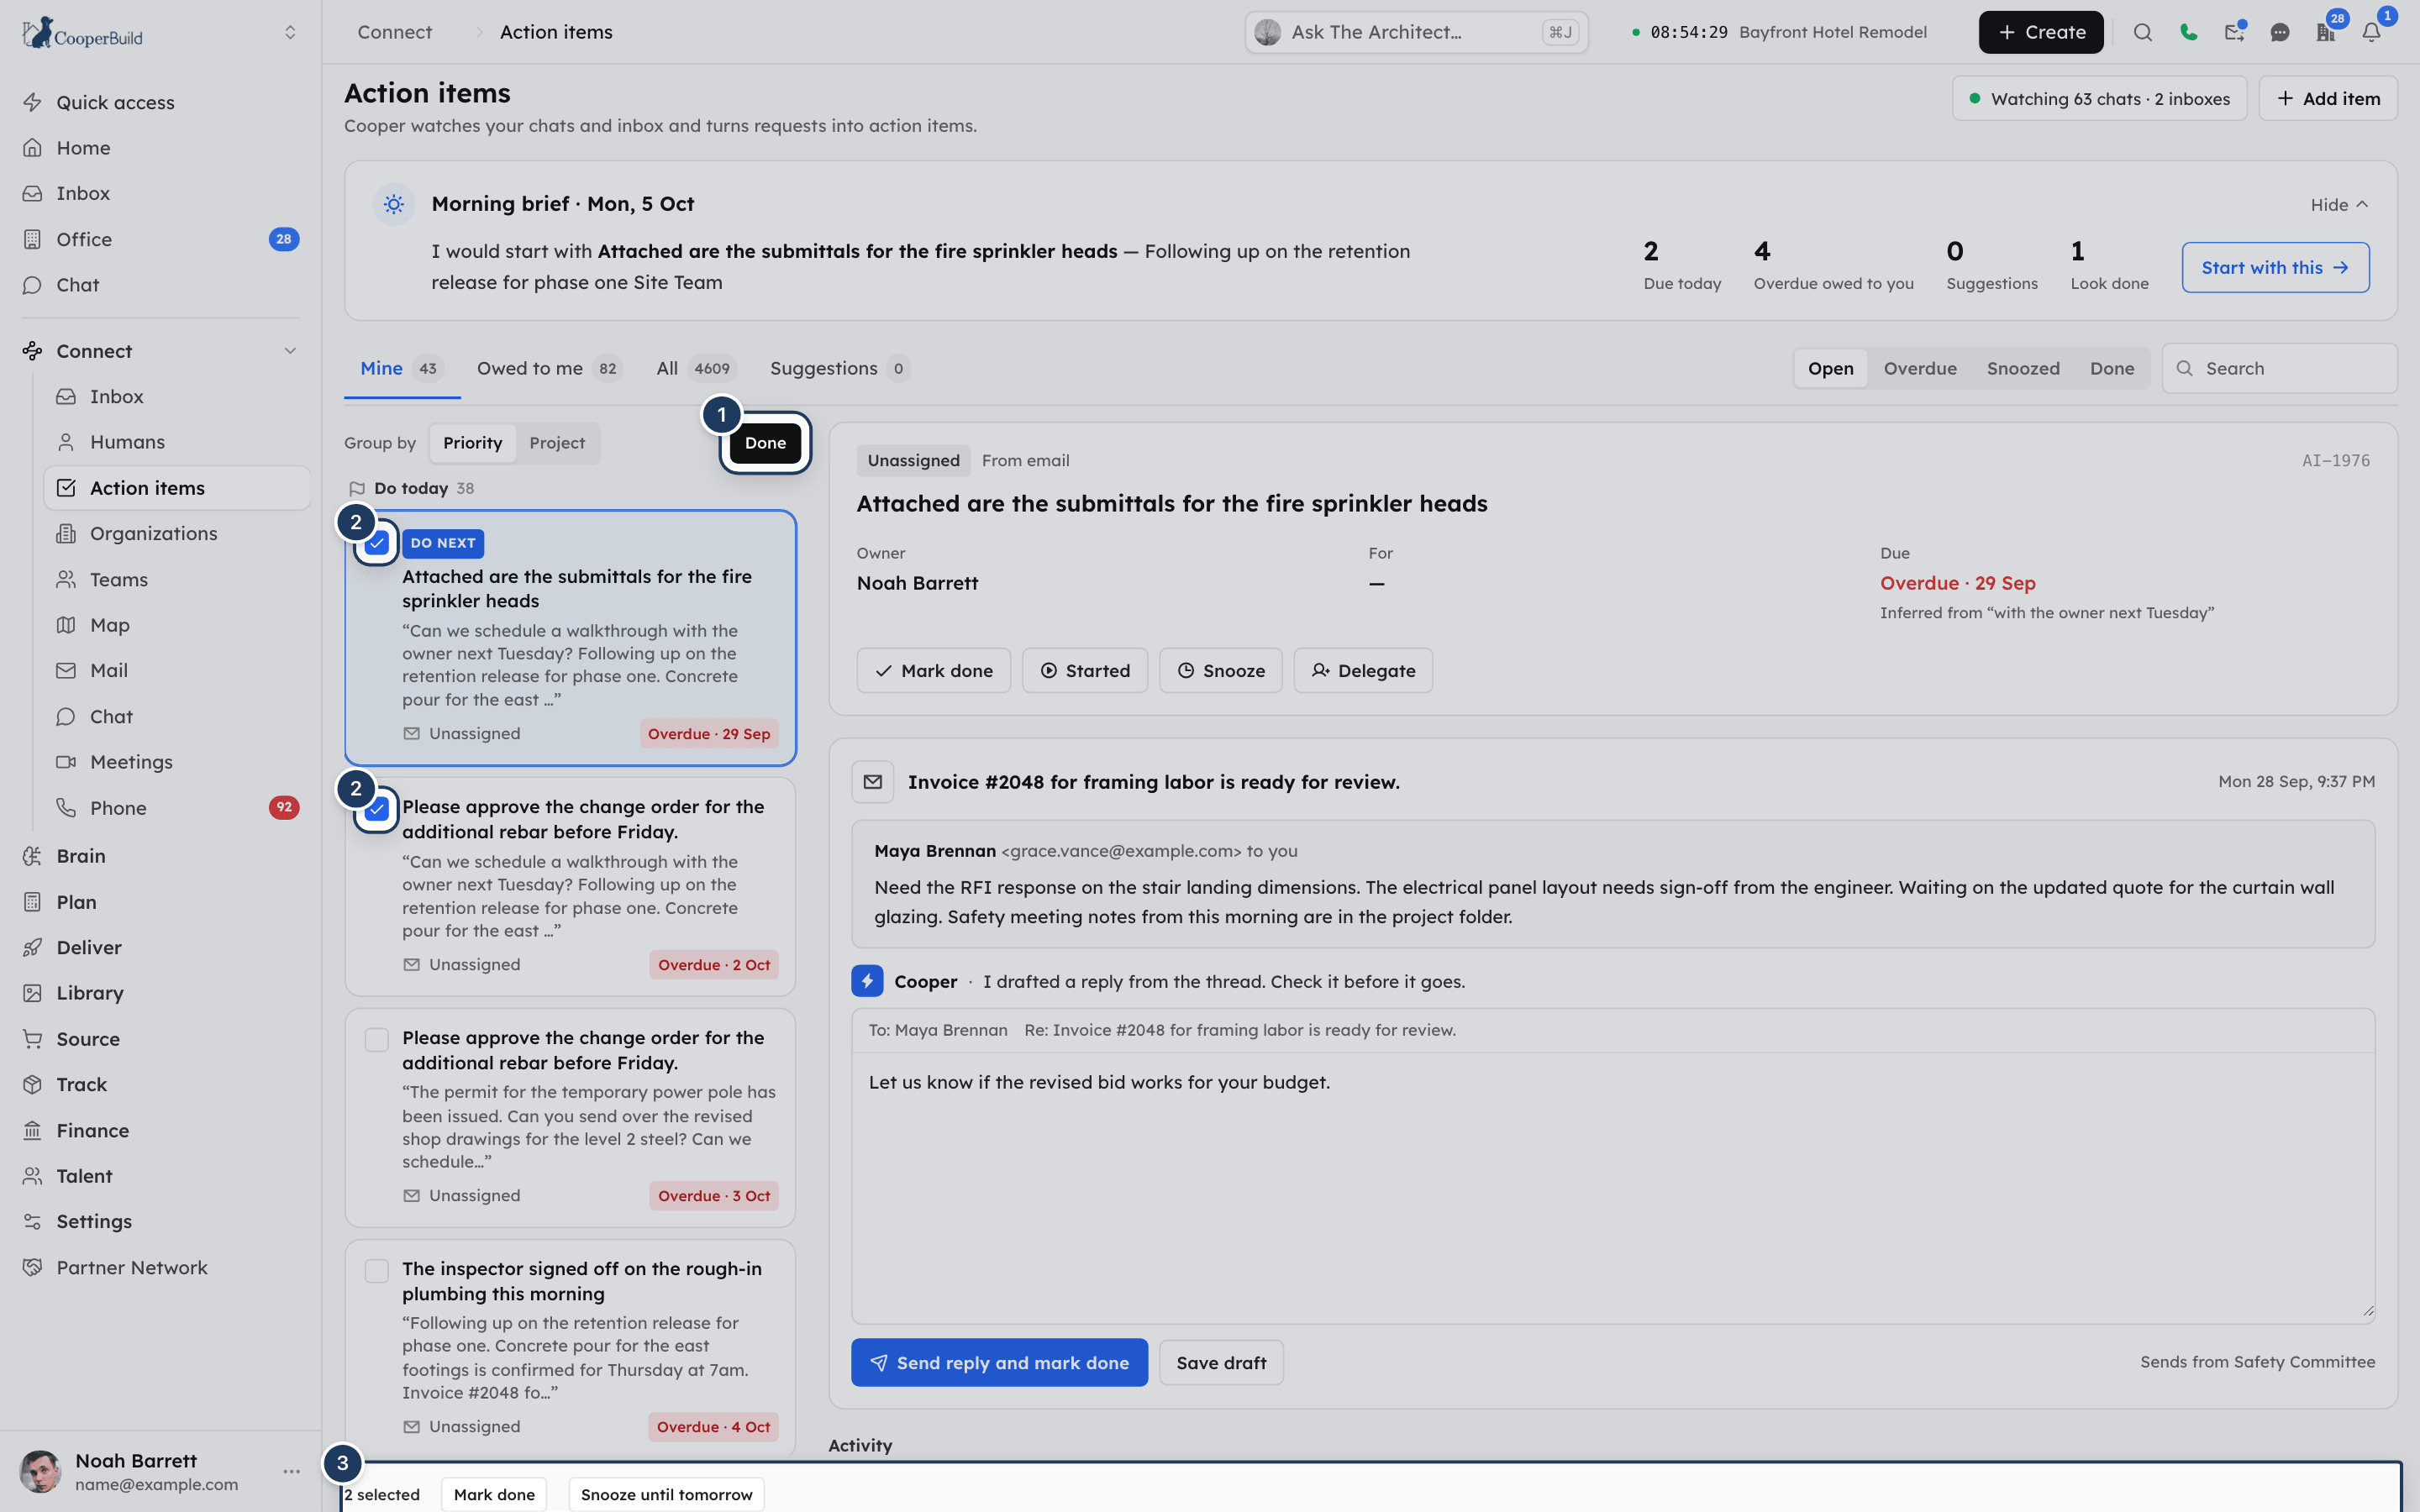
*Screenshot: Select mode. 1: Select / Done, 2: ticked items, 3: Mark done and Snooze until tomorrow.*
## Keyboard shortcuts
These work on the board when you are not typing in a field.
| Key | Action |
|---|---|
| **J** / **K** | Move to the next / previous item. |
| **E** | Mark the selected item done. |
| **S** | Open **Snooze**. |
| **D** | Open **Delegate**. |
| **X** | Turn select mode on or off. |
## Set a due date or dismiss an item
On a person's **Timeline** in [Humans](https://docs.cooperbuild.ai/connect/humans.md), each open item has a **More** menu:
- **Set due date**: pick a date, or clear it. Changing the date resets its reminders.
- **Already done**: dismiss it because it was already done.
- **No longer needed**: dismiss it.
Hover over an item and click **Dismiss** (the **x**) to dismiss it as not a real item. Dismissed items show in the **Done** view. Cooper learns from items you dismiss that it picked up from conversations.
## Notifications and reminders
Cooper sends in-app and push notifications:
| When | Who is notified |
|---|---|
| An item is created for someone | The owner ("New action item for you: …"). |
| An item is delegated | The new owner ("Handed to you: …"). |
| An item is marked started | The person waiting. |
| An item is marked done | The person waiting ("_name_ finished: …"). |
| The day before the due date | The owner ("Due tomorrow: …"). |
| On the due date | The owner ("Due today: …"). |
Due-date reminders go out once each, at about 9:00 AM in your company's time zone. You are never notified about something you did yourself.
## Fields reference
| Field | Required | What it means |
|---|---|---|
| What needs doing | **Yes** | The item, in plain words. Up to 500 characters. |
| Who does it | Yes, on the board | The owner. On the board you pick from your teammates. |
| For | No | Who is waiting on it. Only on the board. On a person's page it is that person; in chat it is you. |
| Project | No | An active project. Groups the item under that project. |
| Due | No | The due date. Today or later. |
## Permissions
Everyone can work with their own items without any extra permission:
| You are… | You can… |
|---|---|
| The creator | Do everything on the item. |
| The owner | Mark done, reopen, dismiss, snooze, set the due date, delegate, link a task and mark started. |
| The person waiting | Mark done, dismiss, snooze, set the due date, delegate and link a task. You cannot mark it started or reopen it. |
Role permissions under **Connect** > **Action items** widen this:
| Permission | What it adds |
|---|---|
| **Read** | See everyone's items in **All**, not just your own. |
| **Write** | Act on anyone's items. |
The **Action items** link sits in the **Connect** menu next to **Humans**.
## Tips and best practices
- Start each day from the morning brief and **Start with this**.
- Write items the way you would say them: "Send the revised drawings to Dana". Put the person in **Who does it** or **For**, not in the text.
- Add a due date when there is one. Reminders and the **Overdue** view depend on it.
- Use **Snooze** > **Until someone replies** for items you cannot move until someone answers.
- Delegate rather than reassigning in conversation. The new owner is notified, and the item stays on your **Owed to me** tab so you can follow up.
- Check the **Suggestions** tab regularly. Approving a suggestion keeps your records in step with what the team says in chat.
## Troubleshooting
### I can't see Action items in the sidebar
The link sits under **Connect** with **Humans**. If you can't see it, your role does not have access to Humans. Ask an admin.
### I only see my own items in All
Without **Connect** > **Action items** > **Read**, you see only items you own, are waiting on or created. Ask an admin for Read access to see everyone's.
### 'You cannot resolve this action item' (or snooze, reassign…)
You are not the creator, owner or person waiting on this item, and your role does not have **Action items** > **Write**. Ask the owner, or ask an admin for Write access.
### The tick on an item is disabled
The item is a suggestion or was made from a claim Cooper checked. It closes by itself once Cooper shows the change on the record. Use its suggestion card, or dismiss it as **not tracked in Cooper**. The tick is also disabled when you are not allowed to mark the item done.
### 'That one already exists'
An open item with the same owner, project and wording already exists. Cooper kept the existing item instead of adding a duplicate.
### 'This action item is already done' (or dismissed)
Somebody already closed the item. Find it in the **Done** view and click **Reopen** if it is not finished.
### I can't pick myself in Who does it
On the board, **Who does it** lists your teammates, not you. To track something you owe yourself, ask a Cooper agent, for example "remind me to send the site pictures Friday". An agent adds an item you own when you don't name anyone else.
### There is no Nudge card on an item
**Nudge** appears only on open items that somebody else owes, and only when Cooper can reach them. That means a chat you share with them, a Cooper login for direct messages, or an email address for them plus a mailbox you have connected to Cooper.
### 'Could not load the list'
The list did not load. Click **Retry**. If it keeps failing, reload the page.
## For AI agents
Agents work with action items through two MCP tools. Every user can call them. The service limits what each user can read and change by the same rules as the board.
**`action_item_browse`** (read-only)
- `action`: `list`, `get` (needs `id`) or `summary` (counts for a person, company or project).
- Filters: `humanId` or `query` (a name, email or phone), `externalOrgId`, `projectId`, `state`, `owed`, `overdueOnly`, `search`, `limit` (default 30, max 100), `pageNo`.
- `owed`: `BY_ME` (things I have to do), `TO_ME` (things I am waiting on), `WE_OWE`, `THEY_OWE` or `ANY`.
- `list` returns open items only unless you pass `state`. Use `["done"]` for finished items, or `["open","done","dismissed"]` for everything.
- Examples: "what do I owe" → `list`, `owed: "BY_ME"`. "What am I waiting on" → `list`, `owed: "TO_ME"`. "Anything overdue" → `list`, `overdueOnly: true`.
**`action_item_manage`** (writes)
- Previews by default. Call with `confirm: false` (or omit it) to see what would happen, then again with `confirm: true` to do it.
- Actions:
- `create`: needs `text`, max 500 characters. Name the owner with `ownerQuery`, `ownerHumanId` or `ownerUserId`. Leave the owner empty when the user means themself. When someone else owes it, the user is recorded as waiting. Optional: `counterpartyHumanId` or `counterpartyUserId`, `dueAt`, `projectId`, and `conversationId` (posts a card in that chat).
- `resolve` (optional `note`), `reopen`, `dismiss` (`reason`: `not_an_action`, `already_done`, `wrong_person`, `duplicate`, `no_longer_needed`, `tracked_elsewhere` or `other`).
- `reassign`: owner and/or counterparty.
- `snooze`: `until`.
- `set_due`: `dueAt`; omit it to clear.
- `link_task` (`taskId`) and `unlink_task`.
- `create_task`: makes a project task from the item. Needs `projectDeliverableId`. Optional: `projectId`, `taskName`, `taskType`, `description`, `scheduledStart`, `scheduledEnd`. Once linked, finishing either one closes the other.
Common errors and fixes:
| Error | Fix |
|---|---|
| `TEXT_REQUIRED` / "Say what needs doing" | Pass a non-empty `text`. |
| `ID_REQUIRED` | Pass a valid action item `id`. Get it from `action_item_browse`. |
| `FORBIDDEN` ("You cannot … this item") | The user is not the creator, owner or person waiting, and lacks **Action items** Write. |
| `ALREADY_LINKED` | Call `unlink_task` before `create_task`. |
| `DELIVERABLE_REQUIRED` | Pass `projectDeliverableId` to `create_task`. |
| `NOT_OPEN` | Only open items can become tasks. `reopen` first if needed. |
| "The same person cannot both owe this and be waiting for it" | Pick a different owner or counterparty in `reassign`. |
| "That one already existed; returned it." | Not an error. A matching open item already existed. Use the returned item. |
- Action items are not project tasks. Never answer an action item question with project task tools or `db_find` on project tasks.
- An ambiguous `query` or `ownerQuery` returns candidates. Ask the user which person they mean.
- For a person's whole history, including their open items, use `person_timeline` or `person_status_brief`. See [Humans](https://docs.cooperbuild.ai/connect/humans.md).
## Related
- [Humans](https://docs.cooperbuild.ai/connect/humans.md): each person's **Timeline** shows what they have to do and what they are waiting for.
- [Organizations](https://docs.cooperbuild.ai/connect/organizations.md): items that concern a company.
- [Phone](https://docs.cooperbuild.ai/connect/phone.md): texts and calls Cooper reads for action items.
---
# Map
> See where your clocked-in team members are on a live map, follow the path a worker took during a work session, and filter by project, status or name.
Source: https://docs.cooperbuild.ai/connect/map
Keywords: team map, team location map, gps, gps tracking, live location, field staff location, crew tracking, where is my crew, work sessions, check-in location, geolocation, location pings
The Map shows where your team members are while they are on the clock. Every pin on the map is a **work session**: when a worker checks in, Cooper records where they checked in, and while the session runs their phone keeps sending location updates. The map moves as those updates arrive.
Office admins, project managers and supervisors use the Map to see who is on which job site right now, check that a crew has arrived, and look back at the route a worker took during a session.
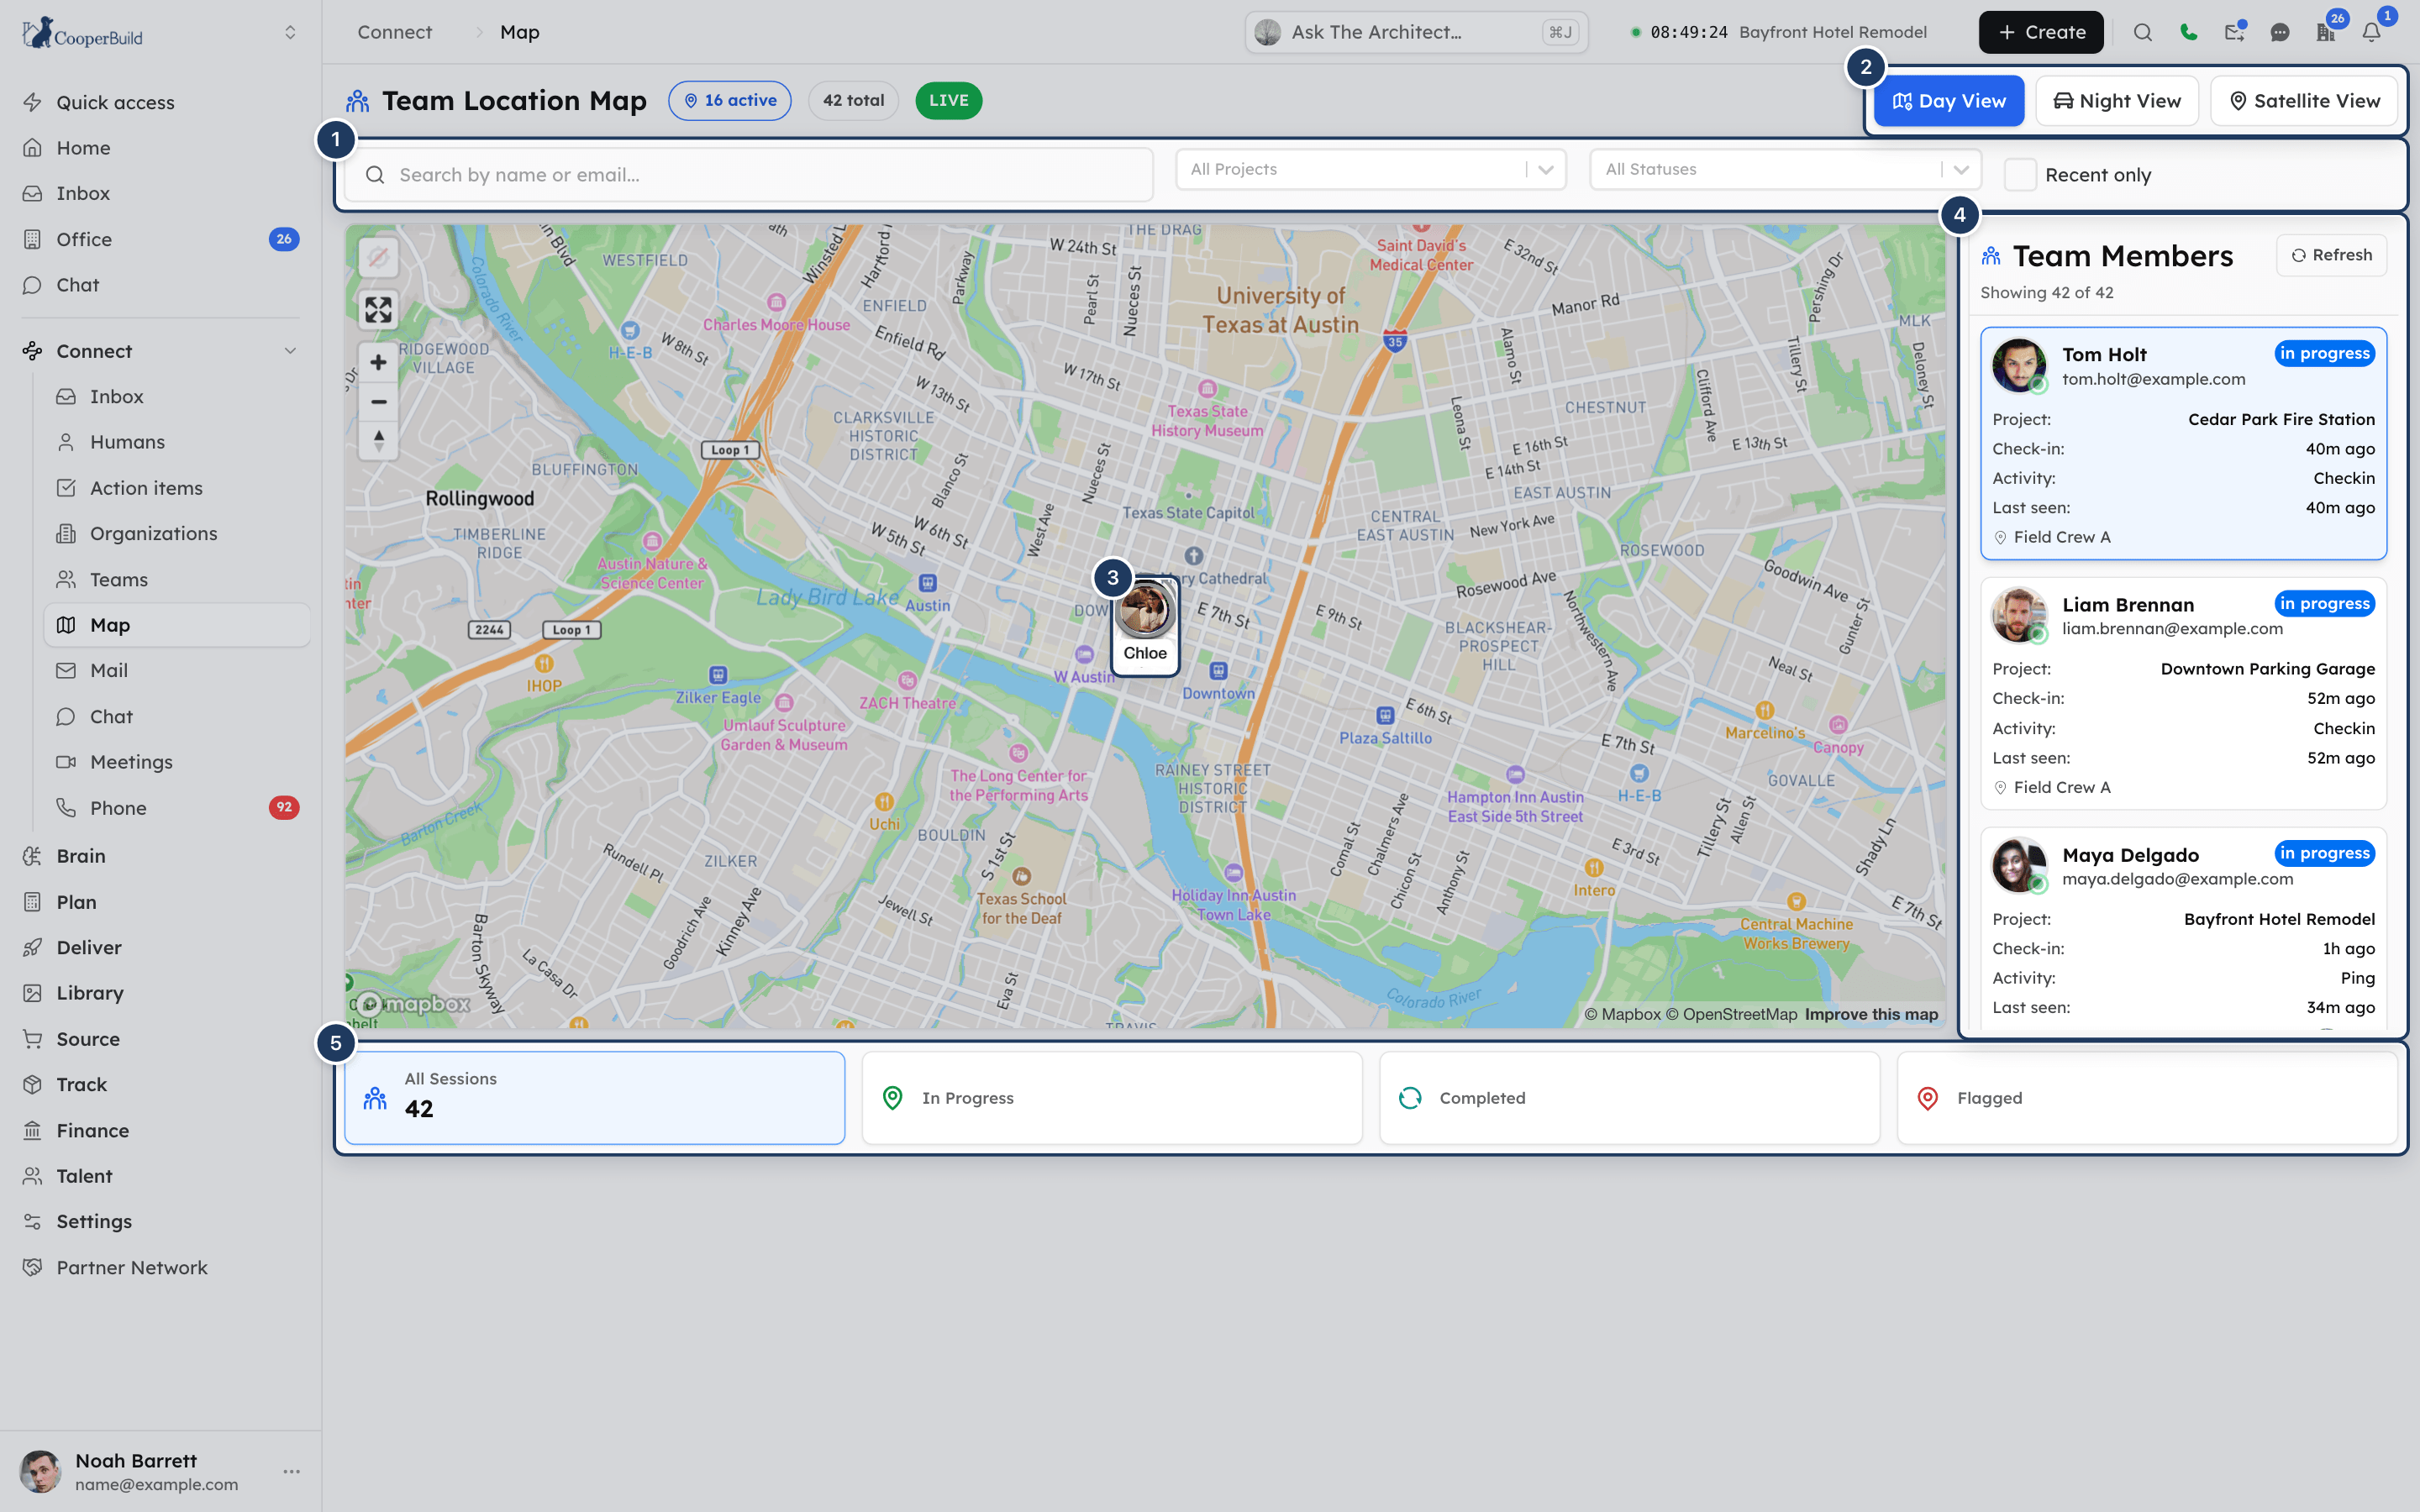
*Screenshot: The Map. 1: filters, 2: map style, 3: team member pins, 4: Team Members list, 5: quick filter cards.*
## Key concepts
| Term | Meaning |
|---|---|
| **Work session** | One shift for one team member, from check-in to check-out. The Map shows one entry per work session, so a person with two sessions in the time window can appear twice. |
| **Location ping** | A location update sent by the worker's phone while their work session is in progress. Each ping has a time, coordinates, and (when the phone reports them) accuracy and battery level. |
| **Last seen** | The time of the newest location Cooper has for the session: the latest ping, or the check-out or check-in location if there are no pings. |
| **Activity** | Where the last-seen location came from: **Ping** (a live update), **Checkout** or **Checkin**. |
| **Active** | A team member whose last-seen location is from the past hour. |
| **Session status** | The work session's status: **In Progress**, **Completed**, **Approved**, **Flagged**, **In Timesheet** or **Paid**. |
## Open the Map
In the sidebar, open **Connect** and click **Map**. The page opens at `/connect/team-member-map` with the title **Team Location Map**.
You see the Map only if your role grants **Map** under **Connect** (read access). Account owners always see it. If your company's plan does not include the Map, you see a locked screen instead.
## What the Map shows by default
When you open the Map with no filters, it shows:
- every work session that is **In Progress**, and
- every work session that was **Completed** in the past 24 hours.
Sessions are sorted newest first and loaded 50 at a time. The page reloads its data every 30 seconds. Live location pings from workers' phones move the pins between reloads, without a refresh.
The header shows the state of the data at a glance:
| Badge | Meaning |
|---|---|
| **N active** | How many team members have a location from the past hour. |
| **N total** | How many work sessions match the current filters. |
| **LIVE** | Data loaded. |
| **NO DATA** | No work sessions match the current filters. |
| **N Live Updates** | How many sessions have sent a live location ping since you opened the page. This badge pulses. |
## Read a team member's pin
Each pin is a round avatar with the team member's first name underneath. The avatar is the person's profile photo, or a person icon when they have no photo.
- A **pulsing green ring** means the last location came from a live location ping.
- A **gray ring** means the last location came from the check-in or check-out, not from a live ping.
When nothing is selected, the map zooms and centers itself to fit every pin. Use the controls at the top left of the map to show your own location, go full screen, and zoom or rotate.
Sessions with no location at all (for example, a check-in made without GPS) do not get a pin. They still appear in the Team Members list with the note **No location data available**.
## Follow a team member's path
### Step 1: Select the team member
Click their pin on the map, or click their card in the **Team Members** list. The selected pin grows and the card is highlighted.
### Step 2: Read the path
The map draws a line through every location ping in that work session, oldest to newest:
- a large **green** dot marks where the journey started,
- small **blue** dots mark each location ping,
- a **red** dot marks the latest location.
The line is green when the latest ping is less than an hour old (the worker is being tracked live), and blue otherwise.
### Step 3: Inspect a point
Hover over any dot to see **Journey Start**, **Current Location** or **Location Ping #n**, with the team member's name and email, the project, the time of the ping and its accuracy (for example **Accuracy: ±12m**). A dot from a session that is being tracked live also shows **Live Tracking**.

*Screenshot: A selected session. 1: journey start, 2: location pings, 3: current location, 4: ping details on hover, 5: the selected card.*
A path appears only for sessions that have location pings. A session with only a check-in location shows a pin but no line.
## Read the Team Members list
The **Team Members** panel to the right of the map lists every work session that matches your filters. Each card shows:
| Field | What it means |
|---|---|
| Name and email | The team member. A small green dot on the avatar means they are active (seen in the past hour). |
| Status badge | The session status, for example **in progress** or **flagged**. |
| **Project** | The project the session is checked in to, or **N/A**. |
| **Check-in** | When the session started, shown as **Just now**, minutes or hours ago, or a date. |
| **Duration** | How long the session has run, for example **3h 15m**. Shown when Cooper has a duration. |
| **Activity** | **Ping**, **Checkout** or **Checkin** — where the last location came from. |
| **Last seen** | When the newest location was recorded. Not shown for sessions without location. |
| **Battery** | The phone's battery level, shown in green, amber or red. Shown when the phone reports it. |
| Address | The address recorded with the location, when there is one. |
Click **Refresh** at the top of the list to reload now instead of waiting for the next 30-second reload.
When more than 50 sessions match, the list shows **Showing X of Y (page a/b)**. Use the arrow buttons at the top or bottom of the list to move between pages. The map shows the pins for the page you are on.
## Filter the Map
Use the filter row above the map. Filters combine, and changing one returns you to page 1.
| Filter | What it does |
|---|---|
| **Search by name or email...** | Shows sessions for team members whose first name, last name, full name or email contains what you type. |
| **All Projects** | Pick one project to see only sessions checked in to it. Type to search projects. Clear the box to see all projects again. |
| **All Statuses** | Pick one status: **In Progress**, **Completed**, **Approved**, **Flagged**, **In Timesheet** or **Paid**. Clear the box to go back to the default view. |
| **Recent only** | Narrows the Team Members list to people whose last location is from the past hour. Pins on the map are not affected. |
> **Note: A status filter looks further back**
>
> With no status picked, the Map shows sessions in progress plus sessions completed in the past 24 hours. When you pick a status, the Map shows every work session with that status, however old. Combine a status with a project or a name to keep the list short.
## Use the quick filter cards
Below the map are four cards:
| Card | What it does |
|---|---|
| **All Sessions** | Clears every filter and shows the default view. Shows the total when no filter is on. |
| **In Progress** | Shows only sessions that are in progress. |
| **Completed** | Shows only completed sessions. |
| **Flagged** | Shows only flagged sessions. |
The selected card is highlighted and shows how many sessions match. Choosing **In Progress**, **Completed** or **Flagged** also turns off **Recent only**.
## Change the map style
Click **Day View**, **Night View** or **Satellite View** at the top right. The Map opens in **Day View** between 6 AM and 6 PM on your computer's clock, and in **Night View** otherwise. Your choice lasts until you leave the page.
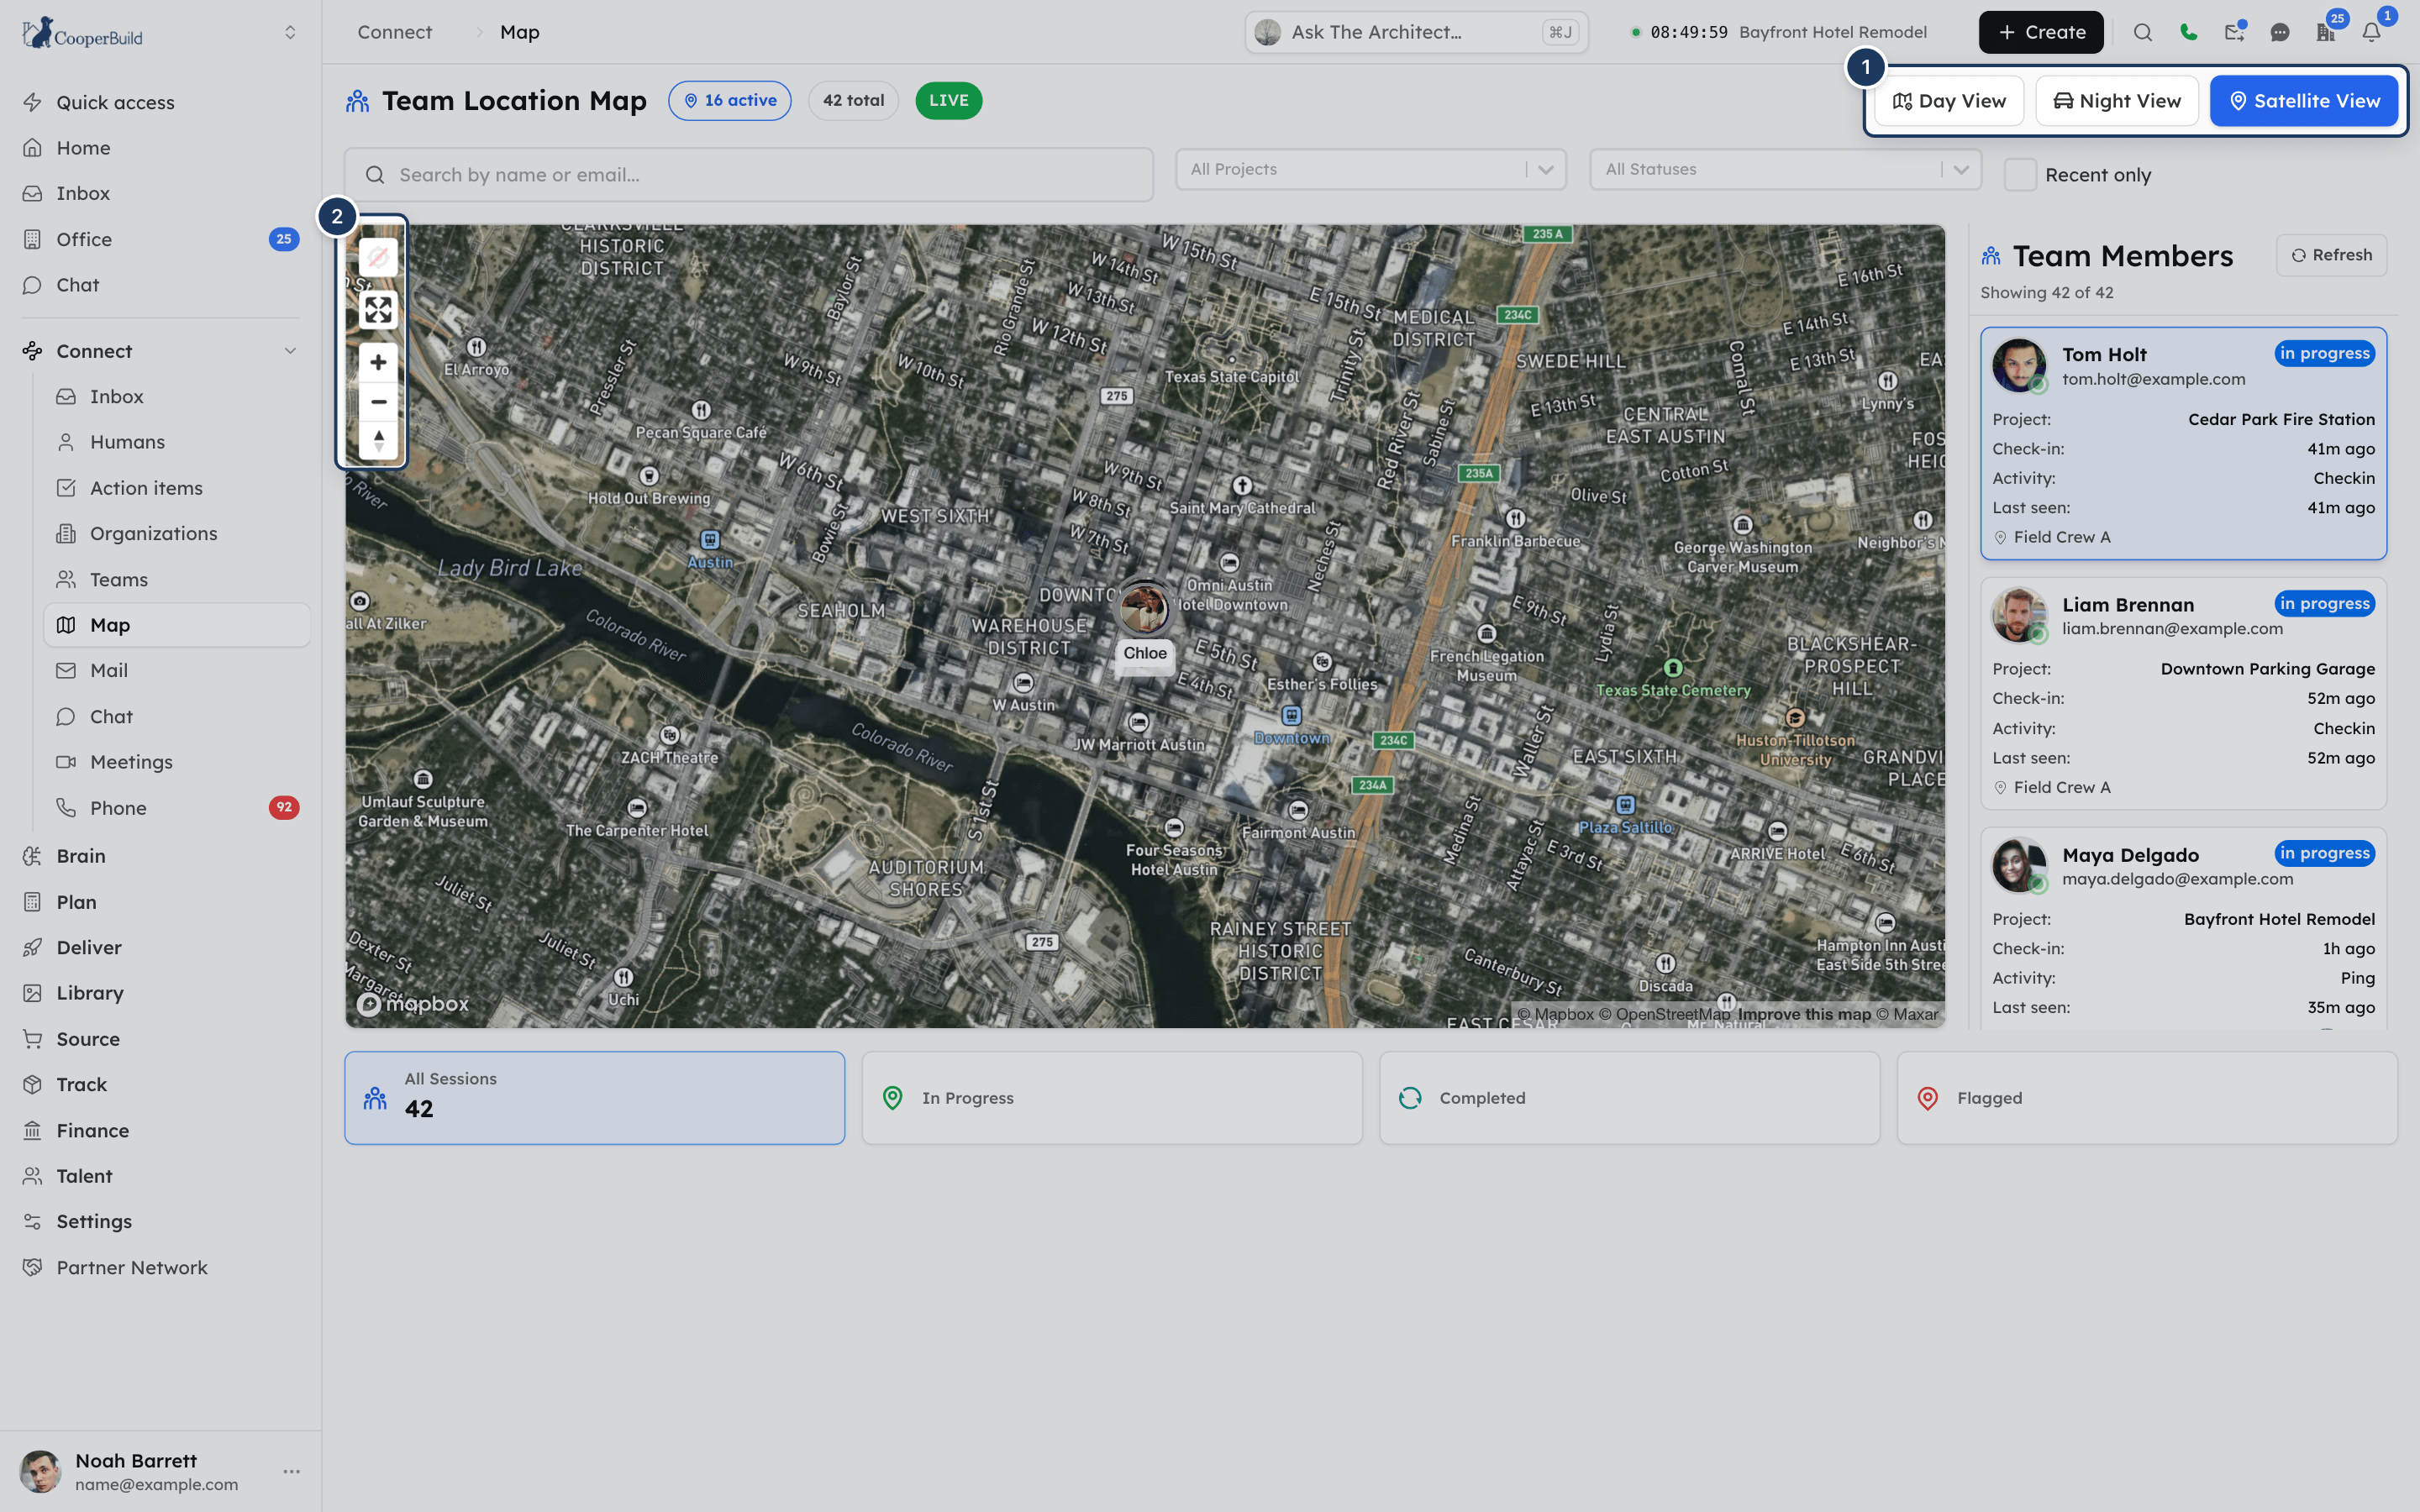
*Screenshot: Satellite View helps you see exactly where on a site a worker is. 1: map style buttons, 2: map controls.*
## How locations are collected
Locations come from work sessions, not from tracking people all the time:
1. A team member checks in to a work session. Cooper records the check-in time and, when available, the location and device details.
2. While the session is in progress, the worker's phone sends location pings to Cooper. Cooper accepts a ping only for an in-progress session that belongs to the person sending it.
3. When the team member checks out, Cooper records the check-out location and stops accepting pings for that session.
No location is collected outside a work session. To see or edit the sessions themselves, open **Talent** → **Work Sessions**.
## Permissions
| What | Who can do it |
|---|---|
| Open the Map and see team member locations | Roles with **Connect** → **Map** (read). Account owners always. |
| Send location pings | The team member, from their own phone, during their own in-progress work session. |
The Map is read-only. Nothing on it changes a work session. To grant access, an admin opens **Settings** → **Roles**, edits the role, and turns on **Map** under **Connect**.
Live location updates are shared with everyone in your company who has the Map open. Grant the Map permission only to roles that need to see where people are.
## Tips and best practices
- Pick a project in **All Projects** to see who is on one job site.
- Turn on **Recent only** to hide people who checked in but have not sent a location in the past hour.
- Click a team member and look at the path to confirm a site visit, then check the hover times on the dots.
- Use **Flagged** to review sessions that need attention, then open them in **Work Sessions** to fix them.
- If a pin keeps a gray ring all day, the worker's phone is probably not sending location pings. Ask them to keep location turned on for the Cooper app while checked in.
## Troubleshooting
### I can't see Map in the sidebar
Your role does not include **Map** under **Connect**, or your company's plan does not include it. Ask an admin to turn on **Map** for your role in **Settings** → **Roles**.
### The header says NO DATA
No work session matches the current filters. Click **Clear Filters** in the Team Members list, or click the **All Sessions** card. With no filters, the Map shows only sessions in progress and sessions completed in the past 24 hours, so a day with no check-ins shows nothing.
### A team member is in the list but not on the map
Their work session has no location. The card says **No location data available**. This happens when the check-in was made without location and the phone has sent no pings. You can't select these cards.
### A pin isn't moving
The pin moves only when the worker's phone sends a location ping. If **Activity** says **Checkin** and the ring is gray, no pings have arrived for that session. Check that the worker is checked in on their phone, that location is allowed for the Cooper app, and that the phone has a data connection.
### I selected someone but no path appears
A path needs location pings. A session with only a check-in location shows a pin and no line.
### The list shows more people than the map
**Recent only** narrows the list but not the map, and sessions without a location appear only in the list. Also check the page number: the map shows the pins for the current page of 50 sessions.
### The map shows a 'Mapbox Map Not Available' message
The map service could not load in your browser. Cooper shows a simpler fallback map with the latest locations underneath the message. Refresh the page; if it keeps happening, report it to your admin.
## For AI agents
There is no MCP tool that returns live map coordinates or location pings. The Map is a screen for people.
To answer questions about who is or was clocked in, where they checked in, and their sessions, use the work-session tools:
| Tool | Use it for | Key parameters |
|---|---|---|
| `ws_browse` | List and search work sessions. Each session includes team member, project, check-in and check-out times, check-in method, address and battery level, duration, and status. | `teamMember` (name, email or Human ID), `project` (name or ID), `status` (`in_progress`, `completed`, `flagged`, `approved`, `in_timesheet`, `paid`, `excluded`), `dateFrom`, `dateTo` |
Common patterns:
- "Who is on site at Riverside right now?" → `ws_browse({ project: "Riverside", status: ["in_progress"] })`.
- "Where did Maria check in today?" → `ws_browse({ teamMember: "Maria", dateFrom: "", dateTo: "" })` and read the check-in address.
If the user wants to see the live position or the path a worker took, send them to **Connect** → **Map** (`/connect/team-member-map`) and tell them to click the person. The Map needs the **Connect** → **Map** permission; if the user can't see it, tell them to ask an admin to grant it.
## Related
- [Humans](https://docs.cooperbuild.ai/connect/humans.md) — the team members whose names and photos appear on the pins.
- [Teams](https://docs.cooperbuild.ai/connect/teams.md) — group the people you track.
- [Phone](https://docs.cooperbuild.ai/connect/phone.md) — call or text a team member you found on the map.
---
# Inbox
> Read, search, send and reply to email from your own connected Gmail or Outlook mailbox inside Cooper, and link threads to projects, tasks, humans and organizations.
Source: https://docs.cooperbuild.ai/connect/inbox
Keywords: email, inbox, gmail, outlook, microsoft 365, office 365, mailbox, compose, reply, forward, drafts, attachments, email signature, connect email, oauth, hold, needs attention
Inbox is your personal email inside Cooper. You connect your own Gmail or Microsoft 365 (Outlook) mailbox once, and then you can read, search, write, reply to and forward email without leaving Cooper. Every thread can be linked to a project, a project task, a human or an organization, so your teammates find the conversation where the work happens.
Inbox only ever shows mailboxes **you** connected. Nobody else in your company can open your Inbox, and you can't open theirs.
> **Note: Inbox is not Mail**
>
> **Inbox** (this page) is your own email account. **Mail** is the company's shared register of incoming letters, packages and notices, with owners and due dates. They are separate features. See [Mail](https://docs.cooperbuild.ai/connect/mail.md). The envelope button titled **Mail** in the top bar opens a quick view of your **Inbox**, not the Mail register.
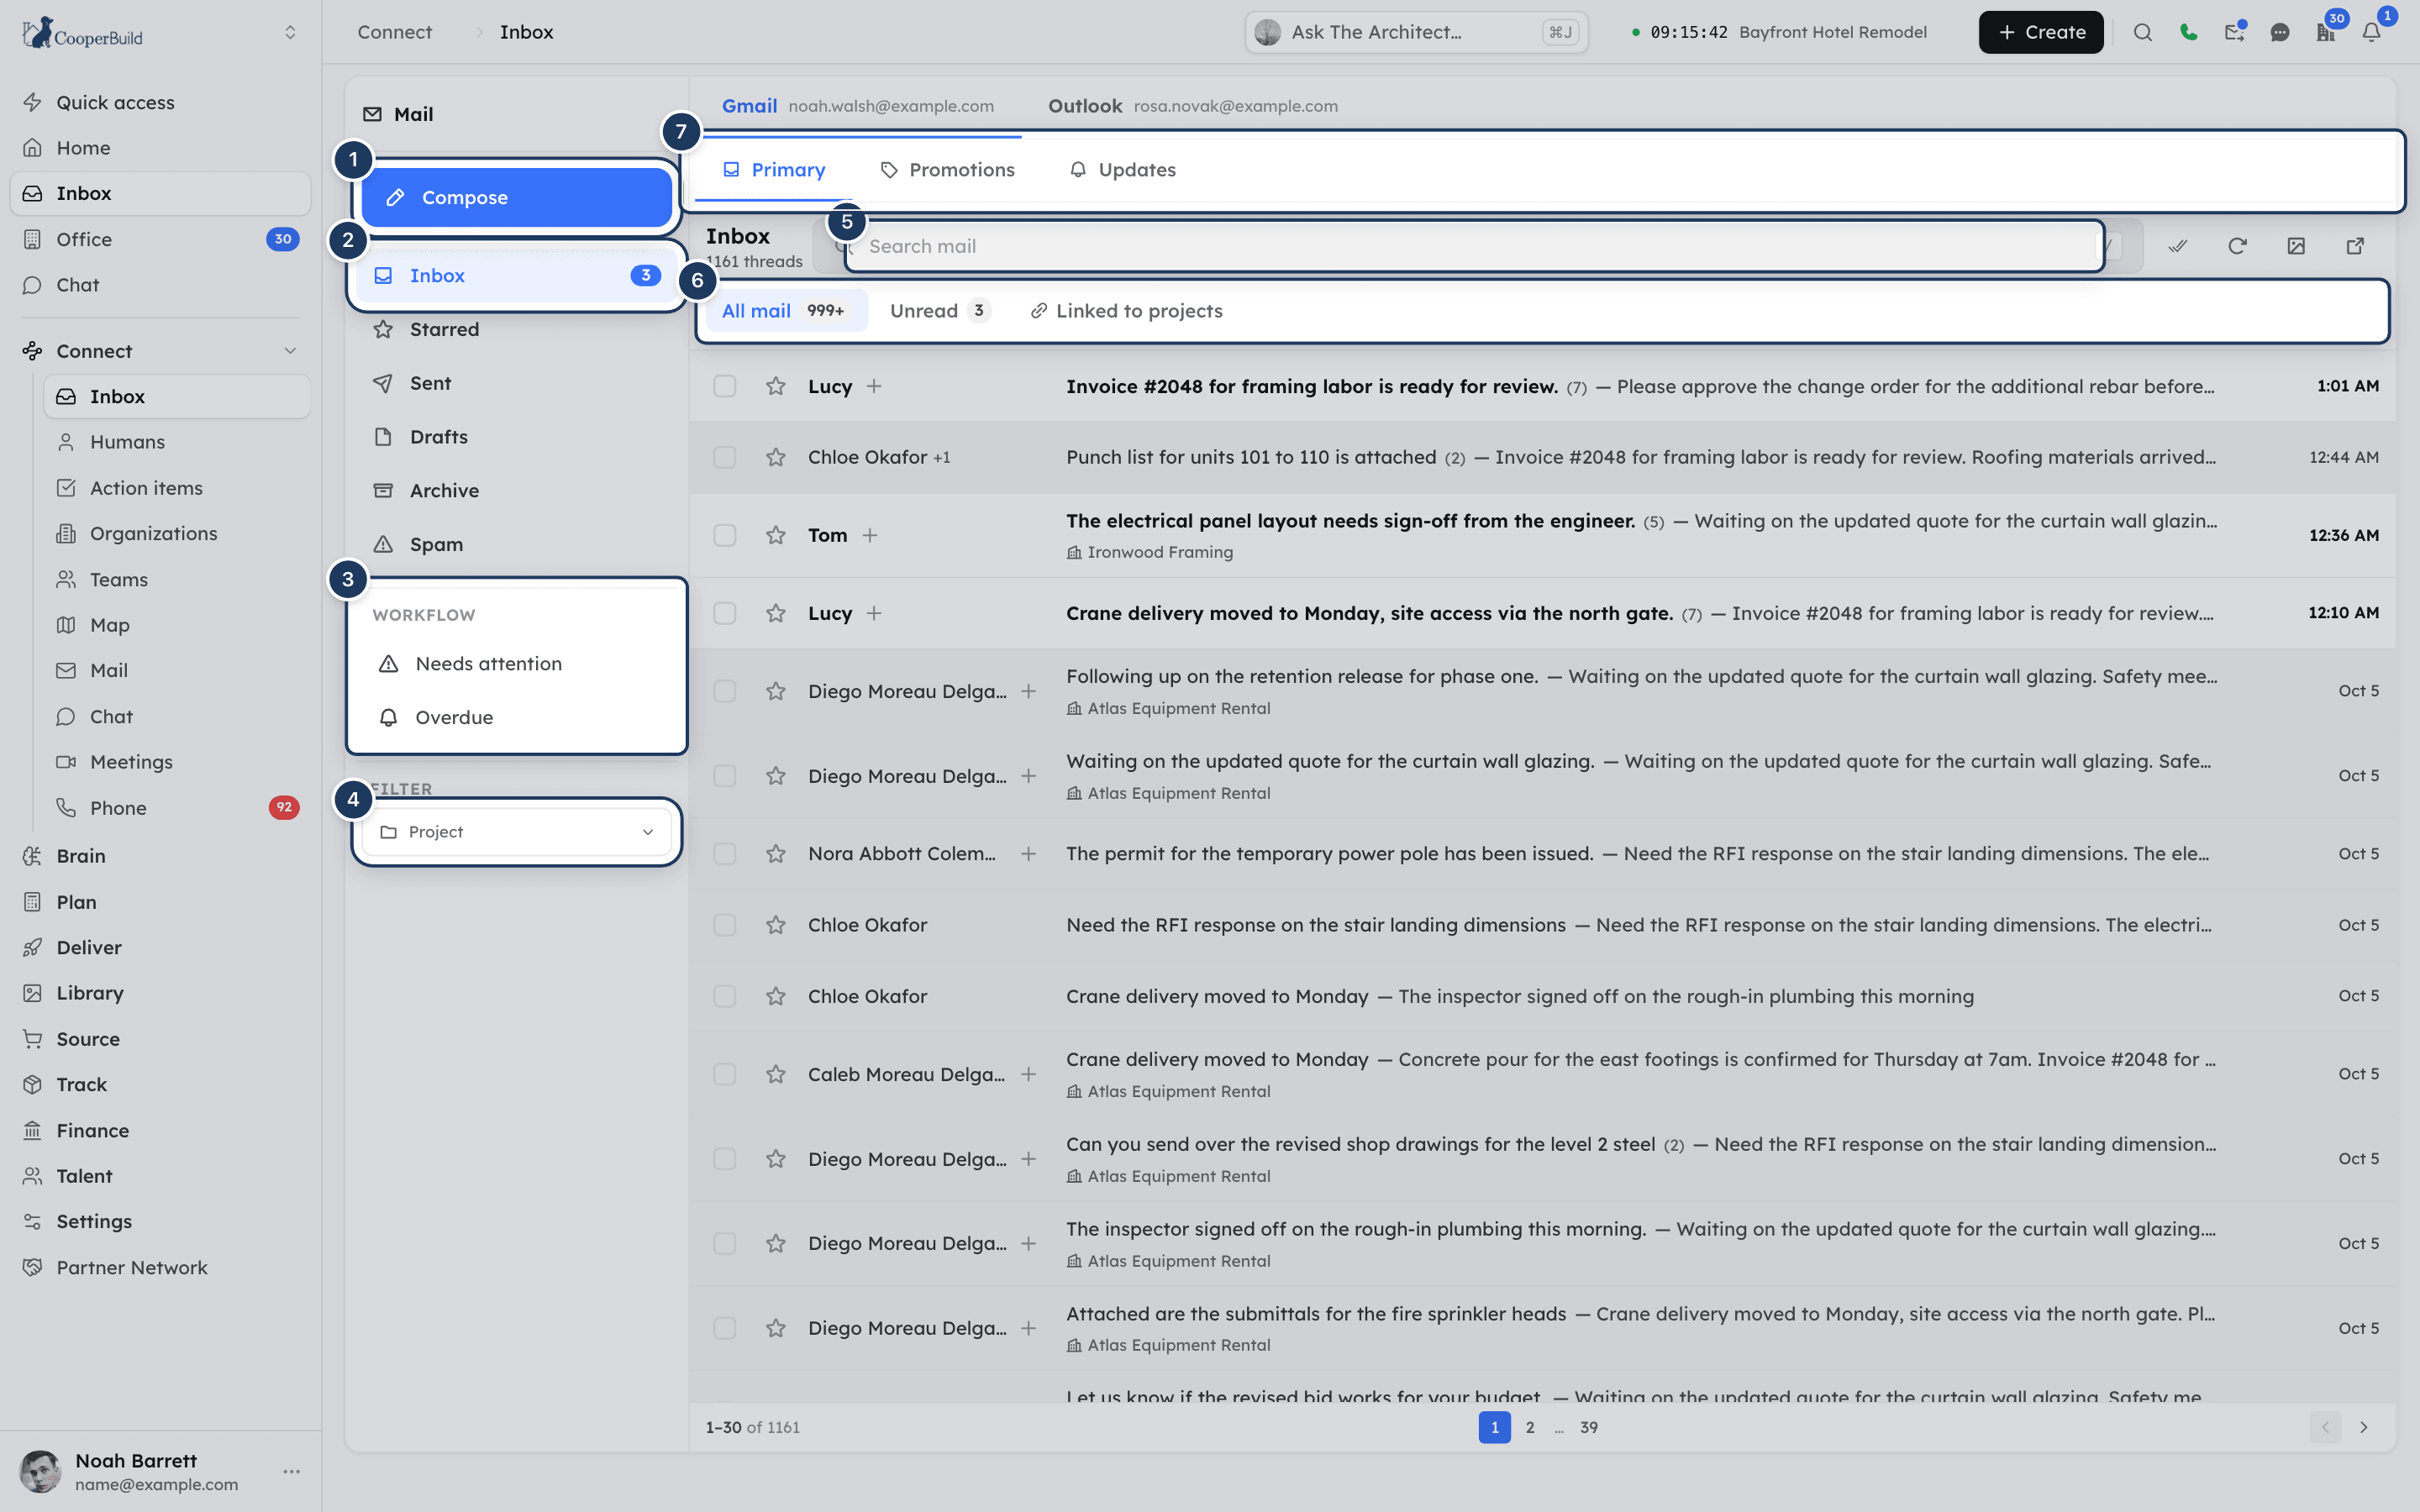
*Screenshot: The Inbox. 1: Compose, 2: folders, 3: Workflow views, 4: project filter, 5: search, 6: list tabs, 7: Primary, Promotions and Updates.*
## Key concepts
| Term | What it means |
|---|---|
| **Mailbox** | A Gmail or Microsoft 365 (Outlook) account you connected to Cooper. You can connect one of each. |
| **Default mailbox** | When you have both Gmail and Outlook connected, the one used for automatic emails Cooper sends on your behalf. |
| **Thread** | A conversation: an email and all its replies, shown as one row in the list. |
| **Folder** | **Inbox**, **Starred**, **Sent**, **Drafts**, **Archive** or **Spam** in the left sidebar. |
| **Category** | **Primary**, **Promotions** or **Updates** — the tabs above the list in the Inbox folder. |
| **Hold** | A flag that says "this email matters but I can't act on it yet", with a reason, an optional date and a next action. Held emails appear under **Needs attention**. |
| **Project assignment** | A thread linked to a project. Cooper can assign projects automatically using routing rules and AI matching. |
| **Task link** | A thread linked to one specific project task. Its attachments are saved to the task. |
| **CRM link** | A thread linked to a human (contact) and/or an organization in Cooper. |
| **Email #** | A reference number Cooper gives a thread. You can copy it from the open thread. |
## Open the Inbox
- In the sidebar, open **Connect** and click **Inbox**. The address is `/connect/gmail`.
- For a quick look without leaving the page you're on, click the envelope button titled **Mail** in the top bar. It shows your latest threads with **All** and **Unread** tabs and a **Mark all as read** button.
- To keep your email in its own browser window, click the **Open inbox in a separate window** button (the arrow-out icon) at the top of the thread list.
- A project's own inbox is in the project workspace. It shows threads assigned to that project, with a **Project** / **All Mail** switch in the sidebar.
Everyone in your company can open Inbox. It needs no special permission because it only shows your own mailboxes.
## Connect your Gmail or Outlook mailbox
You can connect from two places: the Inbox itself (when nothing is connected yet), or your profile settings.

*Screenshot: Before you connect. 1: Continue with Google, 2: Continue with Microsoft.*
### Step 1: Start the connection
Do one of the following:
- Open **Connect → Inbox**. If no mailbox is connected, you see **Connect your email**.
- Or open your profile settings, click **Email Signature** (`/auth/profile-settings/email`), and use the **Email account** card.
### Step 2: Choose your provider
Click **Continue with Google** for Gmail or Google Workspace, or **Continue with Microsoft** for Microsoft 365 or Outlook.com. The **Continue with Microsoft** button appears only when Microsoft sign-in is turned on for your Cooper workspace.
### Step 3: Sign in and approve
A new browser tab opens with Google's or Microsoft's sign-in page. Sign in with the mailbox you want to connect and approve the access Cooper asks for.
### Step 4: Return to Cooper
When the connection succeeds, Cooper shows a message such as **Gmail connected: you@company.com**. Cooper then imports your recent mail and keeps the mailbox in sync from then on. New email appears in the Inbox automatically.
> **Warning: Microsoft 365: admin approval**
>
> Some organizations require an IT admin to approve Cooper before anyone can connect a Microsoft 365 mailbox. If yours does, Cooper shows **Admin approval required**. Click **Copy admin approval link** and send the link to your IT admin. When the admin approves, Cooper shows **Your organisation approved Cooper — Microsoft 365 mailboxes can now connect.** Then connect again.
## Connect both Gmail and Outlook
You can connect one Gmail mailbox and one Outlook mailbox at the same time.
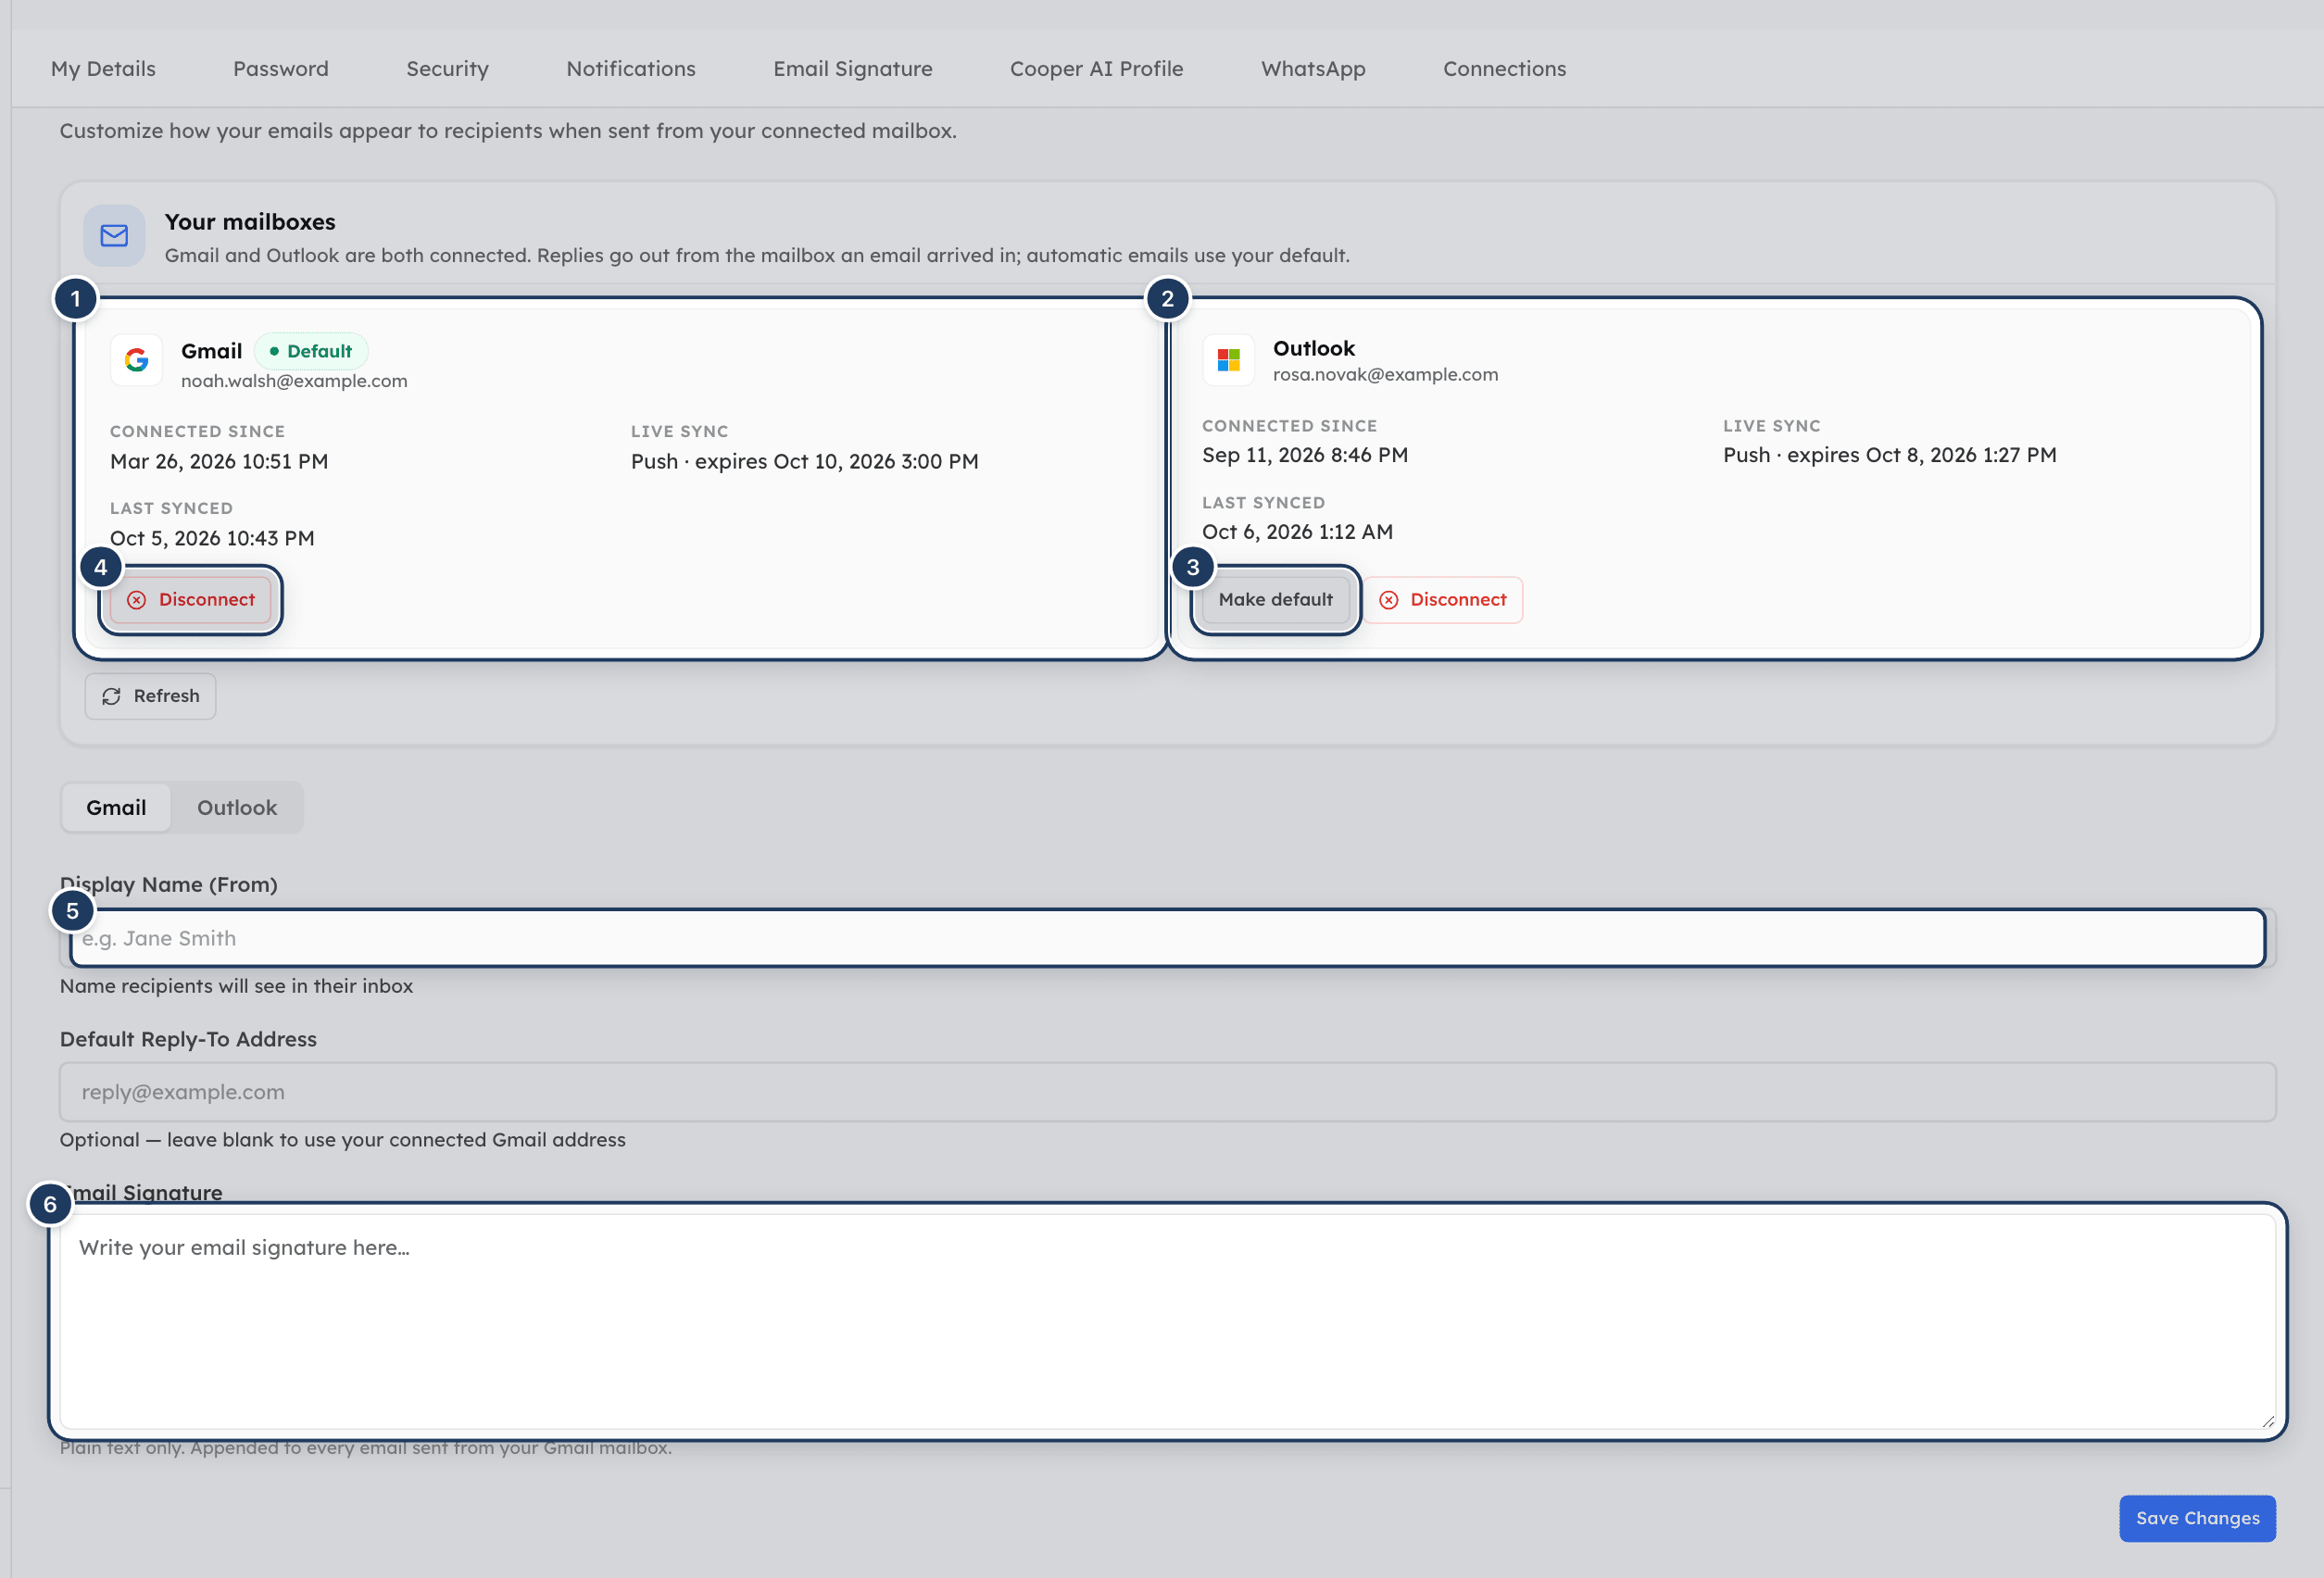
*Screenshot: Email Signature settings. 1: connected mailbox, 2: connect a second mailbox, 3: Disconnect, 4: display name, 5: signature.*
1. Open your profile settings and click **Email Signature**.
2. In **Your mailboxes**, find the empty card for the provider you haven't connected, and click **Connect Gmail** or **Connect Outlook**.
3. Sign in and approve, as for your first mailbox.
With two mailboxes connected:
- The Inbox shows **Gmail** and **Outlook** tabs above the thread list. Each tab shows only that mailbox. Cooper remembers the tab you used last.
- A new email is sent from the mailbox whose tab is open. The composer shows **From** and the address.
- A reply always goes out from the mailbox the thread arrived in.
- Each mailbox has its own display name, reply-to address and signature.
## Choose your default mailbox
When both mailboxes are connected, one is marked **Default**. Cooper uses the default mailbox for automatic emails it sends for you.
1. Open your profile settings and click **Email Signature**.
2. On the mailbox card you want, click **Make default**.
Cooper confirms with **Gmail is now your default mailbox** (or Outlook).
## Check your mailbox connection
Each connected mailbox card in **Your mailboxes** shows:
| Detail | What it means |
|---|---|
| **Connected since** | When you connected the mailbox. |
| **Live sync** | **Push** means new mail arrives instantly (with the date the push subscription renews). **Polling** means Cooper checks for new mail on a schedule. |
| **Last synced** | The last time Cooper received changes from the mailbox. |
Click **Refresh** to reload the connection status.
## Read your email
1. Open **Connect → Inbox**.
2. Pick a folder in the left sidebar: **Inbox**, **Starred**, **Sent**, **Drafts**, **Archive** or **Spam**. The **Inbox** folder shows a count of unread threads.
3. In the **Inbox** folder, choose a category tab: **Primary**, **Promotions** or **Updates**.
4. Click a thread to open it. The thread opens on the right and is marked as read, both in Cooper and in your mailbox.
In an open thread:
- The newest message is on top and expanded. Click an older message to expand or collapse it.
- Each message shows the sender, the time and the first recipients (**to …**, **+N more**).
- The header shows the subject, the **Email #** reference, the number of messages, and the mailbox the thread belongs to.
- Remote images in the email are loaded through Cooper, so logos hosted on services such as Google Drive still display.
- Click the back arrow (**Back to inbox**) to close the thread.
The list shows 30 threads per page. Use the page numbers and the **Previous page** and **Next page** arrows at the bottom. Click **Refresh** to reload the list.
## Filter the thread list
Above the list, three tabs narrow what you see:
| Tab | Shows |
|---|---|
| **All mail** | Every thread in the current folder and category. |
| **Unread** | Only threads with unread messages. |
| **Linked to projects** | Only threads assigned to a project. |
You can also filter by project. In the sidebar under **Filter**, click **Project**, search for a project, and pick it. A chip with the project name appears. Click the **×** on the chip to clear the filter.
## Search your email
1. Click the **Search mail** box above the list, or press **/** on your keyboard.
2. Type a word or address. Cooper searches subjects, participants' email addresses and message previews.
3. Press **Esc** to leave the search box. Press **Esc** again, or click the clear button, to clear the search.
If nothing matches, the list shows **No results found** and **Try a different search term**.
## Write a new email
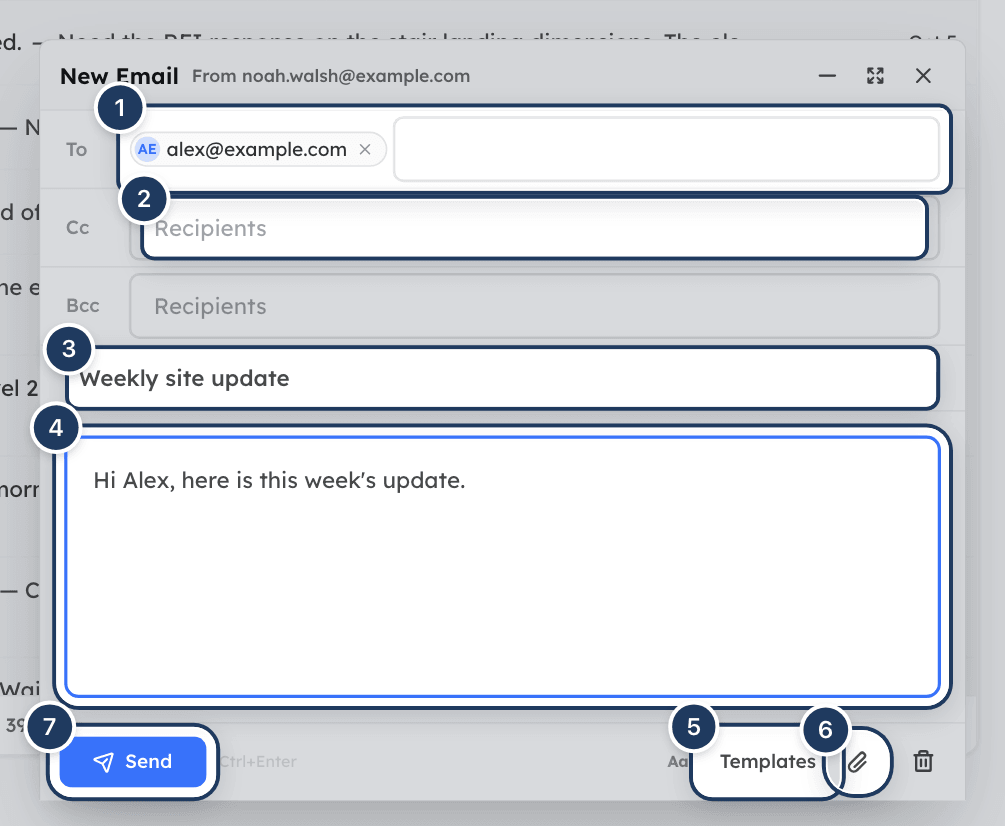
*Screenshot: The composer. 1: To, 2: Cc/Bcc, 3: Subject, 4: message, 5: templates, 6: attach files, 7: Send.*
### Step 1: Open the composer
Click **Compose** at the top of the sidebar. A **New Email** window opens at the bottom right.
### Step 2: Add recipients
In **To**, type a name or email address. Cooper suggests humans from your contacts who have an email address. Pick one with the mouse or the arrow keys, or finish an address with **Enter**, **Tab**, a comma or a semicolon. Each recipient becomes a chip. Click **Cc/Bcc** to add copy and blind-copy recipients.
### Step 3: Write the subject and message
Type the **Subject** and the message. The message editor supports formatting. To write plain text instead, click the **Aa** button (**Plain text mode**). Click the `` button (**Rich text mode**) to switch back.
### Step 4: Add attachments (optional)
Click the paperclip (**Attach files**) and choose one or more files. Each file can be up to 20 MB. The total size shows under the attachments.
### Step 5: Send
Click **Send**. In plain text mode you can also press **Ctrl+Enter**. Cooper confirms with **Email sent**.
The composer window has three buttons in its header: **Minimize**, **Full screen** (or **Exit full screen**), and **Save & close**.
## Use an email template
1. In the composer, click the template button (**Use an email template**) in the bottom toolbar.
2. Search your templates and pick one. Templates come from your company's Template Hub.
3. The template fills in the subject and message.
A branded template keeps its layout and shows a preview with the note **Template formatting is preserved.** To edit the text freely without the branded layout, switch to plain text mode.
## Save and continue drafts
Cooper saves your email as a draft automatically while you write. The composer header shows **Saving…** and then **Saved to Drafts**.
- Click **Save & close** (the **×**) to close the composer. The draft stays in **Drafts**.
- To continue a draft, open the **Drafts** folder and click it. It opens in the composer as **Edit Draft**. When you send it, the draft is removed.
- Drafts you saved directly in Gmail or Outlook also appear in **Drafts**.
- To throw an email away, click **Discard** (the trash icon) in the composer. This also deletes its saved draft.
## Reply to an email
1. Open the thread.
2. At the bottom, click **Reply to** followed by the sender's name.
3. Write your reply. To copy in more people, click **Cc** and type addresses separated by commas.
4. Click **Send reply**, or press **Ctrl+Enter**.
Cooper confirms with **Reply sent**. The reply is sent from the mailbox the thread arrived in. If the latest message in the thread is one you sent, the reply goes to the people you wrote to, not to yourself.
The reply box writes plain text. To discard the reply, click **Discard** or press **Esc**.
## Reply to everyone
1. Open the thread.
2. Click the **Reply All** button next to the reply box, or click **Reply All** inside an open reply.
3. Write your reply and click **Send to all**.
Reply All sends to the sender and everyone on the latest message's To and Cc lines. Your own addresses (Gmail and Outlook) are always left out.
## Forward an email
1. Open the thread.
2. Click the **Forward** button next to the reply box.
3. A **Forward** window opens. The subject starts with **Fwd:** and the message contains a **Forwarded message** header and the text of the latest message.
4. Enter the recipients in **To**, or use **Add From CRM** to search people by name or email.
5. Click **Send**.
The forward contains the latest message's text. Attachments from the original message aren't added automatically. Attach them yourself if the recipient needs them.
## Send and receive attachments
**Attachments you receive** appear under each message as chips with the file name and size. Hover over a chip to see its buttons:
- **Open in new tab** — for PDFs, images, video, audio and text files.
- **Download** — for any file.
Images that are part of the email body are shown in place and aren't listed again as attachments.
**Attachments you send** can be added to new emails, replies and forwards with the paperclip button. Each file can be up to 20 MB. A file that's too large shows an error such as **"plans.pdf" is too large (max 20 MB).**
To store a thread's attachments in a project, link the thread to a task (see below). Cooper saves the attachments to the task.
## Star, archive and trash threads
| Action | How | What happens |
|---|---|---|
| **Star** | Click the star on a row, or **Star for follow-up** in an open thread. | The thread appears in **Starred**. Click again to unstar. |
| **Archive** | Hover over a row and click **Archive**, or click **Archive** in an open thread. | The thread moves to **Archive**. To move it back, open it from **Archive** and click **Archive** again. |
| **Move to trash** | Hover over a row and click **Move to trash**, or click it in an open thread. | The thread leaves the list. |
Star, archive, trash and read changes are applied in your Gmail or Outlook mailbox as well.
Cooper has no Trash folder, so you can't restore a trashed thread from Cooper.
## Act on several threads at once
1. Tick the checkbox at the start of each thread you want. The bulk bar shows how many are selected. Use its checkbox to select or clear every thread on the page.
2. Click **Mark read**, **Archive** or **Trash**.
Cooper confirms, for example **3 threads archived.**
To mark every unread thread on the current page as read, click the **Mark all as read** button (double check mark) at the top of the list.
## Hold an email that needs attention
Use a hold when an email matters but you can't act on it yet — for example while you wait for information or a date.
### Step 1: Open the hold panel
Hover over a row and click **Set aside for attention**, or click **Hold** in an open thread. The **Hold Email** panel opens.
### Step 2: Fill in the hold
- **Reason**: **Waiting on info**, **Waiting on date**, **Needs review**, **Future task** or **Other**.
- **Hold until**: the date and time you expect to act (optional).
- **Next action**: what should happen when it's ready (optional).
- **Note**: why you're holding it (optional).
### Step 3: Save the hold
Click **Hold email**. Cooper confirms with **Thread held.**
A held thread shows a chip with the reason and its due state: a date, **Due today**, **Overdue** or **No date**. Overdue holds are shown in red.
- To see held threads, click **Needs attention** under **Workflow** in the sidebar. Click **Overdue** to see only overdue holds. Click the same item again to go back to the normal list.
- To change a hold, click the chip, or click **Edit hold** in the open thread, then click **Update hold**.
- To release a hold, hover over the chip in the open thread and click **Release hold** (the **×**). Cooper confirms with **Thread released from hold.**
- Linking the thread to a task releases its hold automatically.
## Link an email to a project task
Linking a thread to a task puts the conversation, and its attachments, on that task.
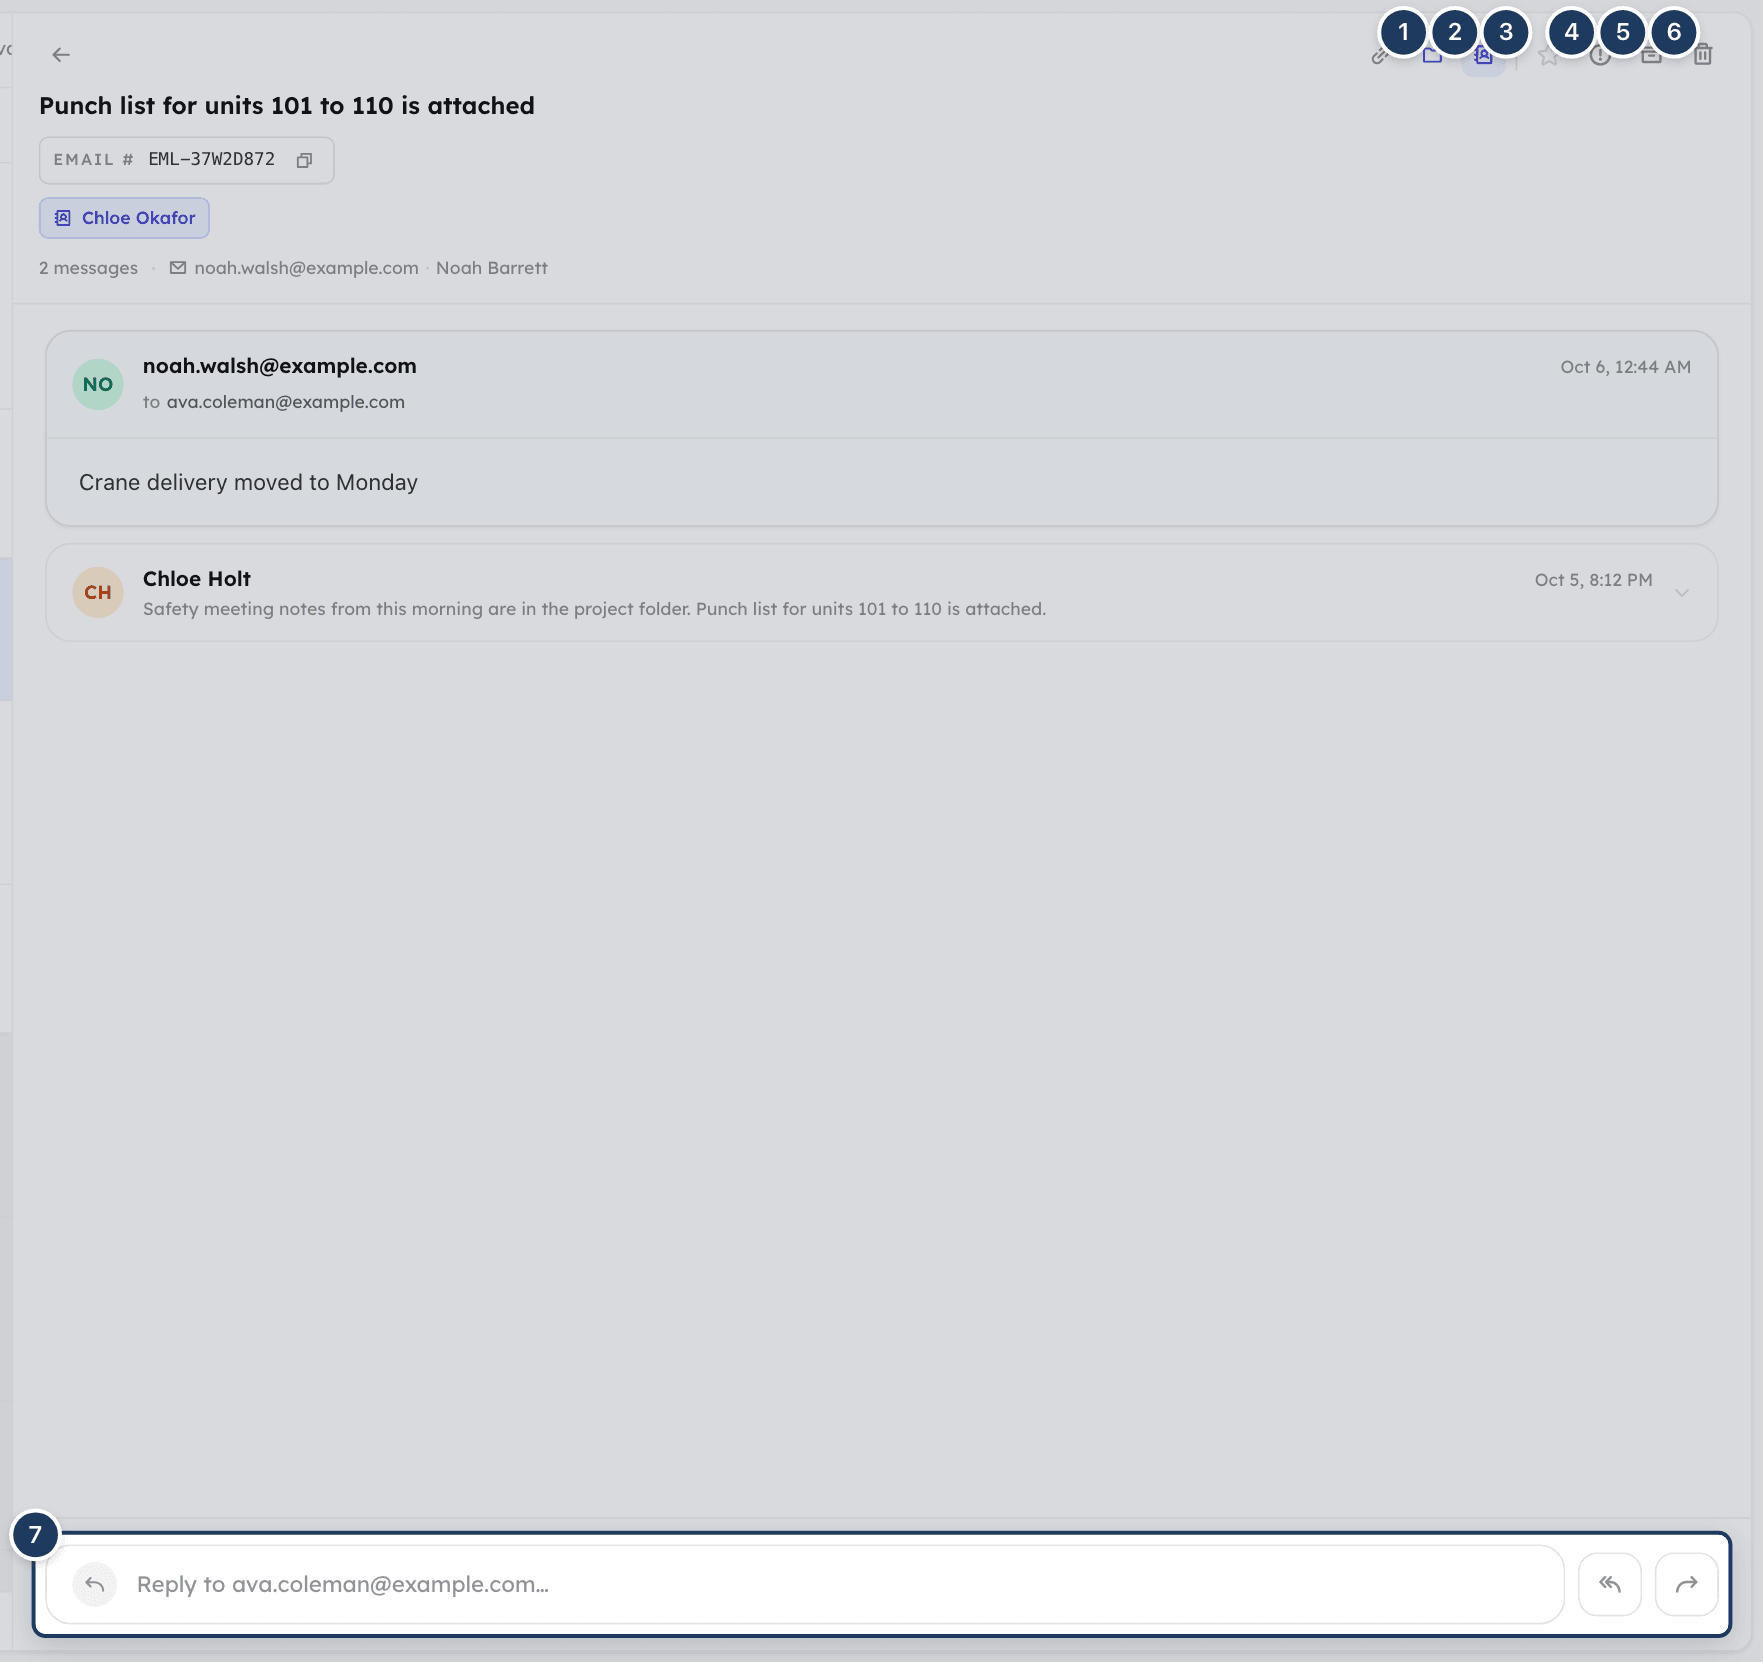
*Screenshot: An open thread. 1: Link to Task, 2: Assign to Project, 3: Create contact, 4: Star, 5: Hold, 6: Archive and Move to trash, 7: reply, Reply All and Forward.*
### Step 1: Open the panel
Open the thread and click the link button (**Link to Task**) in the toolbar. The **Link to Project Task** panel opens.
### Step 2: Pick the project and task
Search for and select the **Project**, then the **Task**. Tasks are grouped by deliverable and show their code and status.
### Step 3: Decide whether to share
Turn on **Share with team** to post an activity to the project feed so teammates can see the email is linked.
### Step 4: Link it
Click **Link Thread**. Cooper shows **Thread linked!** and how many attachments were saved to the task.
The thread then shows a green chip with the project and task names, and the toolbar button reads **Linked to Task**. Click the chip to change the link.
## Assign an email to a project
You can assign a thread to a project without picking a task.
### Step 1: Choose the project
Open the thread and click **Assign to Project** (the folder button). Search for and select the project, then click **Assign to Project**.
### Step 2: Create a routing rule (optional)
Cooper asks **Create a routing rule?** so future emails go to the same project automatically. Choose one:
- **Subject contains a keyword** — any email whose subject contains a keyword or phrase you enter. You can tick **Only from** to limit it to this sender or domain.
- **This sender only** (shown as the sender's address) — only emails from this exact address.
- **Any @domain email** — all emails from the sender's domain. Not offered for personal domains such as gmail.com or outlook.com.
Click **Create Rule**, or **Just this once** to skip the rule.
To remove the assignment, hover over the project chip in the open thread and click **Remove project assignment**. Cooper then asks whether to block the sender from being auto-routed to that project again. Click **Block sender** or **Dismiss**.
## How Cooper assigns projects automatically
When new email arrives, Cooper tries to assign it to a project:
1. **Routing rules** — rules you created (sender, domain or subject keyword) are checked first.
2. **AI matching** — if no rule decides, Cooper's AI compares the subject and preview with your company's active projects and assigns the best match when it's confident enough. AI matching only runs if your company has AI set up for email classification.
Threads assigned by AI show **AI matched · N% confident** when open. In the list, a lower-confidence match shows **Review match · N%** so you can check it. If the match is wrong, remove the project assignment and block the sender.
In a project's inbox, you can also click **Not Project-Related** on a thread. Cooper flags it, removes it from the project's list, and creates a sender rule so similar email isn't routed there again. Such threads show **Not project-related**.
## Link an email to a human or organization
Cooper automatically links a thread to an existing human or organization when it recognizes the sender — for example by email address or company domain. It never creates contacts on its own.
**If the sender isn't in Cooper yet**, create the contact from the email:
1. Click the **+** (**Create contact**) next to the sender's name in the list, or in the open thread's toolbar.
2. Click **Create human** or **Create org**.
Cooper creates the record from the sender's details and links it to the thread. You see **Human contact created** or **Organisation created**.
**If the thread is already linked**, the toolbar shows **CRM Linked** and a chip with the organization and contact names. To change the link:
1. Click the chip or **CRM Linked**. The **Link to CRM** panel opens.
2. Search for a **Contact** and/or an **Organization**, or remove the current ones.
3. Click **Save Link**.
## Copy the email number
Each thread has an **Email #** shown under the subject. Click it to copy the number to your clipboard. Cooper confirms with **Email number copied**. Use the number to refer to the email elsewhere in Cooper or when asking an AI agent about it.
## Set your display name, reply-to address and signature
1. Open your profile settings and click **Email Signature**.
2. If you have Gmail and Outlook connected, pick the **Gmail** or **Outlook** tab.
3. Fill in the fields (see the table below).
4. Click **Save Changes**.
| Field | What it does |
|---|---|
| **Display Name (From)** | The name recipients see in their inbox. |
| **Default Reply-To Address** | Optional. Where replies go. Leave blank to use your connected address. |
| **Email Signature** | Plain text only. Added to every email sent from that mailbox. |
## Add an inbox wallpaper
You can put your own picture behind the Inbox.
1. Click **Add inbox wallpaper** (the picture icon) at the top of the thread list.
2. Choose a JPG, PNG, WebP, AVIF or HEIC image up to 12 MB.
Cooper confirms with **Inbox wallpaper updated.** To change it, click **Change inbox wallpaper**. To remove it, click **Remove inbox wallpaper** (the **×** next to it). The wallpaper is only visible to you.
## Disconnect a mailbox
1. Open your profile settings and click **Email Signature**.
2. On the mailbox card, click **Disconnect**.
3. In **Disconnect Gmail** (or **Disconnect Microsoft 365**), read the warning — **This will stop receiving inbound emails for this account.** — and click **Disconnect**.
Cooper confirms with **Gmail account disconnected** (or Microsoft 365). If you had two mailboxes, the remaining one becomes your default.
## Keyboard shortcuts
| Key | Where | Action |
|---|---|---|
| **/** | Inbox list | Jump to the search box. |
| **Esc** | Search box | Leave the search box; press again to clear the search. |
| **Enter** or **Space** | Focused thread row | Open the thread. |
| **Ctrl+Enter** (**Cmd+Enter** on Mac) | Reply box, or composer in plain text mode | Send. |
| **Esc** | Reply box | Discard the reply. |
| **Enter**, **Tab**, **,** or **;** | Recipient field | Add the typed address as a recipient. |
| **Backspace** | Empty recipient field | Remove the last recipient. |
## Fields reference
**New Email composer**
| Field | Required | What it means |
|---|---|---|
| **To** | Yes | One or more recipients. Pick from contacts or type addresses. |
| **Cc** | No | Copied recipients. Shown after you click **Cc/Bcc**. |
| **Bcc** | No | Blind-copied recipients. Shown after you click **Cc/Bcc**. |
| **Subject** | No | The subject line. |
| Message | Yes | The body. Rich text by default, or plain text. |
| Attachments | No | Files up to 20 MB each. |
**Hold Email panel**
| Field | Required | What it means |
|---|---|---|
| **Reason** | Yes | Waiting on info, Waiting on date, Needs review, Future task, or Other. Defaults to Waiting on info. |
| **Hold until** | No | When you expect to act. Holds past this date count as **Overdue**. |
| **Next action** | No | What should happen when the email is ready. |
| **Note** | No | Why the email is being held. |
**Link to Project Task panel**
| Field | Required | What it means |
|---|---|---|
| **Project** | Yes | The project the task belongs to. |
| **Task** | Yes | The task to link the thread to. |
| **Share with team** | No | Posts an activity to the project feed. |
## Permissions
- **Everyone** can open Inbox and connect their own mailboxes. No role permission is needed.
- **You only see your own mail.** Inbox lists threads from mailboxes you connected. Opening, replying to or changing a thread that belongs to someone else's mailbox is refused, even by an admin.
- A company **recruiting mailbox** (connected in Recruiting settings) is never anyone's personal Inbox.
## Tips and best practices
- Link vendor and client emails to the task they're about. Your team then sees the conversation and attachments on the task, not only in your mailbox.
- When you assign a thread to a project for the first time, create a routing rule. Use **Subject contains a keyword** for project codes, and **This sender only** for vendors who work on one project.
- Avoid **Any @domain email** rules for teammates or shared company domains — every email from that domain would be routed to the project.
- Use holds instead of leaving emails unread. **Needs attention** and **Overdue** give you a short, dated to-do list.
- If you connect both Gmail and Outlook, check the **From** line in the composer before you send.
## Troubleshooting
### The Inbox says Connect your email even though I connected before
Your connection may have expired or been revoked — for example after a password change, or if access was removed in your Google or Microsoft account. Connect the mailbox again with **Continue with Google** or **Continue with Microsoft**.
### I don't see Continue with Microsoft
Microsoft sign-in isn't turned on for your Cooper workspace. Ask your Cooper administrator. Until then you can connect a Gmail or Google Workspace mailbox.
### Microsoft says admin approval is required
Your organization requires an IT admin to approve Cooper first. Click **Copy admin approval link** in the message and send it to your IT admin. When they approve it, connect again.
### That mailbox is already connected to a Cooper account
A mailbox can be connected to only one Cooper account. Disconnect it from the other account first, or connect a different mailbox.
### Cooper says my Microsoft account uses an address that is already my Gmail
The Microsoft account you signed in with uses your Gmail address, so its mail arrives in Gmail, not Outlook. Add an @outlook.com address to your Microsoft account, or use a work Microsoft 365 account, and connect again.
### Cooper says the address is my company's recruiting mailbox
That address is connected as the company recruiting mailbox (**Recruiting → Settings**), so it can't also be your personal Inbox. Connect your own email address instead.
### The sign-in link expired or was cancelled
If you see **That connection link expired** or **sign-in was cancelled**, start again from **Continue with Google** or **Continue with Microsoft** and finish the sign-in in one go.
### I can't see a colleague's email
That's by design. Inbox only shows mailboxes you connected yourself. Ask your colleague to link the thread to a project task or forward it to you.
### An email I expected isn't in the list
Check the other category tabs (**Promotions**, **Updates**) and folders (**Archive**, **Spam**). Check that **Unread** or **Linked to projects** isn't selected, and clear any search or project filter. If you have two mailboxes, check the other mailbox tab. Click **Refresh**.
### Send is greyed out or I get Please add at least one recipient email address
Add at least one recipient in **To** and write a message. Typed addresses become recipients only when they're valid email addresses — finish each with **Enter** or a comma.
### You're sending emails too quickly
Cooper limits how many emails you can send per minute. Wait a moment and send again.
### A file is too large to attach
Each attachment can be up to 20 MB. Compress the file, or share it from a Cooper folder instead.
### An email was assigned to the wrong project
Open the thread, hover over the project chip and click **Remove project assignment**. Then click **Block sender** so that sender isn't auto-routed to that project again. Assign the correct project with **Assign to Project**.
### Cooper doesn't assign projects automatically
Automatic assignment needs a routing rule that matches, or AI set up for your company. Create a rule the next time you assign a thread with **Assign to Project**. Ask your administrator whether AI email classification is set up.
## For AI agents
Agents work with the signed-in user's own connected mailboxes through the CooperBuild MCP server. An agent can never see another person's mailbox. These tools also require the **Mail** permission on the user's role.
| Tool | Use it to |
|---|---|
| `email_inbox_browse` | Read the user's inbox. Actions: `list` (filters such as `projectId`, `contactId`, `externalOrgId`, `hasProject`, `isRead`, `held`, `holdDue`, `emailNo`, `search`, `dateFrom`/`dateTo`, `mailbox`), `get` (one thread with all messages), `stats` (total, unread, project-linked, unlinked, held), `list_attachments`, `read_attachment` (extract text from PDF, DOCX or plain-text attachments), `search_gmail` (search the live mailbox: Gmail query syntax for Gmail, KQL for Outlook). |
| `email_inbox_manage` | Act on threads. Actions: `send`, `reply`, `save_attachments` (save to Media and a project folder), `mark_read`, `link_project` (pass `projectId: null` to unlink), `link_task` (with `shareActivity`), `link_submittal`, `link_crm`, `create_contact` (`contactType: "human"` or `"org"`), `flag_irrelevant`, `hold`, `update_hold`, `release_hold`. |
| `comm_send_email` | Send a one-off email to a contact or address, through the user's linked mailbox or the company's email service. |
Key rules:
- **Send safety.** `send` and `reply` default to `mode: "preview"`, which never sends. Show the user the exact recipients, subject and body, get explicit approval, then repeat the same call with `mode: "execute"` and the returned `confirmationToken`. The token is single-use, expires after 10 minutes and is bound to the exact content.
- **Two mailboxes.** If `send` returns `needsMailboxChoice`, ask the user "Gmail or Outlook?" and preview again with `mailbox` set. Never choose for them. A `reply` always leaves from the thread's own mailbox.
- **Holds.** Use `hold` (with `holdReason`: `waiting_on_info`, `waiting_on_date`, `needs_review`, `future_task`, `other`) for important but not-yet-actionable email. Don't create a task only because a thread is held. `link_task` releases an active hold automatically.
- **Ask before sharing.** Before `link_task`, ask the user whether to log an activity on the task (`shareActivity`).
Common errors:
| Error | Fix |
|---|---|
| `requiresSetup: true` | No mailbox is connected. Give the user the returned `setupUrl` and ask them to connect Gmail or Outlook. |
| **No mailbox is connected for your user. Please connect Gmail or Outlook in settings first.** | Same as above. |
| **Your Gmail access has been revoked or expired. Please reconnect your account in settings.** (or Outlook) | The user must reconnect the mailbox from **Email Signature** in profile settings. |
| **We could not find that email thread or it is not available to your Gmail account.** | The thread ID is wrong or belongs to someone else's mailbox. List threads again with `email_inbox_browse`. |
| **You're sending emails too quickly.** | Wait before sending again. |
## Related
- [Mail](https://docs.cooperbuild.ai/connect/mail.md) — the company register for incoming letters and packages, with owners and due dates. Not your personal email.
- [Humans](https://docs.cooperbuild.ai/connect/humans.md) — contacts you can link to email threads.
- [Organizations](https://docs.cooperbuild.ai/connect/organizations.md) — companies you can link to email threads.
- [Chat](https://docs.cooperbuild.ai/connect/chat.md) — internal messaging with your team.
- [Phone](https://docs.cooperbuild.ai/connect/phone.md) — calls and text messages.
---
# Mail
> Log every letter, package and notice your company receives, give each one an owner and a due date, and make sure nothing sits unanswered — the Mail register and its routing rules.
Source: https://docs.cooperbuild.ai/connect/mail
Keywords: mail sorter, mail register, mail log, incoming mail, physical mail, letters, packages, post, correspondence, tax notice, legal notice, government letter, routing rules, raci, unassigned mail, aging mail, escalate
Mail is your company's register of incoming correspondence. When a letter, package, legal notice or government notice arrives, someone logs it in Mail, attaches a scan or photo, and Cooper makes sure it has an owner, a due date and an outcome. Office admins and mail handlers log items; the people they're assigned to get notified and close them out.
Mail is built as a tracked queue, not a filing cabinet. Cooper shows what has **no owner**, what is **aging**, what is **due this week** and what is **overdue**, nudges owners every day, and escalates anything past its due date.
> **Note: Mail is not your Inbox**
>
> **Mail** (this page) is a shared register of items your company receives — mostly physical mail — with owners, due dates and statuses. It does not connect to an email account, and it does not receive email by itself. Your own Gmail or Outlook email is in [Inbox](https://docs.cooperbuild.ai/connect/inbox.md). The envelope button titled **Mail** in the top bar opens your Inbox, not this register.
| | **Mail** (this page) | **Inbox** |
|---|---|---|
| What's in it | Letters, packages, notices and other items your company receives, logged by hand | Email from your own Gmail or Outlook mailbox, synced automatically |
| Who sees it | Everyone with the **Mail** permission, company-wide | Only you |
| Ownership | Each item has an Accountable person and Responsible people (RACI) | Your own threads |
| Tracking | Status, priority, due date, aging, escalation | Read, starred, held, linked to projects |
| Sidebar | **Connect → Mail** (`/connect/mailsorter`) | **Connect → Inbox** (`/connect/gmail`) |
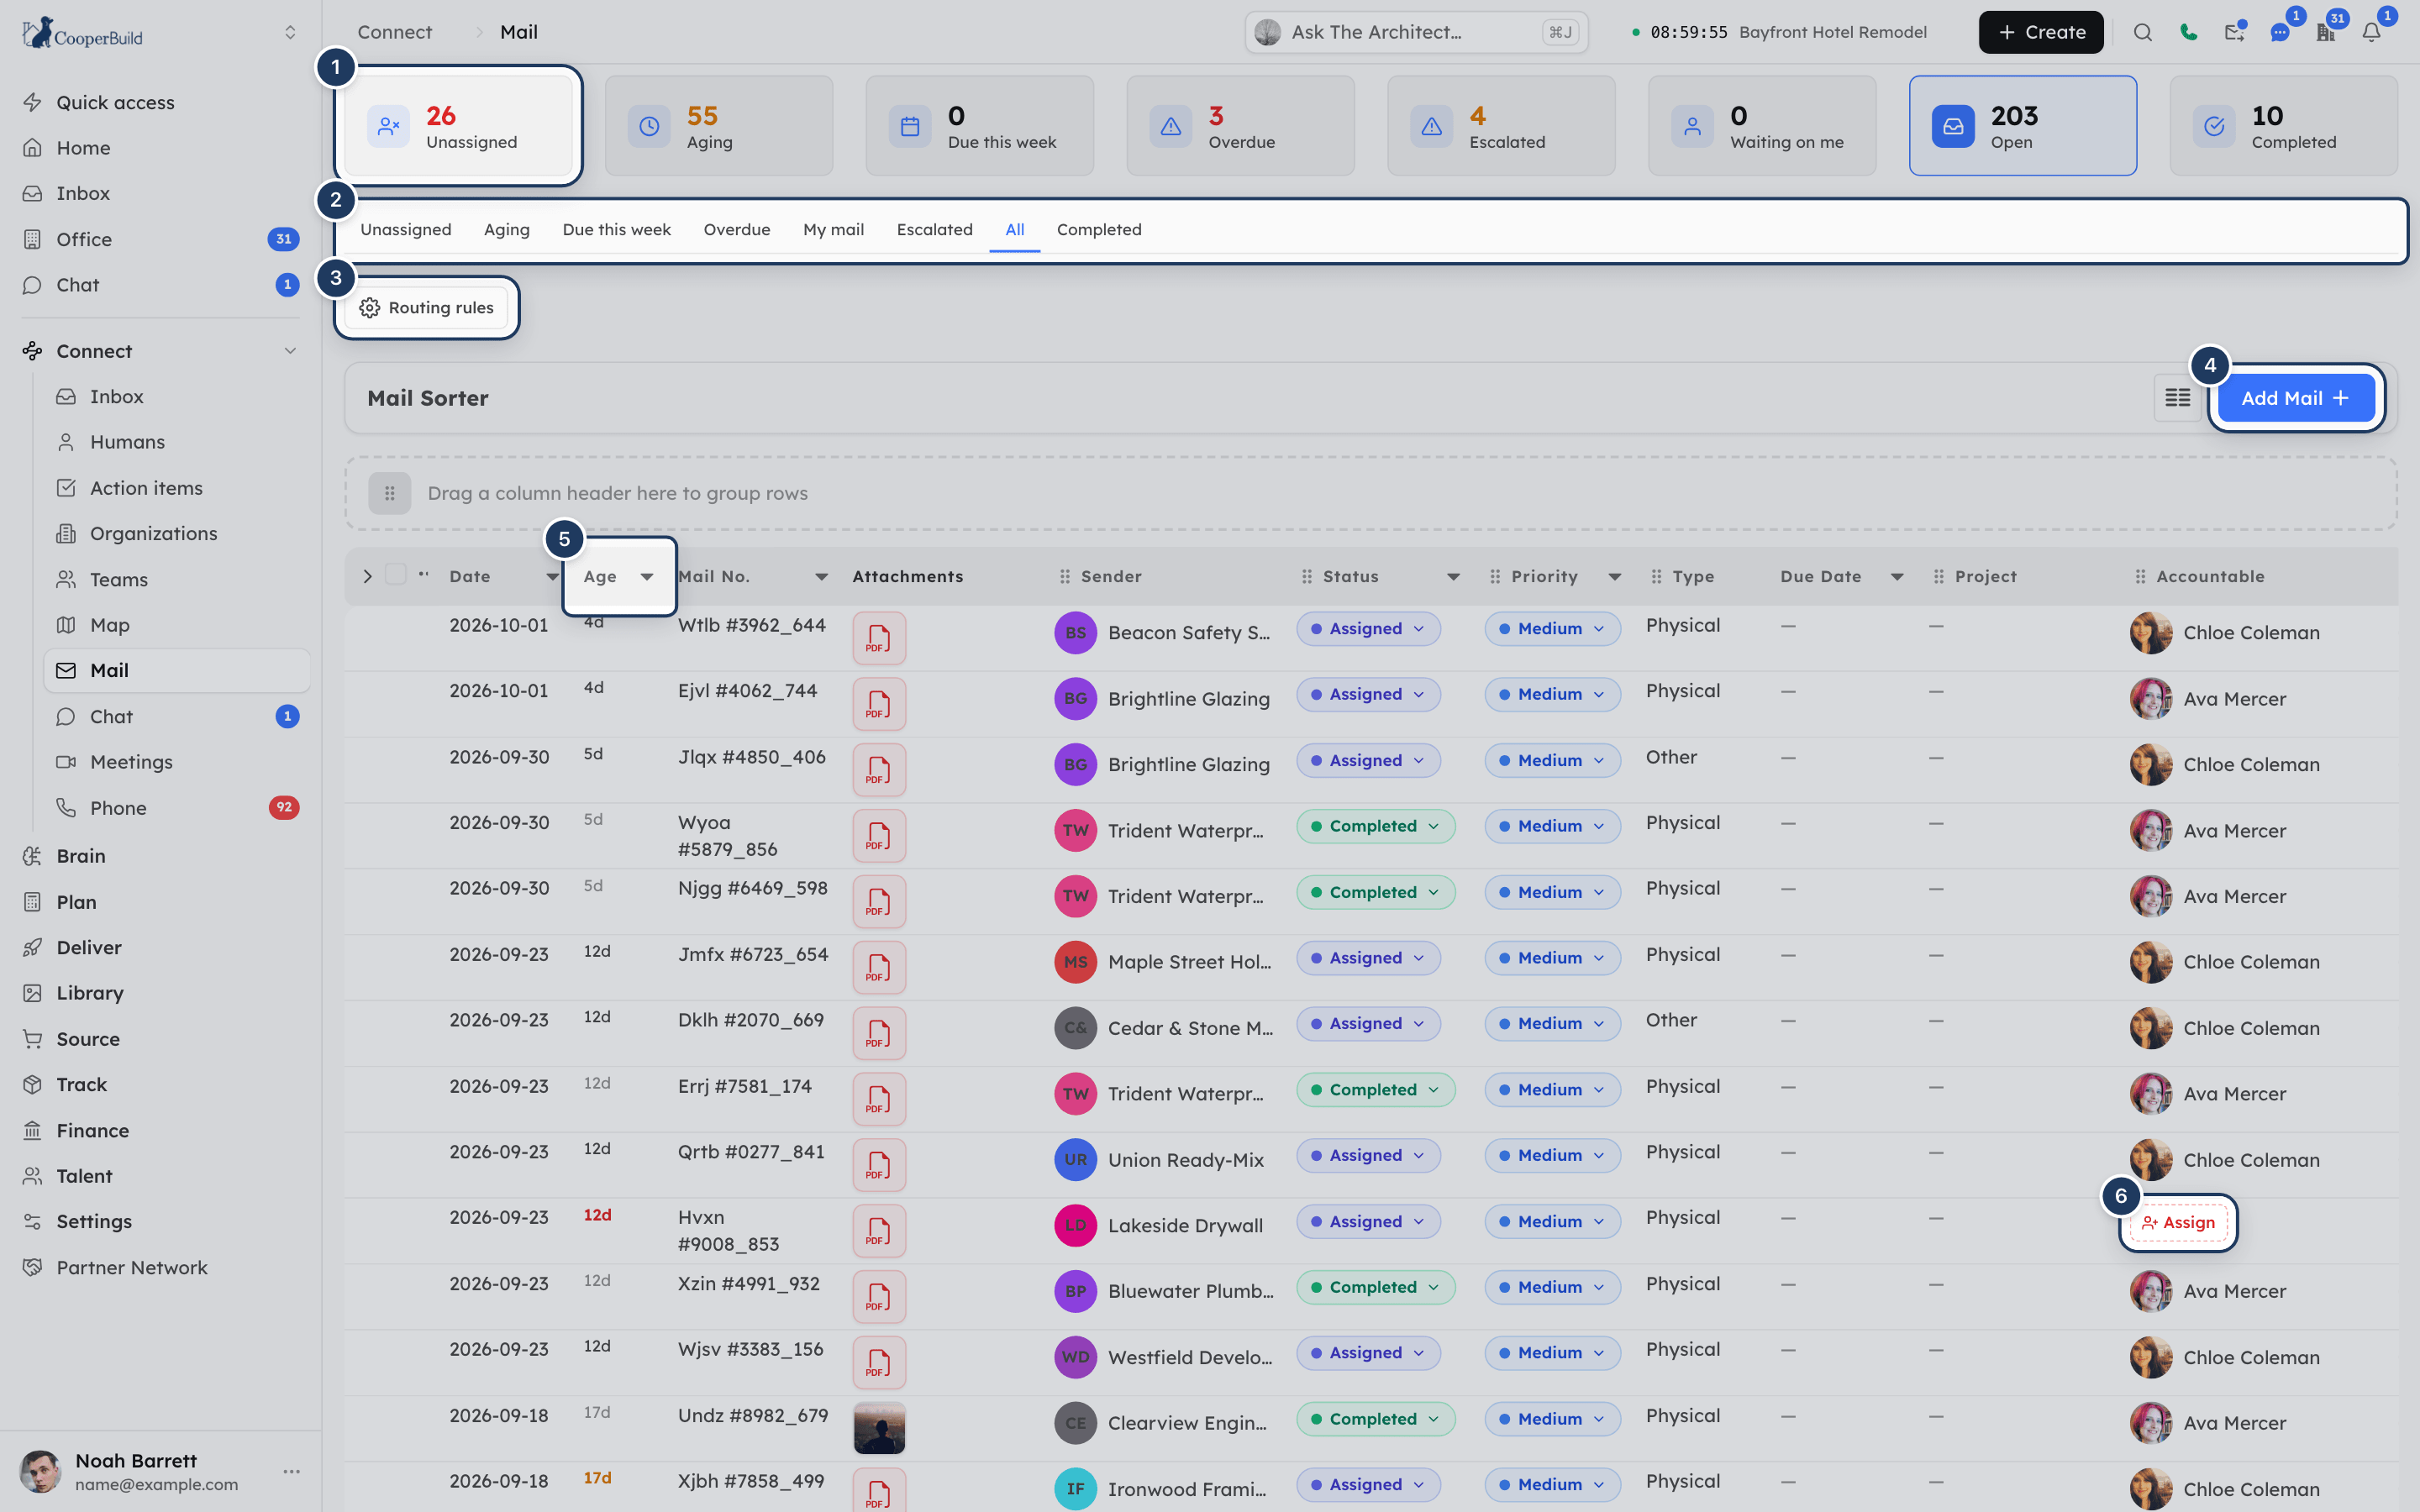
*Screenshot: Mail. 1: summary cards, 2: view tabs, 3: Routing rules, 4: Add Mail, 5: Age, 6: Assign.*
## Key concepts
| Term | What it means |
|---|---|
| **Mail item** | One logged letter, package or notice. Each has a **Mail No.** such as `MAIL-2026-10-0007`. |
| **RACI** | The people on a mail item: **Accountable** (one owner who answers for the outcome), **Responsible** (who does the work), **Consulted** and **Informed** (kept in the loop). |
| **Owned** | A mail item is owned when it has an Accountable person or at least one Responsible person. |
| **Unassigned** | Open mail with nobody Accountable or Responsible. |
| **Aging** | Unowned mail older than 48 hours, or owned mail nobody has touched for more than 5 days. |
| **Escalated** | Mail flagged for attention, by a person or automatically when it passes its due date. |
| **Addressed to** | The legal entity in your company the item is addressed to. |
| **Action required** | What the item asks for: Pay, Deposit, Respond, Review, File, Inspect, Forward, or Inform (no action). |
| **Routing rule** | "When a letter like this arrives, it belongs to this person." Rules fill in the owner, priority, action and due date when mail is logged. |
| **Catch-all rule** | A routing rule with no match conditions. It catches everything no other rule matches. Its Accountable person is your **mail supervisor**. |
## Open Mail
In the sidebar, open **Connect** and click **Mail**. The address is `/connect/mailsorter`.
You need the **Mail** permission to see it. If Mail isn't in your sidebar, ask your administrator.
When you open Mail without choosing a view, Cooper opens the **Unassigned** view if any mail has no owner, and the **All** view otherwise. Links in Mail notifications open the item directly.
## Read the summary cards
The cards at the top show the numbers that tell you whether mail is slipping. Click a card to switch the table to that view. Hover over a card for its definition.
| Card | Counts | Opens view |
|---|---|---|
| **Unassigned** | Open mail with nobody accountable or responsible. Shown in red when above zero. | Unassigned |
| **Aging** | Unowned for more than 48 hours, or owned but untouched for more than 5 days. Shown in amber when above zero. | Aging |
| **Due this week** | Open mail due in the next 7 days. | Due this week |
| **Overdue** | Past its due date and not completed. Shown in red when above zero. | Overdue |
| **Escalated** | Flagged for attention. Shown in amber when above zero. | Escalated |
| **Waiting on me** | Open mail where you are Accountable, Responsible, Consulted or Informed. | My mail |
| **Open** | All mail that isn't completed. The tooltip also shows the total and how many were completed in the last 30 days. | All |
| **Completed** | Mail closed in the last 30 days. | Completed |
## Switch views
The tabs above the table are saved views. Hover over a tab for its description.
| Tab | Shows |
|---|---|
| **Unassigned** | Nobody accountable or responsible. |
| **Aging** | Unowned for more than 48 hours, or owned but untouched for more than 5 days. |
| **Due this week** | Due in the next 7 days. |
| **Overdue** | Past due and not completed. |
| **My mail** | Open mail where you are in the RACI. |
| **Escalated** | Flagged for attention. |
| **All** | Everything, open and completed. |
| **Completed** | Closed items. |
The view you pick is kept in the page address, so you can bookmark or share it.
## Read the mail table
| Column | What it shows |
|---|---|
| **Date** | The date the item was received. |
| **Age** | Days since the item was received, such as `3d`. Red when the item has no owner and is 2 or more days old. Amber when it's 14 or more days old. |
| **Mail No.** | The item's number. A task icon (**Task linked**) shows when a task was created from it. |
| **Attachments** | Thumbnails or file icons. Click one to preview it. Use the arrows in the preview to move between files. |
| **Sender** | Who sent it. |
| **Status** | Received, Assigned, In Progress, Completed, Escalated or On Hold. |
| **Priority** | Low, Medium, High or Urgent. |
| **Type** | Physical, Email, Package, Legal, Government or Other. |
| **Due Date** | When it must be dealt with. Red when overdue. |
| **Project** | The linked project, if any. |
| **Accountable** | The owner. Shows **Assign** (or **Set owner**) when nobody is accountable. |
| **Responsible** | The people doing the work. |
| **Description**, **Remarks** | Hidden by default. |
If you can edit Mail, you can change **Status** and **Priority** right in the table: click the value and pick a new one.
You can group the table by **Status**, **Priority**, **Type**, **Sender**, **Project** or **Accountable**.
## Filter the table
Filters work in the **All** view only. Saved views such as **Unassigned** are already defined, and the table shows a note such as **Showing the "unassigned" view · switch to All to filter**.
1. Click the **All** tab.
2. Open the filters and add conditions on fields such as **Date**, **Mail No**, **Status**, **Priority**, **Type**, **Due Date**, **Accountable**, **Sender**, **Responsible**, **Description**, **Remarks**, **Attachments**, **Added User**, **Created At**, **Modified User** or **Updated At**.
## Log new mail
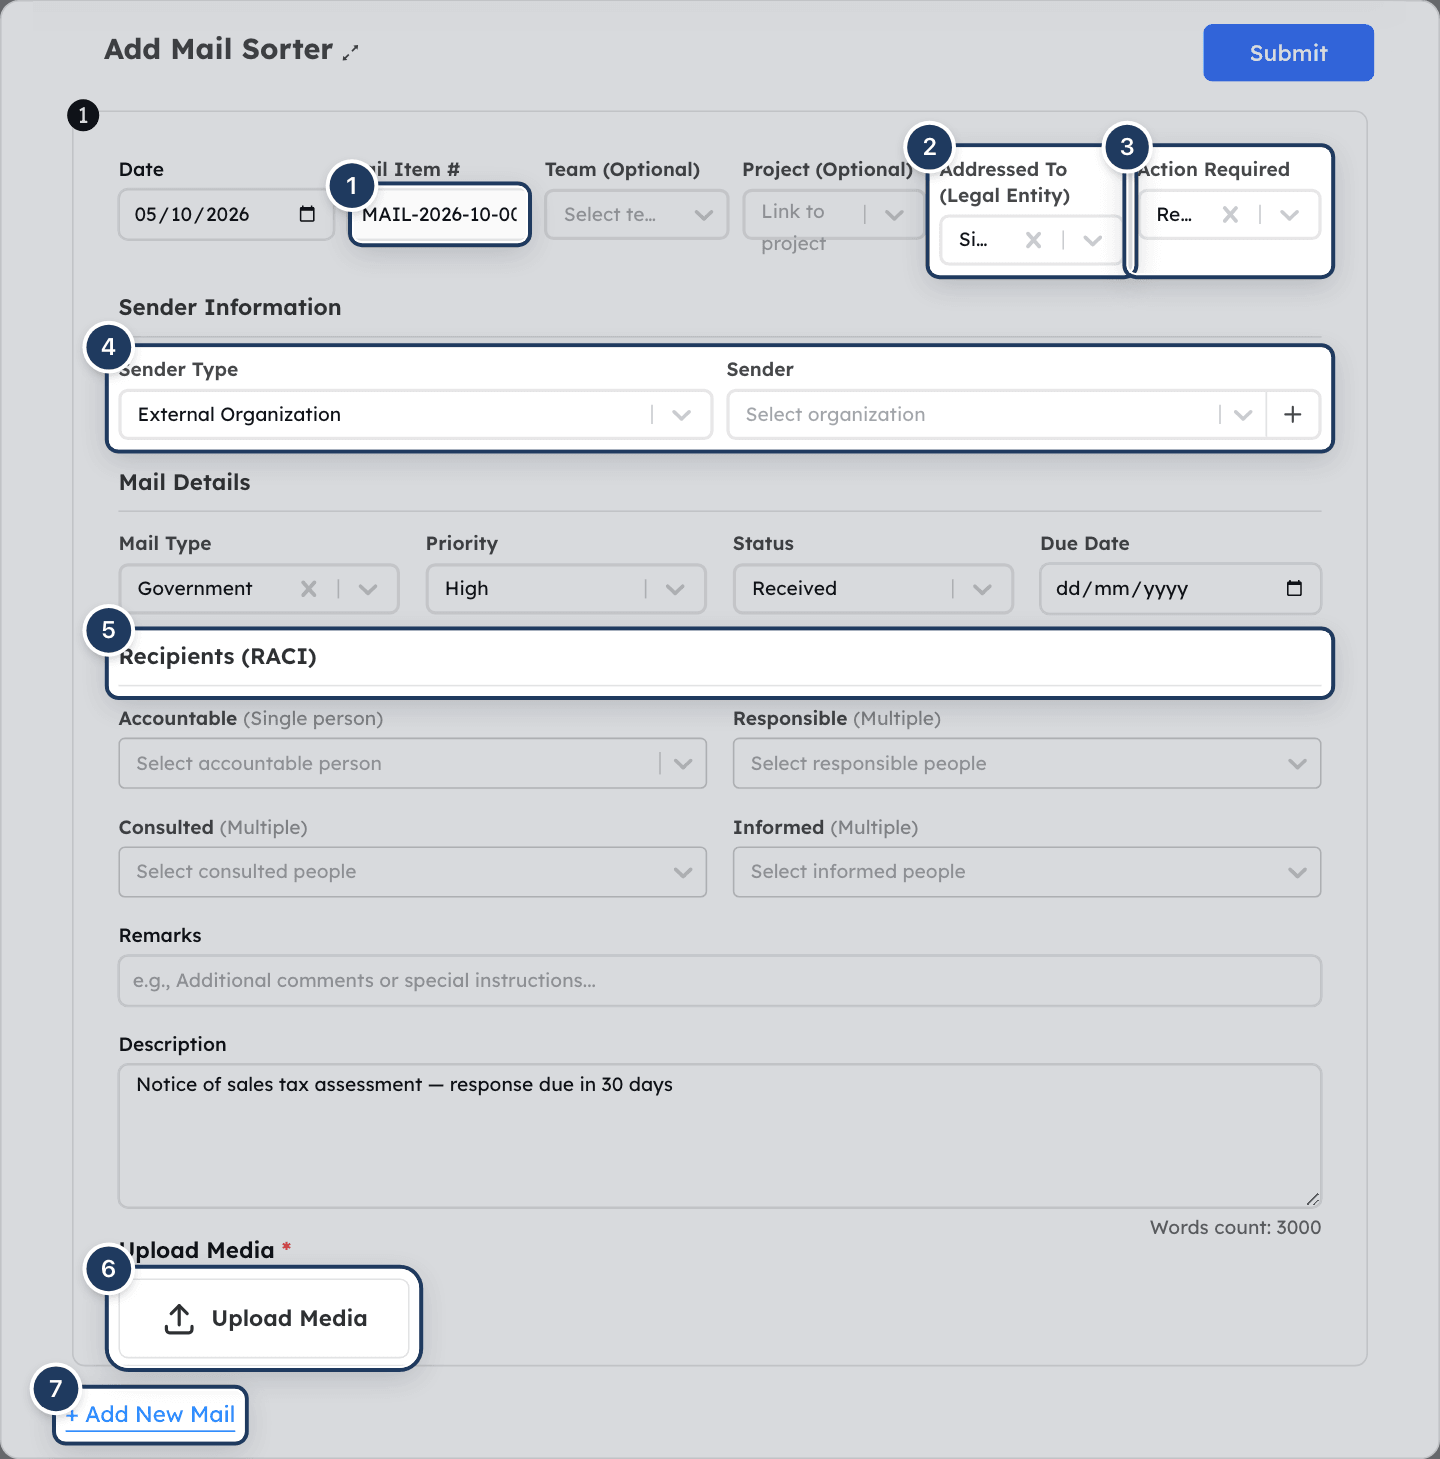
*Screenshot: Logging mail. 1: Mail Item #, 2: Addressed To, 3: Action Required, 4: Sender Type and Sender, 5: Recipients (RACI), 6: Upload Media, 7: + Add New Mail.*
### Step 1: Open the form
Click **Add Mail** at the top of the table. The **Add Mail Sorter** form opens. To work in a full page instead, click the expand icon next to the form title.
### Step 2: Describe the item
- **Date** defaults to today. Change it to the date the item arrived.
- **Mail Item #** is filled in automatically in the form `MAIL-YEAR-MONTH-NUMBER`.
- Choose **Mail Type**, **Priority** (defaults to Medium) and **Status** (defaults to Received).
- Optionally pick the **Team**, the **Project**, who it's **Addressed To (Legal Entity)**, the **Action Required** and a **Due Date**.
### Step 3: Record the sender
Choose a **Sender Type**:
- **External Organization** — pick the organization. If it isn't in Cooper yet, use the add option in the list to create it.
- **External Human** — pick the person.
- **Other (Manual Entry)** — type the sender's name.
### Step 4: Choose who owns it (optional)
Under **Recipients (RACI)**, choose the **Accountable** person (one) and any **Responsible**, **Consulted** and **Informed** people. You can leave these empty — routing rules may fill them in (see below), or you can assign the item later.
### Step 5: Add the scan and notes
Under **Upload Media**, add a scan or photo of the item (images and PDFs). Add **Remarks** and a **Description** of what the item says (up to 3,000 characters).
### Step 6: Save
Click **Submit**. On the full page you can also click **Save as Draft**.
To log several items at once, click **+ Add New Mail** to add another card to the same form. Click **Remove Mail** to drop a card.
When you save, Cooper:
1. Runs your routing rules on any fields you left blank. If a rule matched, the confirmation says **Routed by** and the rule's name.
2. Sets the status to **Assigned** if the item now has an owner.
3. Notifies every person on the RACI — for example **You are accountable for mail MAIL-2026-10-0007 …** with the action and due date.
## Assign mail to an owner
Assigning is the explicit hand-off. It sets the RACI, moves the item from **Received** to **Assigned**, and notifies the people you pick.
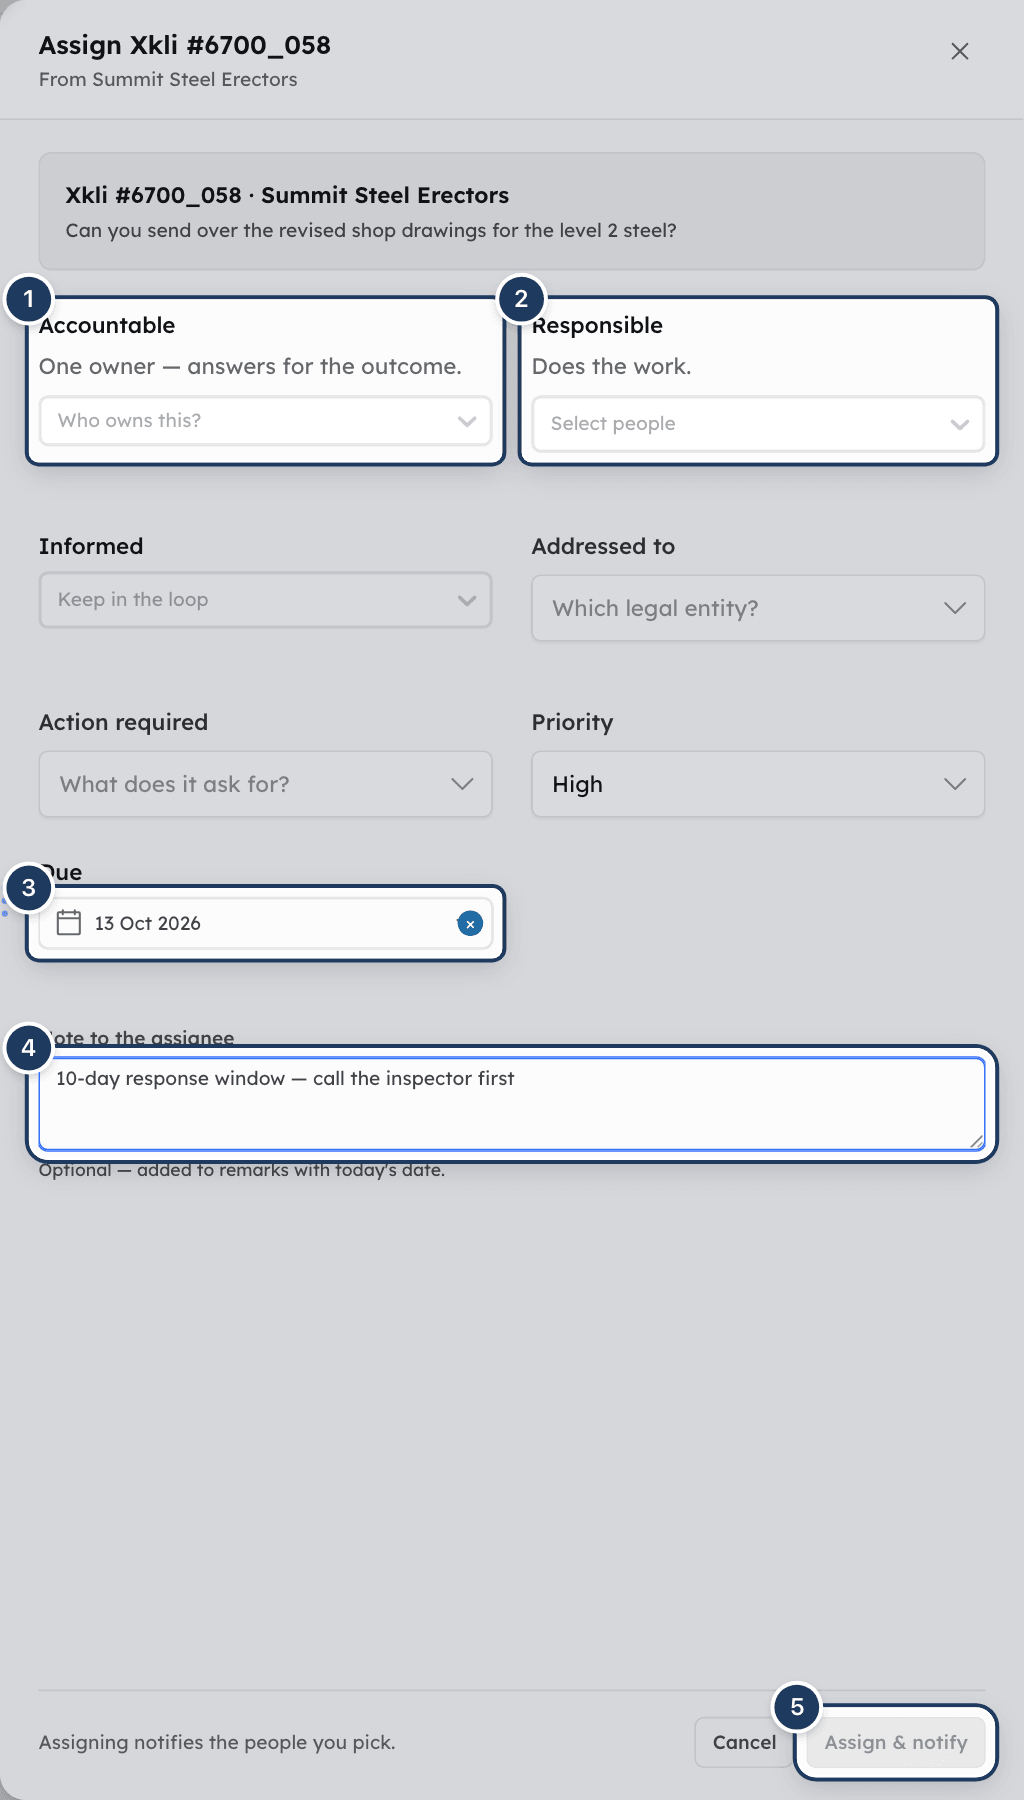
*Screenshot: Assigning mail. 1: Accountable, 2: Responsible, 3: Due, 4: Note to the assignee, 5: Assign & notify.*
### Step 1: Open the Assign panel
Do one of the following:
- Click **Assign** (or **Set owner**) in the **Accountable** column.
- Open the row's **⋯** menu and click **Assign** (or **Reassign** if it already has an owner).
- Open the item and click **Assign** or **Reassign**.
### Step 2: Choose the people
- **Accountable** — one owner who answers for the outcome.
- **Responsible** — the people who do the work.
- **Informed** — people to keep in the loop.
You must choose an Accountable person or at least one Responsible person.
### Step 3: Set the details
Choose **Addressed to**, **Action required**, **Priority** and **Due**. For **Government** and **Legal** mail with no due date, Cooper suggests a due date one week from today.
### Step 4: Add a note (optional)
Type a **Note to the assignee**, such as "10-day response window — call the inspector first". The note is added to the item's remarks with today's date.
### Step 5: Assign
Click **Assign & notify**. Cooper confirms with **Mail assigned and the people notified**. Only people who are newly added are notified.
## Open and edit a mail item
1. Open the row's **⋯** menu and click **View**.
2. The item opens with its addressee as the title and a status line.

*Screenshot: An open mail item. 1: Reassign, 2: Complete, 3: Escalate, 4: Create Task, 5: ownership status, 6: Save changes.*
The status line shows **Owned**, or **No owner — nobody has been told about this letter** in red. It also shows when the item was received, assigned, last touched, completed or escalated, and which routing rule routed it (**Routed by** …).
From here you can:
- Edit fields in place: **Date**, **Sender**, **Mail No.**, **In-Charge**, **Team**, **Project**, **Entity**, **Action**, **Accountable**, **Responsible**, **Consulted**, **Informed**, **Remarks** and **Description**.
- Add or remove attachments.
- Click **Save changes** to save your edits. The item must have at least one attachment.
- Click **Assign** / **Reassign**, **Complete**, **Escalate** or **Create Task**.
To edit with the full form instead, open the row's **⋯** menu and click **Edit**. To edit several items at once, tick their checkboxes, open the menu at the top of the checkbox column and click **Edit**.
## Mark mail completed
1. Open the row's **⋯** menu and click **Complete**, or click **Complete** in the open item.
2. In **What was done?**, describe the outcome — for example "Paid 8/25 via VPR-123" or "Check deposited". This is optional.
3. Click **Mark completed**.
The status becomes **Completed** and the Accountable and Informed people are told. **Complete** isn't offered for items that are already completed.
## Escalate mail
Escalate an item when it needs attention now — for example a final notice inside its response window.
1. Open the row's **⋯** menu and click **Escalate**, or click **Escalate** in the open item.
2. In **Why is this being escalated?**, give a reason, such as "Final notice — 10-day window, nobody has responded". This is optional.
3. Click **Escalate**.
The status becomes **Escalated**. Everyone on the RACI, the mail supervisor and the person who logged the item are notified. The item appears under **Escalated**.
## Create a task from mail
1. Open the row's **⋯** menu and click **Create Task**, or click **Create Task** in the open item.
2. The **Create Task from Mail** form opens with the item's project and RACI people already filled in.
3. Complete the task details and save.
Cooper confirms with **Task created from mail item** and links the task to the mail item. The **Mail No.** column then shows the **Task linked** icon.
## Delete mail
- **One item:** open the row's **⋯** menu, click **Delete**, and confirm.
- **Several items:** tick their checkboxes, open the menu at the top of the checkbox column, click **Delete**, and confirm.
## Set up routing rules
Routing rules decide who a letter belongs to the moment it's logged. Without rules, every new item starts with no owner until someone assigns it.
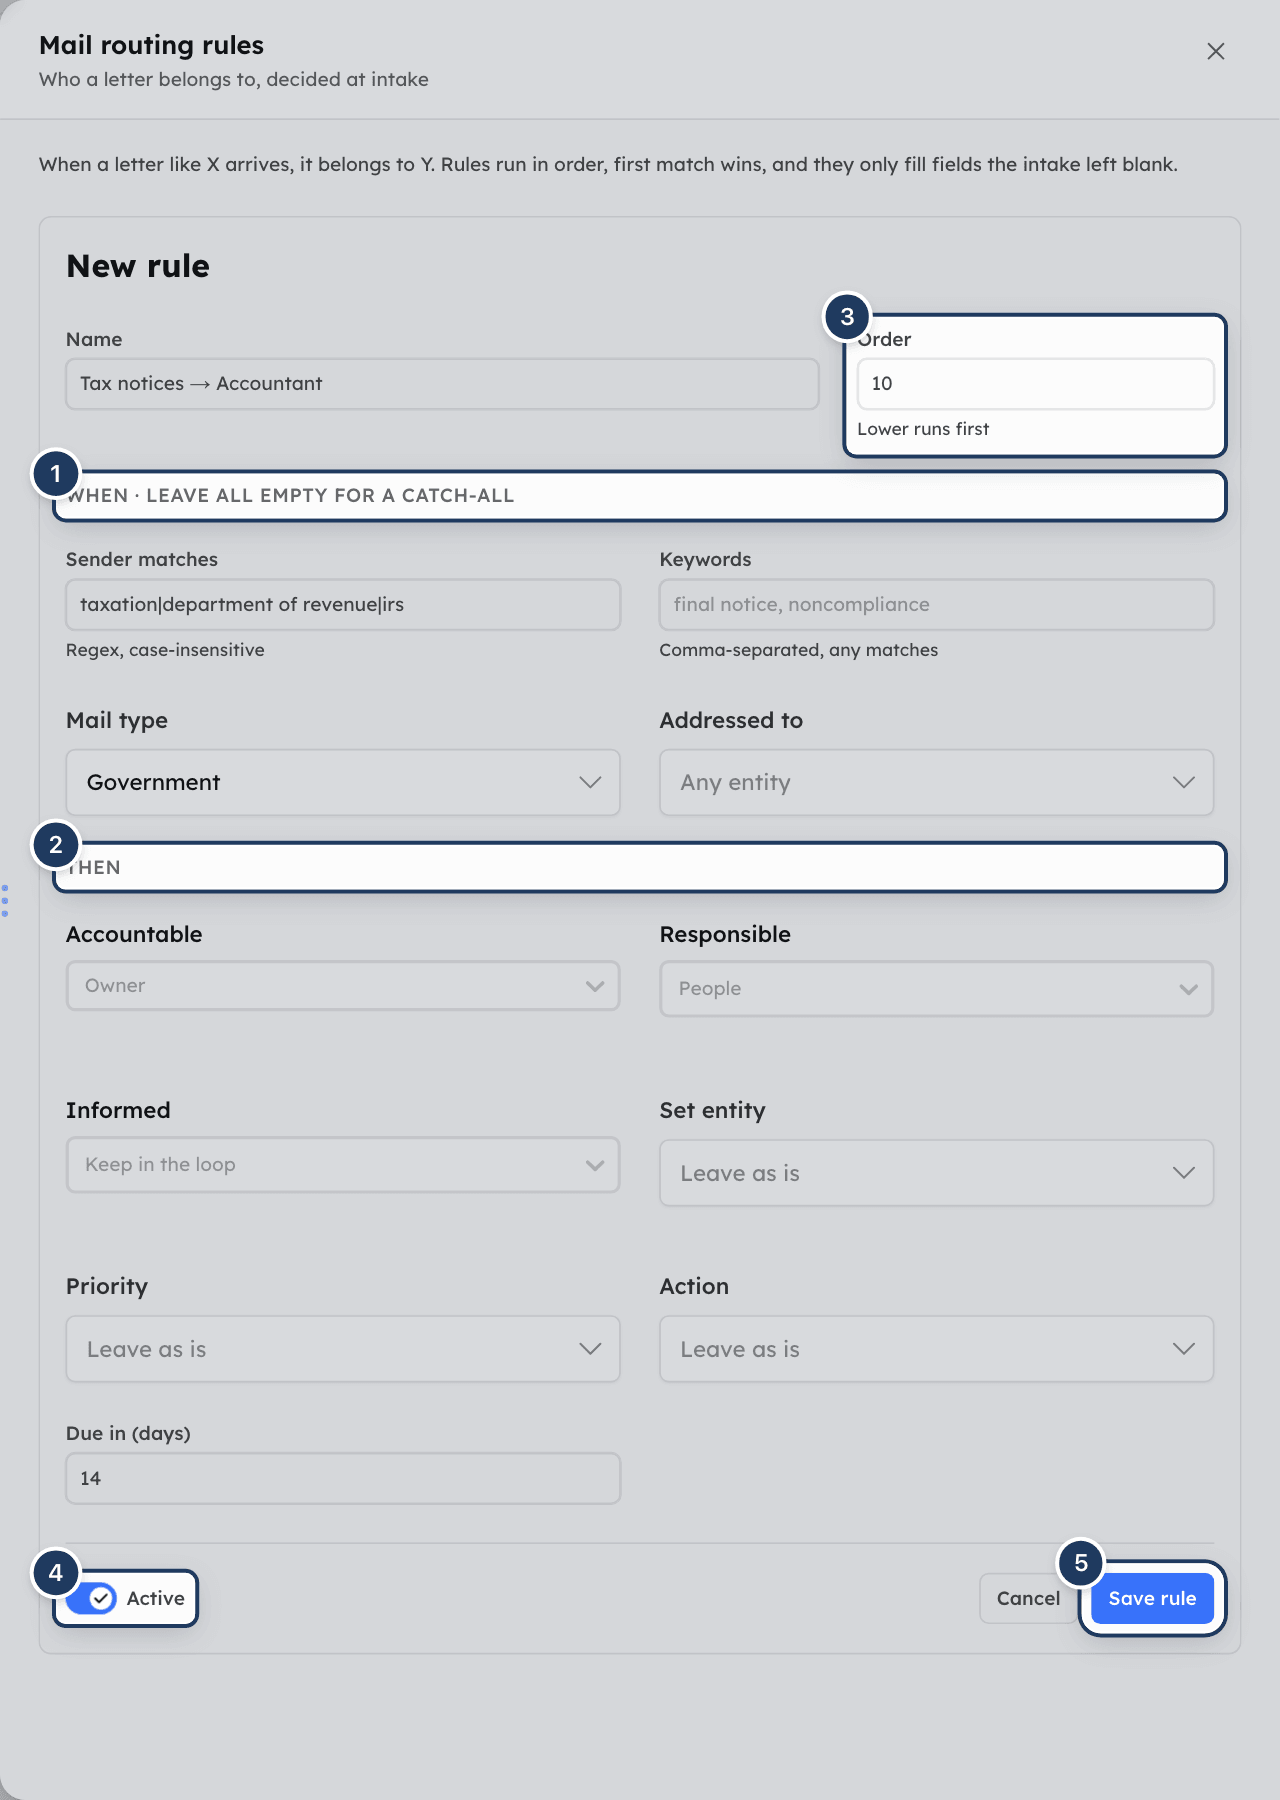
*Screenshot: Routing rules. 1: When conditions, 2: Then actions, 3: Order, 4: Active, 5: Save rule.*
### Step 1: Open the rules
Click **Routing rules** above the table. The **Mail routing rules** panel opens.
### Step 2: Start a rule
Click **New rule**. If you have no catch-all rule yet, you can click **Add a default owner** instead — see below.
### Step 3: Name and order the rule
Enter a **Name**, such as "Tax notices → Charmie". Set the **Order**: lower numbers run first.
### Step 4: Set the conditions (When)
Fill in any of these. All the conditions you fill in must match. Leave them all empty to make a catch-all rule.
- **Sender matches** — text or a pattern (regular expression, not case-sensitive) checked against the sender and the sender organization's name. For example `taxation|department of revenue|irs`.
- **Keywords** — comma-separated. The rule matches when any keyword appears in the item's description or remarks.
- **Mail type** — for example Government.
- **Addressed to** — the legal entity.
### Step 5: Set what the rule does (Then)
Choose any of: **Accountable**, **Responsible**, **Informed**, **Set entity**, **Priority**, **Action** and **Due in (days)**. Every rule must set an Accountable person or at least one Responsible person.
### Step 6: Save
Leave **Active** on and click **Save rule**.
How rules work:
- Rules run in **Order**, lowest first. **The first matching rule wins**; later rules are ignored.
- Rules only **fill fields the person logging the item left blank**. They never overwrite an owner, entity, action or due date someone chose. A Priority of Medium counts as blank, so a rule can raise it.
- **Due in (days)** sets the due date to the received date plus that many days.
- Each rule in the list shows its order, name, a **When:** and **Then:** summary, and how many times it has matched (**matched N×**).
- Use the switch on a rule to turn it on or off, the pencil to edit it, and the bin to delete it.
- Rules apply to mail logged after you save them. They don't change existing items.
## Add a catch-all rule (mail supervisor)
A catch-all rule makes sure no item is ever logged without an owner.
1. Click **Routing rules**.
2. If you see **No catch-all rule. Mail that matches nothing is created without an owner.**, click **Add a default owner**. Cooper starts a rule named **Default owner (catch-all)** with order 999.
3. Leave every **When** field empty. Under **Then**, choose the **Accountable** person — your mail supervisor.
4. Click **Save rule**.
The catch-all rule shows a **catch-all** badge and **When: Everything not matched above**. Its Accountable person is your company's **mail supervisor**, who also gets the daily unowned-mail digest and escalation notices.
## Daily reminders and automatic escalation
Once a day, at 13:00 UTC (9 a.m. US Eastern daylight time), Cooper checks the Mail register:
| Check | Who is told |
|---|---|
| Mail with **no owner** after 48 hours | A digest goes to the person who logged it and to the mail supervisor. |
| Owned mail **untouched for 5+ days** | The Accountable and Responsible people get a nudge — at most every 3 days. |
| Mail **past its due date** and not completed | The item is marked **Escalated** with the reason "Past due … without completion". The RACI people, the mail supervisor and the person who logged it are told. |
Notifications arrive in Cooper and by email.
An administrator can change these settings in **Settings → Organization → Notifications**, under **Mail that is slipping**. It's on by default. The options are:
| Option | Choices |
|---|---|
| **Flag mail with no owner after** | 24 hours, 48 hours, 3 days, 5 days |
| **Nudge the owner when untouched for** | 3, 5, 7 or 14 days |
| **Auto-escalate past-due mail** | On (recommended) or off |
These options change the reminders only. The **Aging** card and view always use 48 hours and 5 days.
## Fields reference
**Add Mail Sorter form**
| Field | Required | What it means |
|---|---|---|
| **Date** | No (defaults to today) | The date the item was received. |
| **Mail Item #** | Automatic | The item's number, `MAIL-YEAR-MONTH-NUMBER`. |
| **Team (Optional)** | No | The team that handles it. |
| **Project (Optional)** | No | A project it relates to. Most mail is company-level, not project-level. |
| **Addressed To (Legal Entity)** | No | Which of your company's legal entities it's addressed to. |
| **Action Required** | No | Pay, Deposit, Respond, Review, File, Inspect, Forward, or Inform (no action). |
| **Sender Type** | No (defaults to External Organization) | External Organization, External Human, or Other (Manual Entry). |
| **Sender** | No | The organization, person or typed name that sent it. |
| **Mail Type** | No | Physical, Email, Package, Legal, Government, or Other. |
| **Priority** | No (defaults to Medium) | Low, Medium, High or Urgent. |
| **Status** | No (defaults to Received) | Received, Assigned, In Progress, Completed, Escalated or On Hold. |
| **Due Date** | No | When it must be dealt with. Drives **Due this week**, **Overdue** and automatic escalation. |
| **Accountable** | No | One owner. |
| **Responsible** | No | People who do the work. |
| **Consulted** | No | People to consult. |
| **Informed** | No | People to keep in the loop. |
| **Remarks** | No | Short comments or special instructions. |
| **Description** | No | What the item is or says. Up to 3,000 characters. Keywords in routing rules search this text. |
| **Upload Media** | No when adding; at least one needed to **Save changes** on an open item | Scans or photos of the item. Images and PDFs. |
**Assign panel**
| Field | Required | What it means |
|---|---|---|
| **Accountable** | One of Accountable or Responsible | One owner — answers for the outcome. |
| **Responsible** | One of Accountable or Responsible | Does the work. |
| **Informed** | No | Kept in the loop. |
| **Addressed to** | No | The legal entity. |
| **Action required** | No | What the item asks for. |
| **Priority** | No | Low, Medium, High or Urgent. |
| **Due** | No | The due date. |
| **Note to the assignee** | No | Added to remarks with today's date. |
**Routing rule**
| Field | Required | What it means |
|---|---|---|
| **Name** | Yes | A name you'll recognize. |
| **Order** | No (default set for you) | Lower runs first. |
| **Sender matches** | No | Pattern matched against the sender and sender organization name. Not case-sensitive. |
| **Keywords** | No | Comma-separated; any one matching in description or remarks is enough. |
| **Mail type** | No | Only this type. |
| **Addressed to** | No | Only this legal entity. |
| **Accountable** / **Responsible** | One of them | Who owns the matched mail. |
| **Informed** | No | Who is kept in the loop. |
| **Set entity**, **Priority**, **Action** | No | Values to fill in if blank. |
| **Due in (days)** | No | Due date = received date + this many days. |
| **Active** | — | Turn the rule on or off. |
## Permissions
Access to Mail is controlled by the **Mail** permission on your role.
| Permission | Lets you |
|---|---|
| **Mail — Read** | See Mail, the summary cards, views, items and routing rules. |
| **Mail — Write** | Log, edit, assign, complete, escalate and delete mail; create tasks from mail; create, edit and delete routing rules. |
People you put on an item's RACI need **Mail — Read** to open the item from their notification.
The same **Mail** permission also controls whether AI agents can use the email and mail tools on your behalf (see *For AI agents*).
## Tips and best practices
- **Add a catch-all rule first.** It guarantees every item is born with an owner, and it defines your mail supervisor.
- **Write a description.** Keywords in routing rules search the description and remarks, so "Final notice — sales tax" routes far better than a blank description.
- **Always attach the scan.** People assigned the item can then act without walking to the mail tray.
- **Give statutory mail a real due date.** Tax demands, court papers and final notices should have **High** or **Urgent** priority and an actual due date. Overdue mail escalates automatically.
- **Close the loop.** Use **Complete** with a short outcome ("Paid via VPR-123") instead of leaving items in Received.
- **Use My mail daily.** It's your personal list of open items you're part of.
## Troubleshooting
### I can't see Mail in the sidebar
You need the **Mail** permission. Ask your administrator to add **Mail — Read** (and **Write** if you log or assign mail) to your role.
### Add Mail, Assign, Complete or Edit are missing
Those actions need **Mail — Write**. With read access only, you can view items but not change them.
### Save changes says Attachments is required
An open item needs at least one attachment before you can save edits. Upload a scan or photo of the item, then click **Save changes** again.
### Pick an accountable person or at least one responsible person
Assigning needs an owner. Choose an **Accountable** person, or at least one **Responsible** person, then click **Assign & notify**.
### A rule must set an accountable person or at least one responsible person
Every routing rule must give matched mail an owner. Under **Then**, choose an **Accountable** person or at least one **Responsible** person.
### My routing rule didn't apply
Check that the rule is **Active** and that all its **When** conditions match the item. Remember that the first matching rule wins — a rule with a lower **Order** may have matched first. Rules also never overwrite fields someone filled in when logging the item, and they don't change items logged before the rule existed.
### Items are logged without an owner
No rule matched and there's no catch-all rule. Open **Routing rules** and click **Add a default owner**.
### Filters are greyed out or missing
Filters only work in the **All** view. Click the **All** tab.
### My mail or Waiting on me is empty
These show open items where you are Accountable, Responsible, Consulted or Informed. Ask whoever logs mail to add you to the item's RACI.
### An item was escalated that nobody escalated
Cooper escalates mail automatically when it passes its due date without being completed. The reason reads "Past due … without completion". Complete the item, or assign it and set a new due date.
### I'm getting too many mail reminders
An administrator can change or turn off **Mail that is slipping** in **Settings → Organization → Notifications**.
### I was looking for my email
Your Gmail or Outlook email is in **Connect → Inbox**, not Mail. See [Inbox](https://docs.cooperbuild.ai/connect/inbox.md).
## For AI agents
Agents work with the Mail register through the CooperBuild MCP server. Both tools need the user to have the **Mail** permission; write actions need **Mail — Write**. The `mailSorter` prompt ("Mail Triage") walks through the triage loop below.
| Tool | Actions |
|---|---|
| `mail_sorter_browse` | `stats` (unassigned, aging, dueThisWeek, overdue, escalated, waitingOnMe, totals), `inbox` with `view`: `unassigned`, `aging`, `due_soon`, `overdue`, `mine`, `escalated`, `completed`, `all`; `list` (filters `mailStatus`, `priority`, `mailType`, `actionRequired`, `legalEntityId`, `unassignedOnly`, `projectId`, `dateFrom`/`dateTo`); `search` (`query` across Mail No., sender, addressee and description); `get` (`mailId`); `rules` (`includeInactive`). |
| `mail_sorter_manage` | `create` (logs an item; `applyRouting` defaults to true), `update`, `assign` (`accountableId`, `responsibleIds`, `informedIds`, `dueDate`, `priority`, `actionRequired`, `note`), `complete` (`outcome`, `proofRef`), `escalate` (`reason`), `delete` (`mailId` or `mailIds`), `apply_rules` (re-run rules on existing `mailIds`; `overwrite: true` replaces existing assignments), `rule_create`, `rule_update`, `rule_delete` (`ruleId`, `rule` with `match` and `apply`). |
Key rules:
- People can be passed as Human IDs or as `{ name: "Full Name" }`.
- **Assigning notifies the people.** Don't also send them an email about it.
- A rule with an empty `match` block is the catch-all. Its `apply.accountableId` is the mail supervisor. Put it last (for example `order: 999`).
- `apply_rules` is only available to agents. In the app, rules apply when mail is logged.
- Statutory items (final notices, court, tax demands): set `priority: "high"`, a real `dueDate`, and `escalate` if already inside the response window.
- Report counts (assigned, escalated, still unowned) rather than the full contents of each letter.
Valid values:
| Field | Values |
|---|---|
| `mailStatus` | `Received`, `Assigned`, `In Progress`, `Completed`, `Escalated`, `On Hold` |
| `mailType` | `Physical`, `Email`, `Package`, `Legal`, `Government`, `Other` |
| `priority` | `low`, `medium`, `high`, `urgent` |
| `actionRequired` | `Pay`, `Deposit`, `Respond`, `Review`, `File`, `Inspect`, `Forward`, `Inform` |
Common errors:
| Error | Fix |
|---|---|
| **Mail entry not found** | The `mailId` is wrong or the item was deleted. Find it again with `search` or `inbox`. |
| **Assignment needs an accountable person or at least one responsible person** | Pass `accountableId` or at least one `responsibleIds` entry. |
| **A humanId is required for the "mine" view** | The user has no linked person record. Use another view or filter by person. |
| **Unknown inbox view** | Use one of the views listed above. |
The email tools `email_inbox_browse`, `email_inbox_manage` and `comm_send_email` belong to [Inbox](https://docs.cooperbuild.ai/connect/inbox.md), not to this register, even though they share the **Mail** permission.
## Related
- [Inbox](https://docs.cooperbuild.ai/connect/inbox.md) — your own Gmail or Outlook email. Not the company Mail register.
- [Organizations](https://docs.cooperbuild.ai/connect/organizations.md) — senders you can pick when logging mail.
- [Humans](https://docs.cooperbuild.ai/connect/humans.md) — the people you put on a mail item's RACI.
- [Teams](https://docs.cooperbuild.ai/connect/teams.md) — the team that handles a mail item.
---
# Chat
> Message teammates one-to-one or in groups, share files, photos, voice notes, polls and locations, call from a thread, and bring Cooper's AI agents into the conversation.
Source: https://docs.cooperbuild.ai/connect/chat
Keywords: chat, messaging, messages, direct message, dm, group chat, team chat, instant messaging, mentions, threads, reactions, voice notes, polls, chat dock, message requests, invite link, ai agent chat, slash commands
Chat is Cooper's internal team messaging. You use it to talk to colleagues one-to-one or in groups, to share site photos, drawings and PDFs, and to run quick decisions with polls. Project managers link group chats to projects so everyone knows which job a group is about. Field staff use voice notes and live location. You can also reach contacts at other companies who use Cooper, and invite people who don't have an account yet.
Cooper's AI agents can join a conversation too. Type `@` and an agent's name, and the agent answers in the thread.
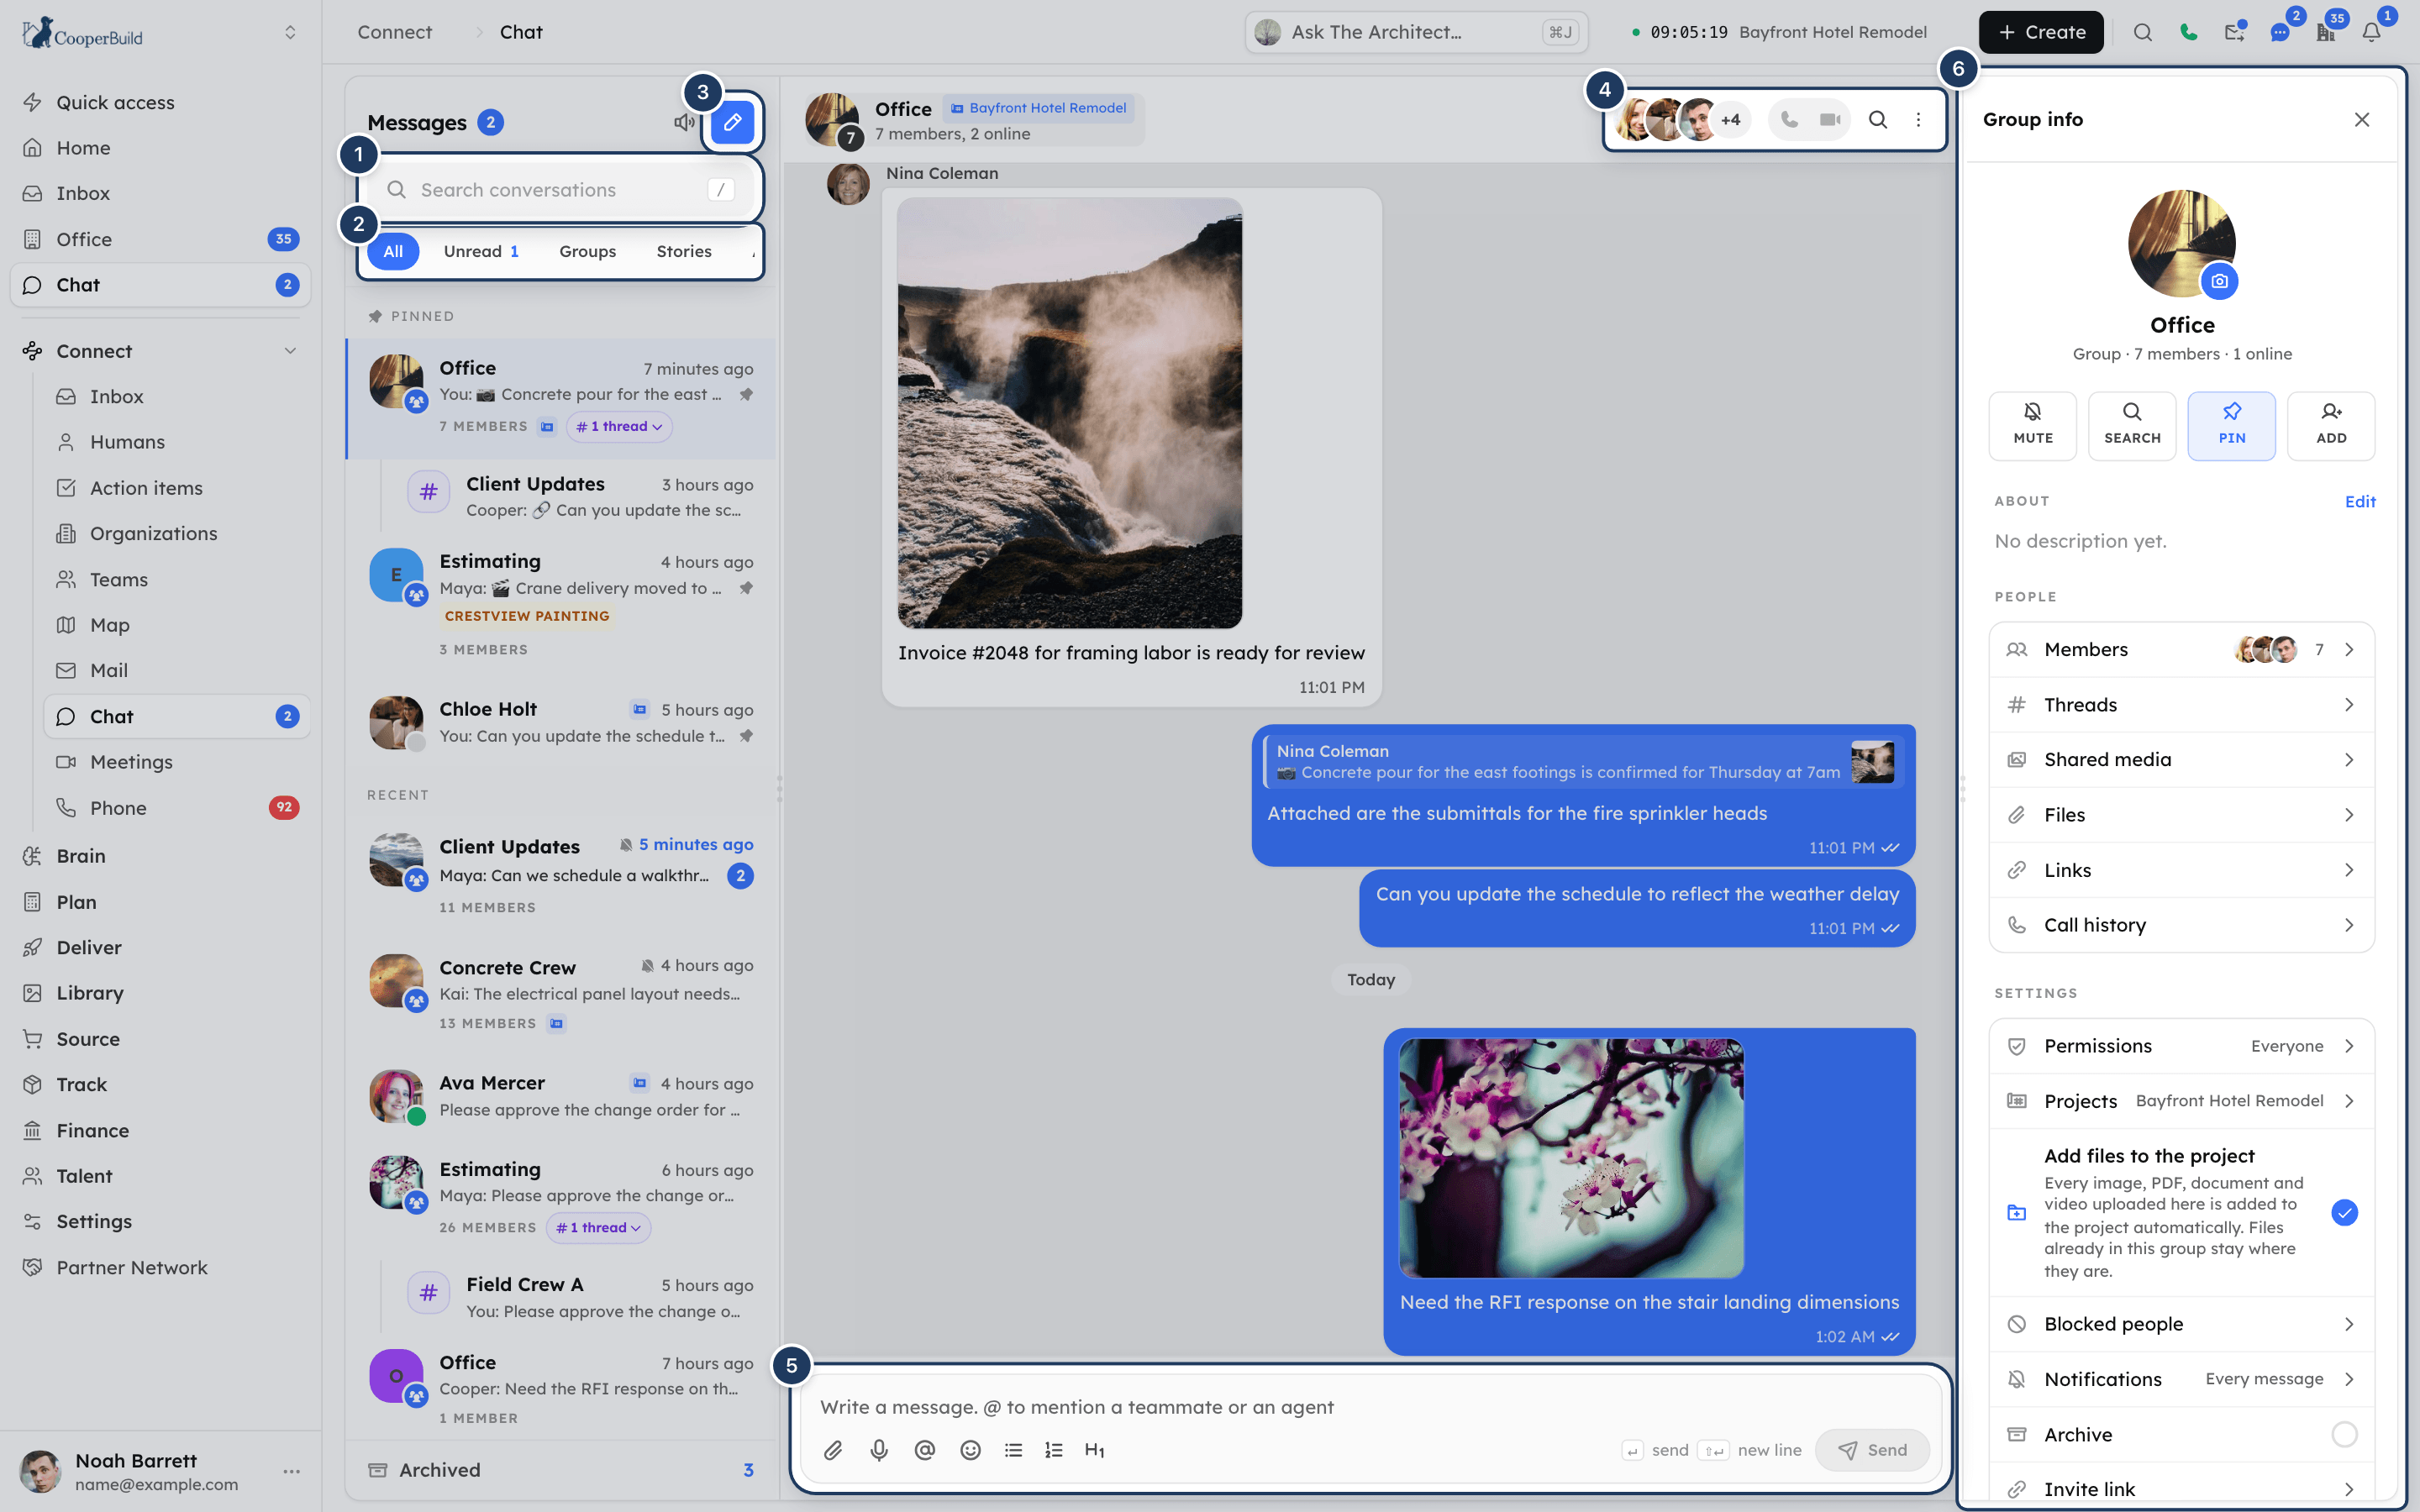
*Screenshot: Chat. 1: search, 2: filters, 3: new message, group or meeting, 4: call and search buttons, 5: message box, 6: Group info.*
## Key concepts
| Term | Meaning |
|---|---|
| **Conversation** | Any chat: a 1:1 with one person, a group, a thread inside a group, or a private chat with an AI agent. |
| **Direct message (1:1)** | A private conversation between you and one other person. Both people have the same rights. |
| **Group** | A conversation with several people (up to 512). Every group has one **Owner**, and can have **Admins** and **Members**. |
| **Thread** | A smaller group inside a group, for example "Vendors". Only the thread's members can see it. A thread can include people who aren't in the main group. |
| **Message request** | A first message from someone outside your organization, or an invitation to join a group. You choose **Allow** or **Ignore** (or **Join** or **Decline** for a group). |
| **Invite link** | A link that lets anyone in your organization join a group without being added one at a time. |
| **Agent** | One of Cooper's AI agents. You can mention an agent in any conversation, or open a private chat with one. |
| **Chat dock** | Small floating chat windows that let you keep chatting while you work on other pages. |
| **Pinned message** | A message shown in a banner at the top of a conversation for everyone in it. |
| **Starred message** | A message you saved for yourself. Only you see your stars. |
## Open Chat
In the sidebar, open **Connect** and click **Chat**. The page opens at `/chat`. When you open a conversation, the address changes to `/chat/`. A link that ends in `?m=` scrolls to that message and highlights it.
Opening `/chat` shows your conversation list but does not open a conversation, so nothing is marked as read just by visiting the page. If no conversation is open, you see **Pick a conversation** and a **Start a conversation** button.
You can also reach Chat from anywhere in Cooper:
- The **Messages** chat bubble in the top header, next to the notification bell. See [Chat from any page](#chat-from-any-page-the-chat-dock).
- The unread badge on the **Chat** item in the sidebar.
You see Chat only if your role includes **Chat** → **Messaging**. Every role has it by default. See [Permissions](#permissions).
### How the Chat page is laid out
| Screen width | Layout |
|---|---|
| Wide screens (1536 px and wider) | Three panes: the conversation list, the open conversation, and the details pane. |
| Medium screens | The conversation list and the conversation. Details open as a slide-in panel titled **Conversation details**. |
| Narrow screens (under 768 px) | One pane at a time. Use the back arrow to return to the list. |
You can drag the edge of the conversation list (240–420 px) and of the details pane (260–460 px) to resize them.
## Find a conversation
The left pane (the rail) is titled **Messages** and shows your total unread messages.
### Step 1: Search
Click **Search conversations**, or press `/` when you aren't typing in a field. Type a name or words from the conversation. Press `Esc` to clear the search.
While you type, people also appear under the matching conversations, grouped as **In your organization**, **Your contacts on Cooper**, **Your contacts without an account** and **Agents**. Click **Message**, **Send invite** or **Chat with agent** on a person to start a conversation with them.
### Step 2: Filter the list
Click a filter above the list:
| Filter | Shows |
|---|---|
| **All** | Every conversation that isn't archived. |
| **Unread** | Conversations with unread messages. The pill shows how many. |
| **Groups** | Group conversations only. |
| **Stories** | Status stories from your team and your groups (shown when your workspace uses the Office). |
| **Archived** | Conversations you archived. |
| **Calls** | Your call history. Click a call to open its conversation. |
### Step 3: Use the keyboard
Press `↑` and `↓` to move through the list and `Enter` to open the highlighted conversation.
Pinned conversations appear under **Pinned** at the top. Everything else is under **Recent**.
### What a conversation row shows
- The name or group title, the time of the last message, and a preview of it.
- A green dot when the other person in a 1:1 is online, a group badge for groups, and a robot badge for agents.
- A blue ring around the photo when the person or group has a story you haven't seen.
- An `@` badge with the number of times you were mentioned, and an unread count.
- **Video call in progress** or **Audio call in progress** while a call is running. Missed calls show in red.
- For groups: the number of members, the linked project, and a **N threads** chip you can click to show the group's threads.
- For contacts at other companies: their company, and **Waiting to be accepted** or **Request declined** if they haven't allowed your request yet.
You can drag files onto a row. The conversation opens with the files attached but not sent.
## Start a direct message
### Step 1: Open New message
Click the pencil button at the top of the conversation list (**New message or group**) and choose **New message**.
### Step 2: Find the person
In **Search by name, email or phone number**, type part of their name, their email address or their phone number. Before you type, the panel lists your **Agents**, your **Recent** conversations and **Your teammates**.
### Step 3: Pick the person
Click **Open chat** next to a teammate. If you already have a conversation with that person, Cooper reopens it instead of starting a new one.
Search covers your teammates and your contacts. If someone is missing, type their full email address or phone number.
### Message a contact at another company
People at other companies who use Cooper appear under **Your contacts on Cooper**.
1. Click **Message** next to the contact.
2. Write and send your first message.
Cooper shows: "Request sent — they will see your message once they accept." The contact sees your message as a [message request](#answer-a-message-request). Until they allow it, the conversation shows **Waiting for them to accept**. If they ignore it, you see **They declined your request** and an **Ask again** button.
If the contact has never signed in to Cooper, the button reads **Message + email** and they also get an email.
### Invite someone who isn't on Cooper
### Step 1: Open the invite form
In **New message**, click **Invite someone by email**. The form also opens on its own when you type a full email address that matches nobody.
### Step 2: Enter their address
Type the email address in **name@company.com**. You can **Add a note**. The note is shown to them when they decide whether to reply.
### Step 3: Send
Click **Send invitation**. Cooper shows "Invitation emailed to …".
The email carries a link only. Your message text is never sent in the email. If the address already belongs to someone on Cooper, Cooper sends them a message request instead.
## See the invitations you sent
Click the pencil button (**New message or group**) and choose **Invitations you sent**.
The panel shows totals for **Waiting**, **Accepted** and **Declined**, and filters for **All**, **Waiting**, **Accepted**, **Declined** and **Cancelled**. Each row shows when you sent it and when they answered. **Opened** means they viewed the link.
- Click **Open** to go to the conversation.
- Click **Cancel invitation** on a waiting invitation. This also frees the person up to be invited again.
You see **Invitations you sent** only if your role includes **Chat** → **Chat Invites & Requests**.
## Answer a message request
Requests appear as cards above your conversation list, under **Message request** or **Message requests · N**.
- For a person: click **Allow** to accept, or **Ignore**.
- For a group invitation: click **Join** or **Decline**.
When you open a conversation from someone who isn't in your contacts, a strip at the top asks: "… is not in your contacts. Allow them to keep messaging you?" Click **Allow**, **Ignore** or **Block**. You can read their messages before you answer.
If you allowed someone and want them to stop, open the conversation menu (**⋮**) and click **Stop messages**. They can ask again later, and nothing is deleted.
## Create a group
### Step 1: Open New group
Click the pencil button (**New message or group**) and choose **New group**.
### Step 2: Choose the members
On **Who is in this group?**, search in **Search teammates, contacts or an email…** and click people to add them. Switch to **Teams** to add a whole team at once (teams come from **Connect** → **Groups**). Click **Next**.
People at other companies who have Cooper accounts can be added. People without a Cooper login can't be added to a group.
### Step 3: Name the group
On **Name your group**, enter a **Group name** (for example "Tower B — MEP coordination"). You can add a **Description** and a group photo.
### Step 4: Set permissions (optional)
Open **Permissions** to decide **Who can send messages**, **Who can add members** and **Who can edit group info**. Each is **Everyone** or **Admins only**. The form starts with **Everyone** for all three.
### Step 5: Create the group
Click **Create group**. You are added as the owner.
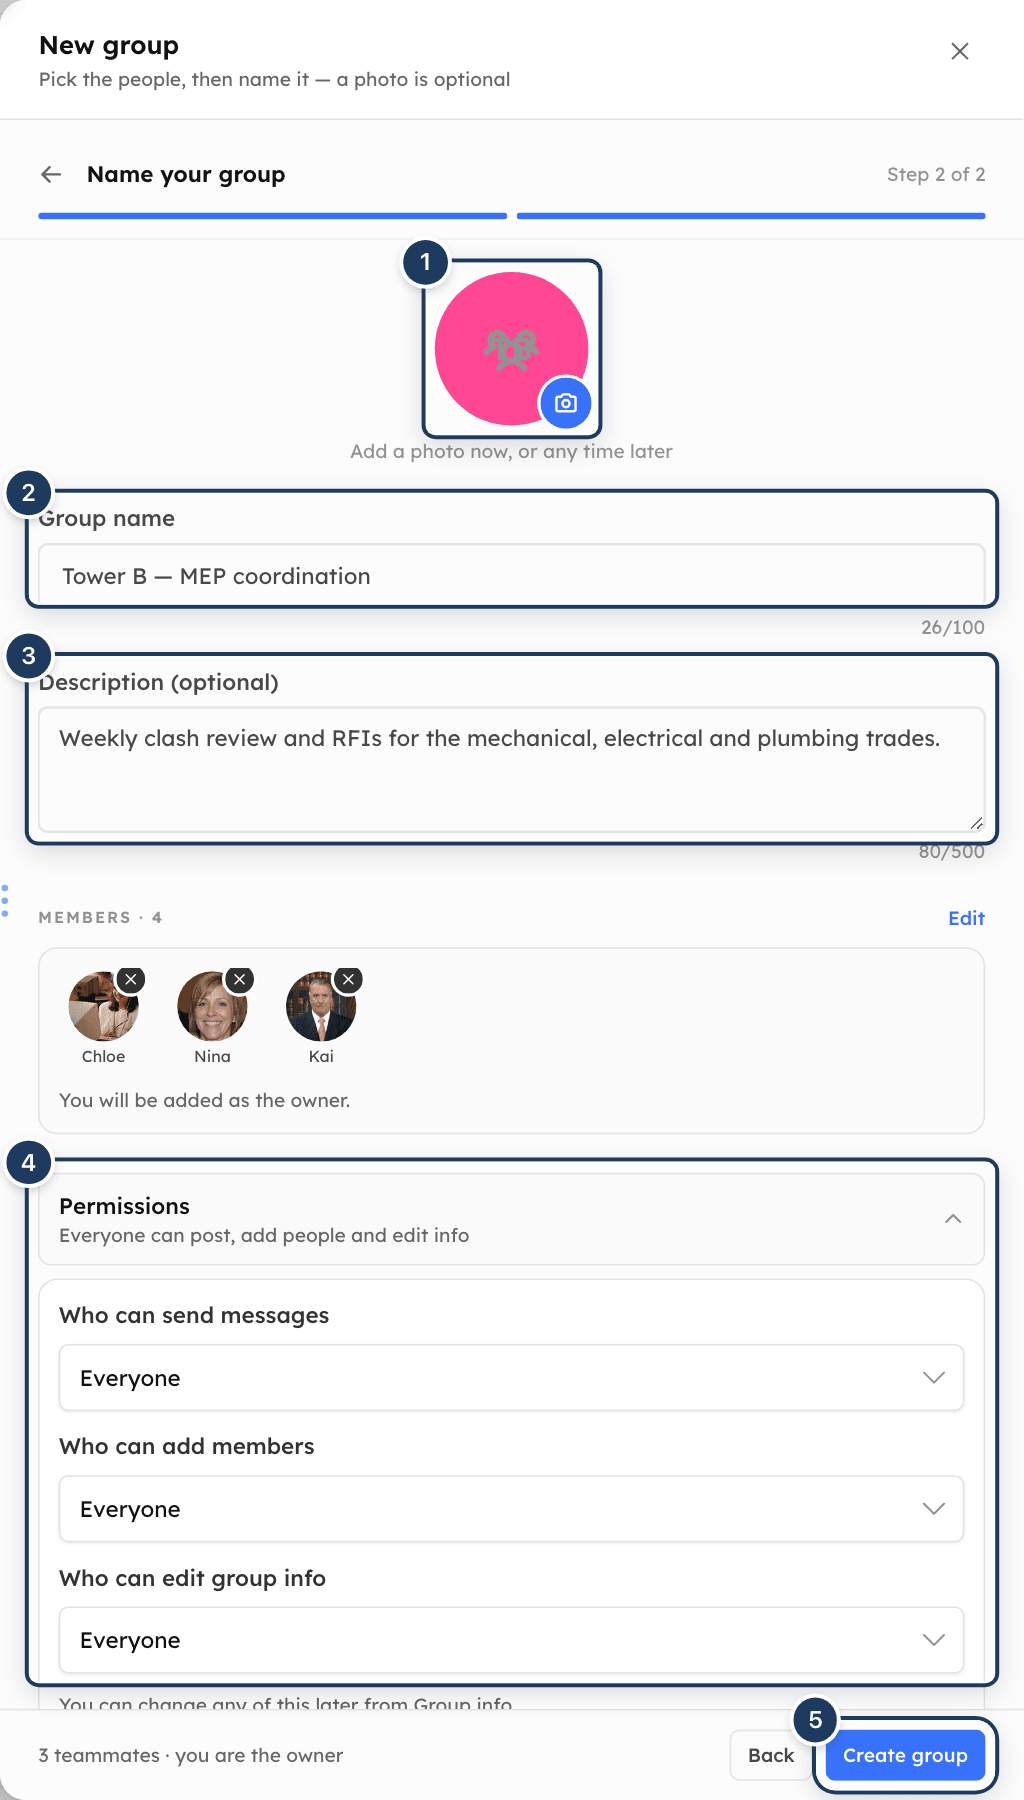
*Screenshot: Creating a group. 1: group photo, 2: group name, 3: description, 4: permissions, 5: Create group.*
You see **New group** in the menu only if your role includes **Chat** → **Group Chats** with write access.
### Group fields reference
| Field | Required | What it means |
|---|---|---|
| Members | Yes | At least one teammate. A group holds up to 512 people, including you. |
| Group photo | No | An image file. You can add or change it later from **Group info**. |
| **Group name** | Yes | Up to 100 characters. Shown in everyone's conversation list. |
| **Description** | No | Up to 500 characters. What the group covers — scope, area, phase. |
| **Who can send messages** | No | **Everyone** or **Admins only**. With **Admins only**, other members can read and react but not post. |
| **Who can add members** | No | **Everyone** or **Admins only**. |
| **Who can edit group info** | No | **Everyone** or **Admins only**. Covers the name, photo and description. |
## Manage a group
Click the group's photo or name at the top of the conversation to open **Group info**. On wide screens it is already open on the right.
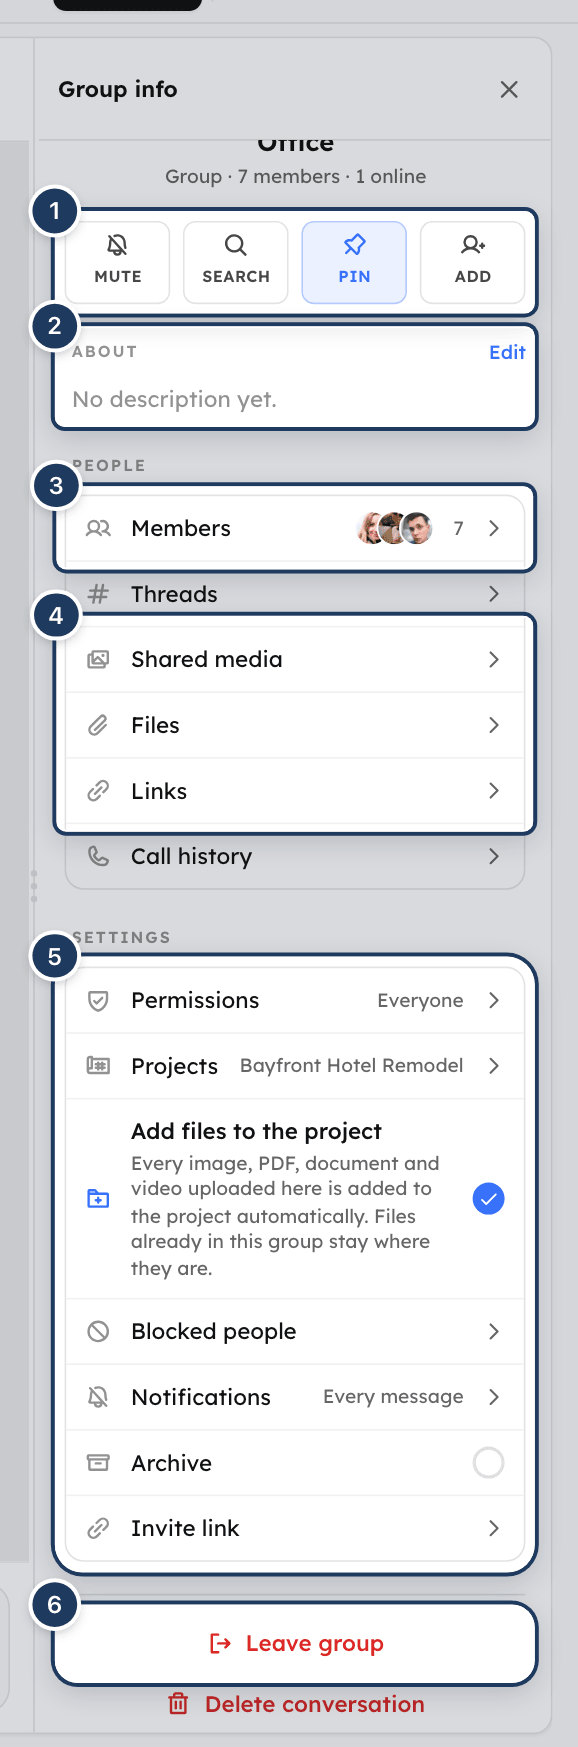
*Screenshot: Group info. 1: Mute, Pin, Search and Add shortcuts, 2: About, 3: Members, 4: Shared media, Files and Links, 5: Settings, 6: Leave group.*
**Group info** contains:
- **Mute**, **Pin**, **Search** and **Add** shortcut buttons.
- **About**: the description. Click **Edit** to change the group name and description.
- **Members**, **Threads**, **Shared media**, **Files**, **Links** and **Call history**.
- Settings: **Permissions**, **Projects**, **Add files to the project**, **Blocked people**, **Notifications**, **Archive** and **Invite link**.
- **Leave group**, and **Delete conversation** or **Delete for everyone**.
### Change the group name, photo or description
1. In **Group info**, click **Edit** next to **About**. Change the **Group name** or **Description** and click **Save**.
2. To change the photo, click the camera badge on the group photo (**Change photo** or **Add photo**).
You can do this if you are the owner or an admin, or if **Edit group info** is set to **Everyone**.
### Add members
1. In **Group info**, click **Add** (or open **Members** and click **Add members**).
2. Search in **Search teammates, contacts or an email…** and select people.
3. Click **Add to group** (or **Add N members**).
People from outside the group's organizations get an invitation they can accept or decline. You can add members if you are the owner or an admin, or if **Add members** is set to **Everyone**.
### Make someone an admin, transfer ownership or remove someone
1. In **Group info**, open **Members**. Admins are listed under **Admins**, everyone else under **Members**.
2. Click a person. Their page shows their **Role** and when they were **Added**.
3. Under **Manage**, choose an action:
| Action | Who can do it | What happens |
|---|---|---|
| **Make admin** | Owner | They can add members and edit group info. |
| **Remove admin** | Owner | They stay in the group as a member. |
| **Transfer ownership** | Owner | They become the owner and you become an admin. Only the new owner can hand ownership back. |
| **Remove from group** | Owner (anyone); admins (members only) | They lose access to the group and its history from now on. Their past messages stay. |
Nobody can remove the owner. Click **Message** on a person's page to open a 1:1 with them.
### Change who can post, add people, edit info or use agents
1. In **Group info**, click **Permissions**. The row is shown to the owner and admins.
2. Click **Send messages**, **Add members**, **Edit group info** or **Use AI agents** (shown when AI agents are on for your workspace).
3. Choose **Everyone** or **Admins only**.
The change is saved as soon as you choose, and applies immediately for everyone in the group.
### Link a group to a project
1. In **Group info**, click **Projects**.
2. Click **Link a project**, search by name or number, and select the project.
3. Click **Done**.
A group can be linked to up to 20 projects. The owner and admins can link projects in a group. In a 1:1, either person can. You can only link projects your own organization owns. Projects linked automatically, because someone in the chat is the project's client, carry a **Client** tag. To unlink, hover over the project and click the remove icon.
When a project is linked, the owner and admins can turn on **Add files to the project**. Every image, PDF, document and video uploaded to the group from then on is added to the project automatically. Files already in the group stay where they are.
### Share an invite link
1. In **Group info**, click **Invite link**.
2. Click **Create invite link**.
3. Click **Copy link** and share it.
You can also use **Copy invite link** in the conversation menu (**⋮**).
Anyone in your organization who has the link can join the group as a member. The link has no expiry date. Click **Reset link** to make the old link stop working and get a new one, or **Turn off link** so nobody can join by link. Only the owner and admins can manage the invite link. Threads and 1:1s don't have invite links.
### Join a group from an invite link
When you open an invite link (`/chat/invite/`), Cooper shows the group's photo, title, description, some of its members, and whether everyone can post. Click **Join group** to join, or **Not now**. If you are already a member, click **Open group**.
If you see "This invite link no longer works", the link was reset or turned off by a group admin, or it belongs to a different organization. Ask for a fresh link.
### Leave or delete a group
- **Leave group**: in **Group info** or the conversation menu (**⋮**). You stop getting messages and need to be added back (or use an invite link) to return. Your past messages stay. If the owner leaves, ownership passes to the longest-serving admin, or to the longest-serving member if there are no admins. Cooper suggests transferring ownership yourself first.
- **Delete conversation**: removes the group from your list and clears its history for you only. Other members keep their copy.
- **Delete for everyone**: shown to the owner. Deletes the group and its entire history for every member. This can't be undone.
## Use threads in a group
A thread is a smaller group inside a group, for example for the vendors or just your team. Only its members can see it, and you only see the threads you are in.
### Start a thread from a message
1. Hover over a message in the group, click **More message actions** (**⋯**) and choose **Share to thread**.
2. Pick an existing thread, or click **New thread**.
3. For a new thread, enter a **Thread name** (for example "Vendors"), select people from the group, and add **Anyone else** you need. You can **Add a note**.
4. Click **Share**, **Create & share** or **Create thread**.
People outside your company get an invitation first. They see only the thread and what is shared into it.
You can also open **Group info** → **Threads** and click **New thread**.
### Share an answer back to the main group
Inside a thread, click **Share to main group** in the strip at the top. Write what was decided and click to post it. People in the main group see only the answer. Thread members can open the discussion from it.
Messages discussed in a thread show **Discussed in …**, and answers posted back show **From …**.
## Send a message
Type in the message box and press `Enter`. Press `Shift`+`Enter` for a new line. `Ctrl`+`Enter` (or `Cmd`+`Enter`) always sends.
- Messages can be up to 8,000 characters. A counter appears near the limit.
- Your draft is saved per conversation, so it survives a page reload.
- If a message fails to send, it shows **Message not sent** with **Retry** and **Discard**. Messages written while you are offline show **Queued** and send when you reconnect.
### Format text
Select text to show **Bold**, **Italic**, **Strikethrough** and **Code** buttons. **Bulleted list**, **Numbered list** and **Heading** are always available. You can also type the formatting:
| Format | Type | Shortcut |
|---|---|---|
| Bold | `*text*` | `Ctrl`/`Cmd`+`B` |
| Italic | `_text_` | `Ctrl`/`Cmd`+`I` |
| Strikethrough | `~text~` | `Ctrl`/`Cmd`+`U` |
| Code | `` `text` `` | |
| Bulleted list | `- ` at the start of a line | |
| Numbered list | `1. ` at the start of a line | |
| Heading | `# ` at the start of a line | |
Click **Emoji** to insert an emoji.
### Mention someone
Type `@` or click **Mention a teammate**, then pick a person. Use `↑`/`↓` and `Enter` or `Tab` to choose. The list shows the conversation's members and, when they are turned on, AI agents.
In a group, choose **@all** to notify everyone in the group. Typing `@everyone` also inserts **@all**.
A mention reaches the person even when they have muted the conversation.
### Rewrite a message with AI
When your draft is 2,000 characters or less, click **Clean up this message** (the magic wand). Cooper rewrites the draft and shows **Rewritten**. Pick a different tone (**Clearer**, **Shorter**, **More formal** or **Warmer**) or click **Undo**. Mentions are kept as they are.
## Share files, photos and more
Click **Add an attachment** (the paperclip) and choose:
| Option | What it does |
|---|---|
| **Upload from computer** | Pick files from your device. |
| **Media library** | Reuse a file already in your organization. Opens filtered to the conversation's linked project; clear the filter to see everything. |
| **Location** | Send where you are, or share it live. |
| **Poll** | Ask the conversation to decide something. |
| **Action** | Ask someone in the conversation to do something. Creates an action item. |
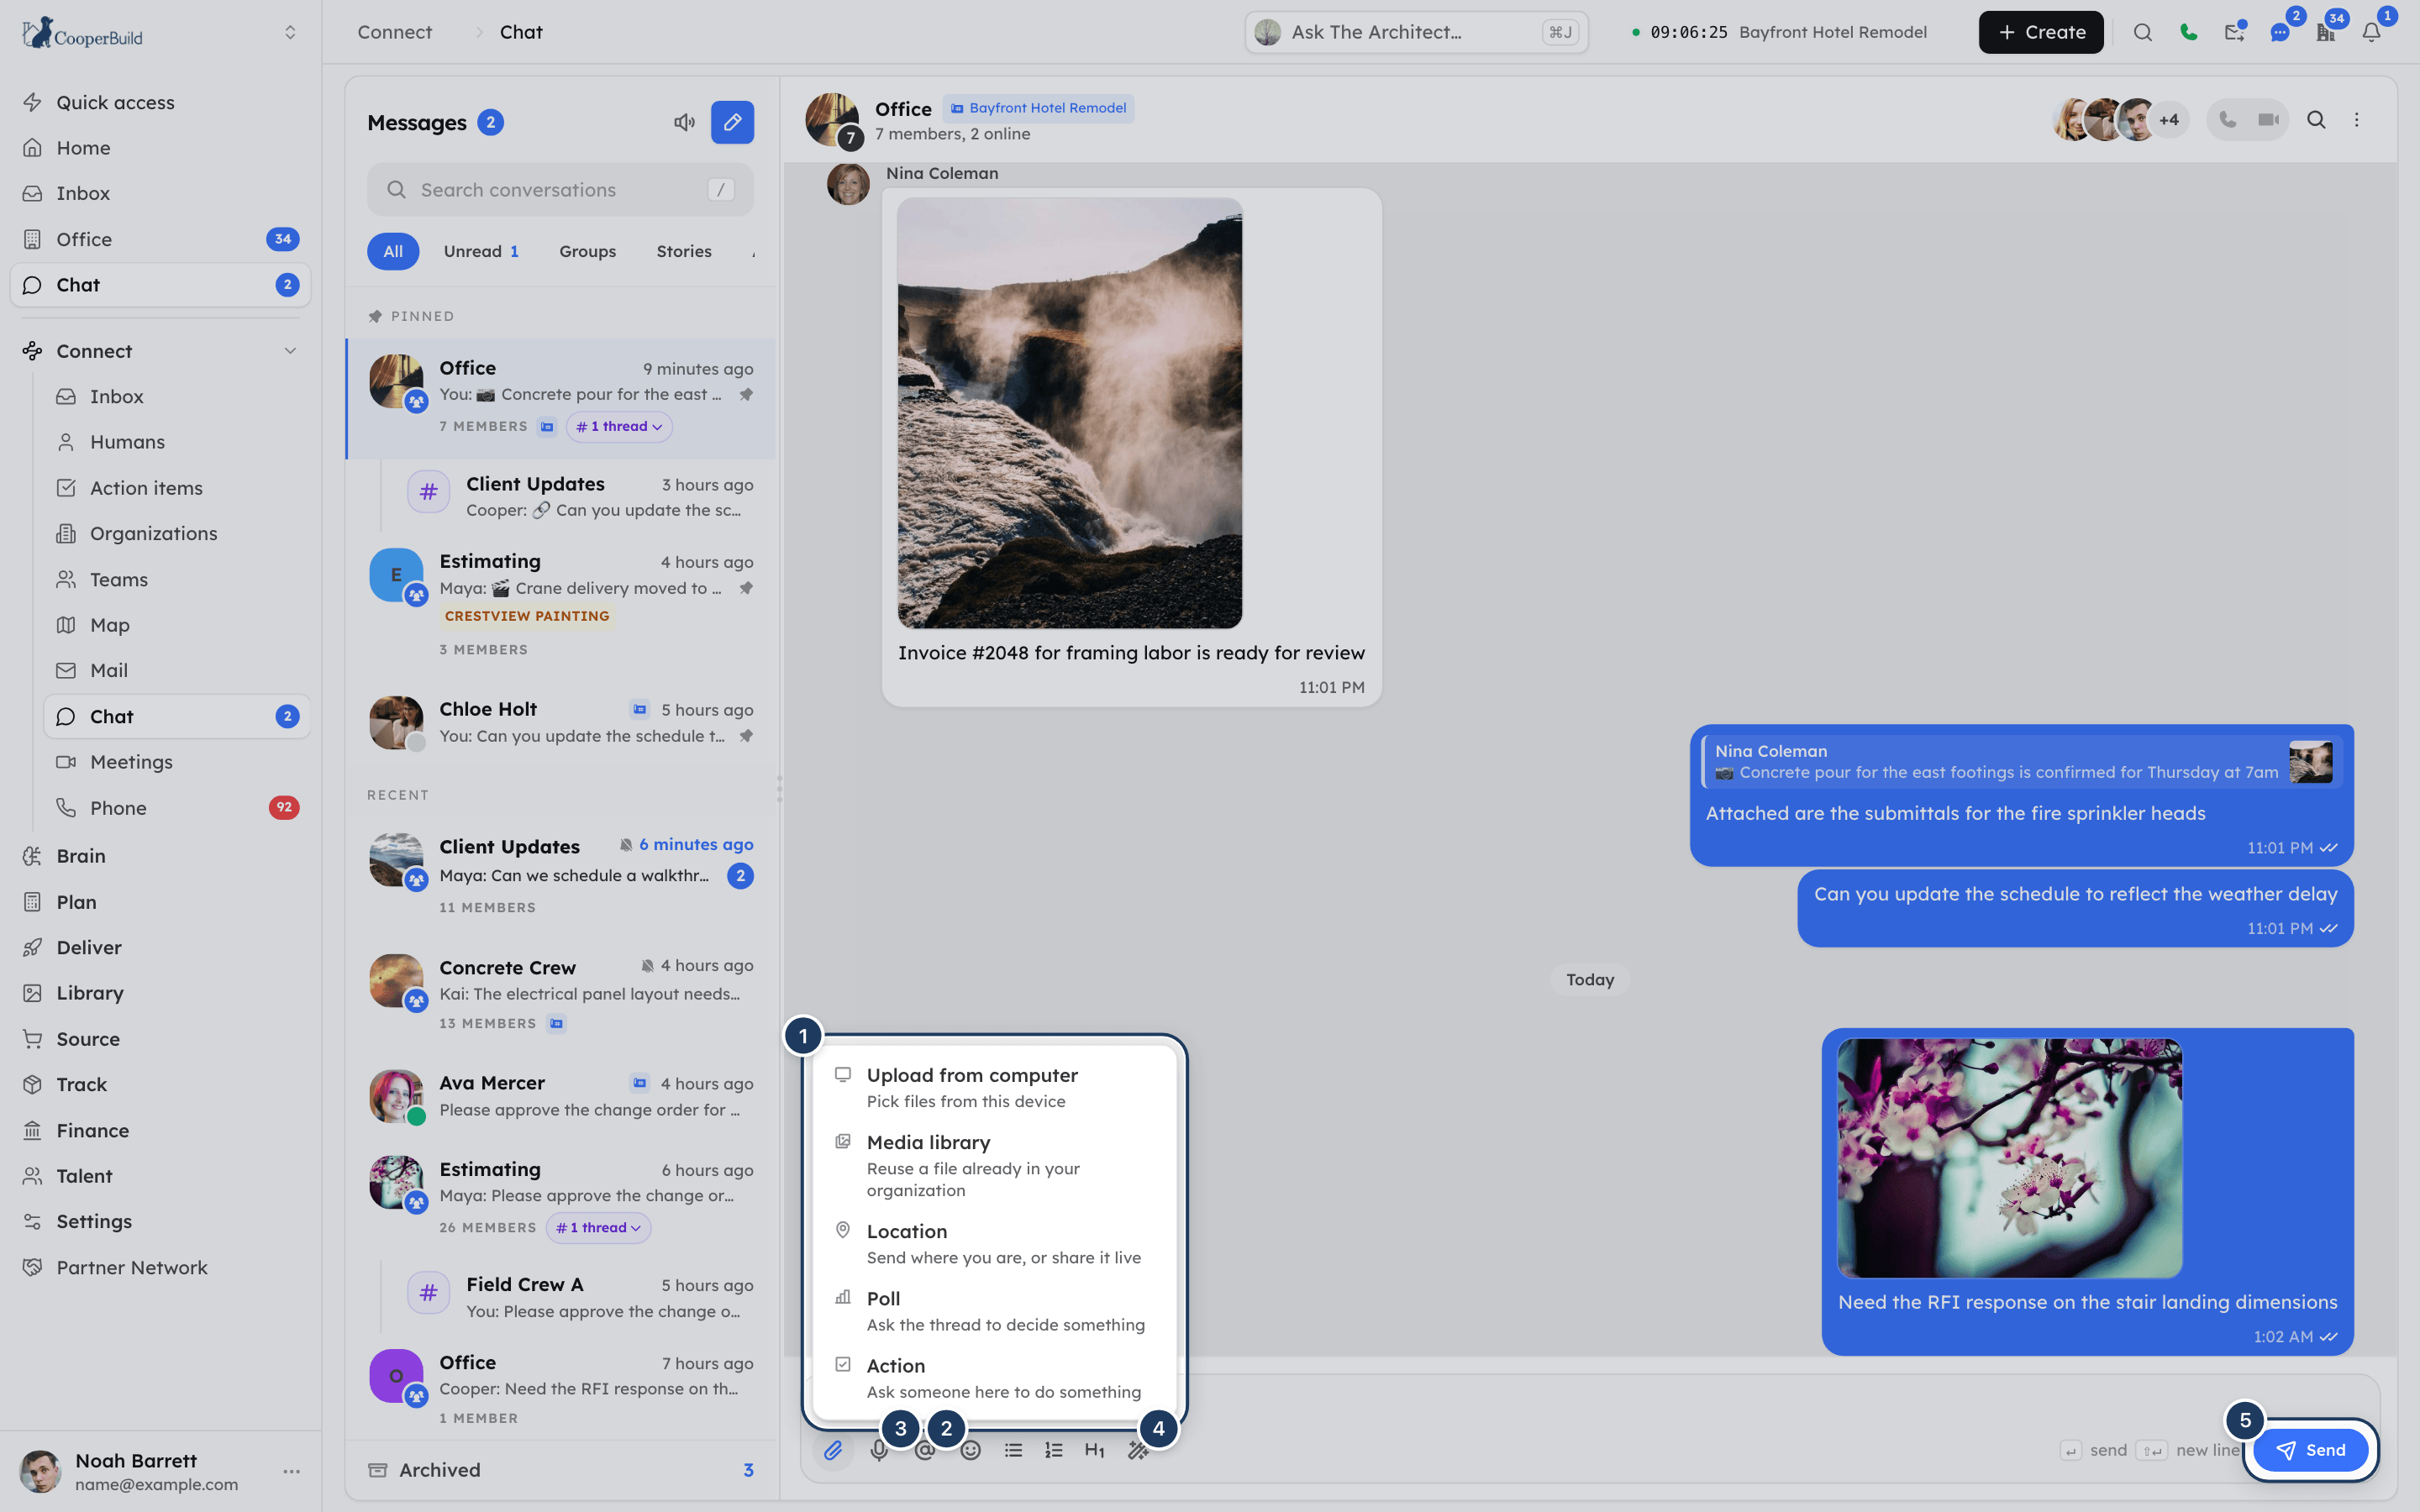
*Screenshot: The message box. 1: Add an attachment menu, 2: Mention a teammate, 3: Record a voice note, 4: Clean up this message, 5: Send.*
### Attach files
- Up to 30 attachments per message, and up to 100 MB per file. Any file type is accepted.
- Paste a screenshot or file into the message box, or drag files onto the message box or the conversation.
- Nothing sends until you press **Send**. You can add text to the same message.
- A file that fails to upload shows **Upload failed**. Click **Retry upload** or remove it.
Photos show as a grid, PDFs show a first-page preview, and small text, Markdown and CSV files show their first lines. Click a photo or video to open the viewer. You can zoom (up to 8×), use the arrow keys to move between items, and **Download**. Documents open in Cooper's file viewer.
### Record a voice note
1. Click **Record a voice note** (the microphone). Allow microphone access if your browser asks.
2. Speak. A timer shows how long you have recorded. Recording stops on its own at 5 minutes.
3. Click **Stop and attach**, or **Discard**.
4. Click **Send**.
Voice notes play back at 1×, 1.5× or 2×.
### Create a poll
1. Click **Add an attachment** → **Poll**.
2. Enter the question in **What are we deciding?** (up to 300 characters).
3. Enter at least 2 options, and up to 12. Click **Add option** for more.
4. Turn on **Allow multiple answers** if voters may pick more than one.
5. Click **Create poll**.
A poll can't be edited after it is sent. Results show counts only, never who voted. To vote, click an option. With multiple answers, click **Save votes**. The person who created the poll, or an admin, can click **Close poll**.
### Share your location
1. Click **Add an attachment** → **Location**. Allow location access if your browser asks.
2. Check the map and address. Click **Refresh** if needed.
3. To keep updating as you move, turn on **Share live** and choose **15 min**, **1 hour** or **8 hours** in **Keep sharing for**.
4. Click **Send location** or **Start sharing**.
People can click **Open in Maps**. While you share live, you can click **Stop sharing** on the message.
## Work with a message
Hover over a message (or press and hold on a touch screen) to show **React to message**, **Reply to message**, **Forward message** and **More message actions** (**⋯**).
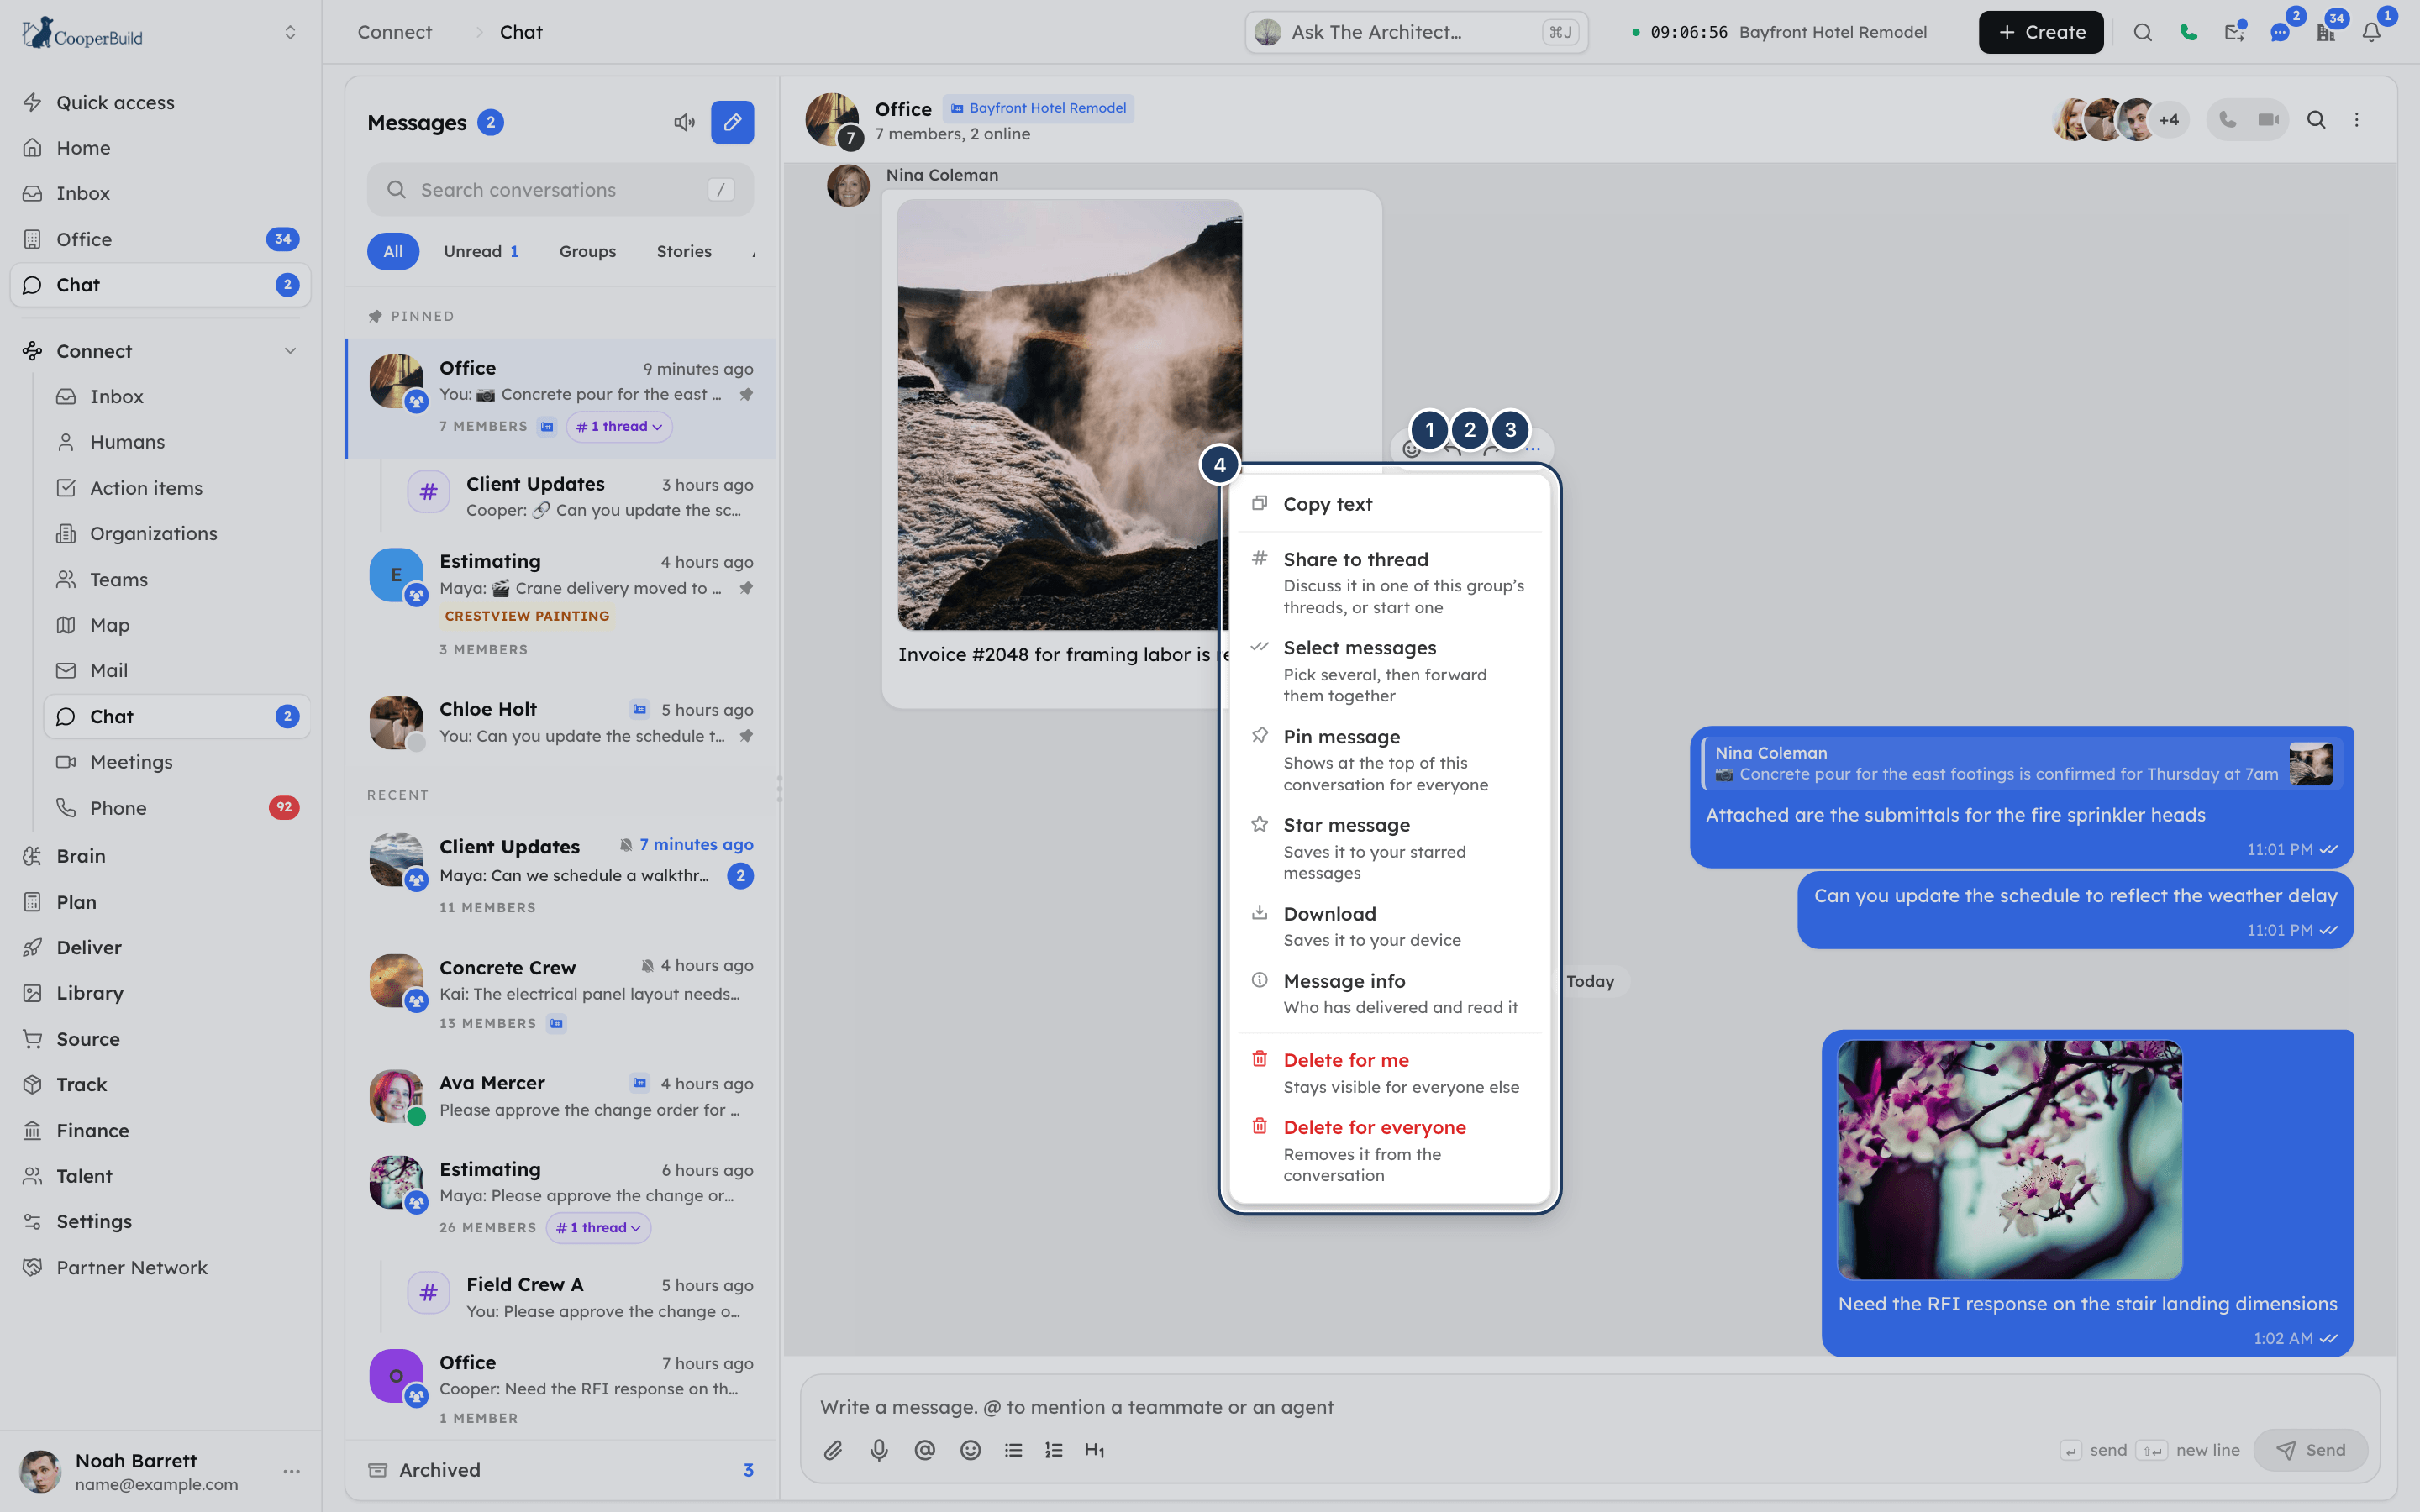
*Screenshot: Message actions. 1: React, 2: Reply, 3: Forward, 4: More message actions menu.*
| Action | Where | Who can use it |
|---|---|---|
| React | Smiley button. Quick reactions are 👍 ❤️ 😂 🎉 👀 🙏; click **⋯** for every emoji. Click your reaction again to remove it. | Anyone |
| **Reply** | Quotes the message above your reply. Press `Esc` to cancel. | Anyone |
| **Forward** | See [Forward messages](#forward-messages). | Anyone |
| **Copy text** | **⋯** menu | Anyone |
| **Edit message** | **⋯** menu, or press `↑` in an empty message box to edit your last message. Edited messages show **edited**. | The sender, for text messages. There is no time limit. |
| **Share to thread** | **⋯** menu | Group members |
| **Select messages** | **⋯** menu. Pick several messages to forward together. | Anyone |
| **Pin message** / **Unpin message** | **⋯** menu. Shows at the top of the conversation for everyone. | Any member |
| **Star message** / **Remove star** | **⋯** menu. Saves it to your starred messages. | Anyone (stars are private) |
| **Download** | **⋯** menu, when the message has attachments. Several files download as a zip. | Anyone |
| **Message info** | **⋯** menu. Shows who has received and read it. | Groups |
| **Delete for me** | **⋯** menu. The message disappears from your view only. | Anyone |
| **Delete for everyone** | **⋯** menu. Everyone sees "This message was deleted". This can't be undone. | The sender; group owners and admins; you, for an agent's reply to your question. Also needs the **Delete** right in **Chat** → **Messaging**. |
In a group, click a person's photo or name on a message and click **Message** to open a 1:1 with them.
### Read receipts
Your own messages show ticks:
| Tick | Meaning |
|---|---|
| Clock | **Sending**, or **Queued** while you are offline |
| One tick | **Sent** |
| Two grey ticks | **Delivered** |
| Two coloured ticks | **Read** |
| Warning | **Not sent** |
In a group, open **Message info** to see who has **Read** it, who it was **Delivered** to, and who it is **Not delivered yet** to.
### Pinned messages
Pinned messages show in a banner at the top of the conversation, newest first. Click the banner to jump to the message. With several pins, use the arrows to move between them. Click **Unpin this message** to remove it.
### Forward messages
1. Click **Forward** on a message. To forward several, choose **⋯** → **Select messages**, click up to 20 messages, then click **Forward**.
2. Search for and pick one or more conversations.
3. Send. Forwarded messages show **Forwarded from …**.
The number of messages multiplied by the number of conversations can be at most 60.
## Search inside a conversation
1. Click **Search in conversation** (the magnifier) in the conversation header.
2. Type at least two characters in **Search this conversation…**.
3. Click a result to jump to the message.
Search shows up to 25 results. Press `Esc` to close it.
## See shared media, files and links
In **Group info** or **Contact info**, click **Shared media**, **Files** or **Links**. The panel has tabs for **Media**, **Files** and **Links**.
To download several photos at once, open **Media**, click **Select**, click the photos, then click **Download (N)**. Cooper creates a zip.
## Call from a conversation
Click **Audio call** or **Video call** in the conversation header. In a group, the buttons read **Start a group call** and **Start a group video call**, and you can choose who rings. A pre-join screen opens. Click **Call now**.
Everyone in a group can start a call. When calling isn't available, the buttons are greyed out and the tooltip says why. Conversations mirrored from Slack have no call buttons.
## Arrange a meeting from Chat
Click the pencil button (**New message or group**) and choose **New meeting**. The same **New meeting** form opens as in the Meetings module. You can schedule a meeting or start one now. See [Meetings](https://docs.cooperbuild.ai/connect/meetings.md).
Meetings that are about to start, or are happening now, also appear as a strip at the top of your conversation list, with **Join** and **Decline** buttons.
## Chat with AI agents
AI agents are available when your workspace has chat agents switched on, and your role includes **Chat** → **AI Agents in Chat**.
- **In any conversation:** type `@` and pick an agent, or type `@AgentName`. Only the first agent named in a message runs. Files you attach go to the agent too. Replying to an agent's answer asks that agent again.
- **In a private agent chat:** in **New message**, pick an agent under **Agents** and click **Chat with agent**. Every message you send goes to that agent.
While an agent works, you see a panel with its progress and a **Stop the agent** button. Only you see this panel. Others see "… is working — … · asked by …".
If an agent needs an answer from you, a question appears in place of the message box. Pick an option (press `1`–`9`), type your own answer, or click **Skip**.
Each agent answer has **See how this was answered**, which shows the tools and steps the agent used.
In a group, the owner or an admin can set **Use AI agents** to **Admins only** in **Permissions**.
### Slash commands for agents
Type a command at the start of a message and press **Send**. The reply is shown only to you.
| Command | What it does |
|---|---|
| `/new` | Start fresh — the agent forgets this chat up to now |
| `/reset` | Same as `/new` |
| `/compact` | Summarise older history, keep the gist |
| `/status` | Model, context in use, and cost so far |
| `/stop` | Stop the agent working here |
| `/model` | Show or set the model for this agent here |
| `/think` (or `/t`) | How hard the agent thinks: low, medium, high |
| `/agents` | Which agents you can use here |
| `/profile` (or `/soul`) | How agents write, call and answer for you |
| `/memory` (or `/mem`) | What agents remember about you |
| `/help` (or `/?`) | List the commands |
To target one agent, add its name, for example `/status @Blake`.
## Action items and Cooper cards in chat
### Ask someone to do something
Click **Add an attachment** → **Action** to create an action item in the conversation. Cooper may also spot action items in what people write. These show **Cooper spotted this**.
The person who owes the action item, and the person waiting for it, can:
- Click **Done** or **Started**.
- Click **Dismiss** on an item Cooper spotted.
- Click **Make a task** to create a project task tied to the action item. Finishing either one closes the other.
- Click the pencil (**Change who owes this**) to change who is **Doing it** and who is **Waiting for it**.
See [Action items](https://docs.cooperbuild.ai/connect/action-items.md).
### Records shared in chat
RFIs, projects, tasks, invoices, submittals and estimates can appear as cards with a status and an **Open** link. If you don't have access to the record, the card says so. Ask the sender for access.
### Cooper checks
When a message says something happened, for example "RFI #5 response received", Cooper compares it with the project records and adds cards under the message. The person who has to act gets buttons such as **Close RFI #5** or **Do all N**. Nothing changes in a record until someone presses a button. Click **Not now** to hide a card for a day.
## Mute, pin and archive conversations
Right-click a conversation in the list (or long-press it on touch), or open the conversation menu (**⋮**) in the header:
| Action | What it does |
|---|---|
| **Mute for 8 hours**, **Mute for 1 week**, **Mute until I turn it back on** | Stops notifications for this conversation. Mentions still reach you. Click **Unmute** to undo. |
| **Pin conversation** / **Unpin conversation** | Keeps the conversation at the top of your list. |
| **Archive** / **Move to inbox** | Hides the conversation until someone replies. Find it under **Archived**. |
| **Delete conversation** | Removes it from your list and clears its history for you. |
Muting, pinning and archiving are personal. Nobody else in the conversation can see them.
In **Group info** → **Notifications**, you can choose **Every message** or **Mentions and replies**, and set **Mute until**.
## Block someone
When someone who isn't in your contacts messages you, click **Block** in the strip at the top of the conversation. They can no longer message you, and the history stays.
Blocking is between you and that person. It applies everywhere you use Cooper, and doesn't remove either of you from any group.
To unblock, click **Unblock** in the conversation, or open **Group info** or **Contact info** → **Blocked people** and click **Unblock**.
## Get notified about new messages
- **Unread badges:** the **Chat** item in the sidebar, the **Messages** bubble in the header and the rail all show your unread message count.
- **Message sound:** click the speaker button at the top of the conversation list. Turn **Message sound** on or off, set the **Volume**, and click **Play test sound**. The sound plays for new messages in other conversations, only while Cooper is open, and is held back while you are on a call.
- **Browser notifications:** if you see "You won't be told when someone replies", click **Turn on notifications** and allow them in your browser. If your browser blocks Cooper notifications, click **Show me how**.
- **Push notifications** go to your phone and browser when you aren't online in Cooper.
If you see "Not connected — messages will send when you're back online", Cooper has lost its connection. Your messages send when the connection returns.
## Chat from any page (the chat dock)
You can chat without leaving the page you are on.
### Step 1: Open the Messages menu
Click the **Messages** chat bubble in the top header. Choose the **Unread** or **All** tab. Click **Mark all as read** to clear every unread badge.
### Step 2: Open a conversation
Click a conversation. It opens in a small window at the bottom right of the screen.
### Step 3: Work with the window
Drag the window by its title bar. Use **Minimize**, **Open full page**, **Collapse to button** or **Close**. Drag the top-left corner to resize it.
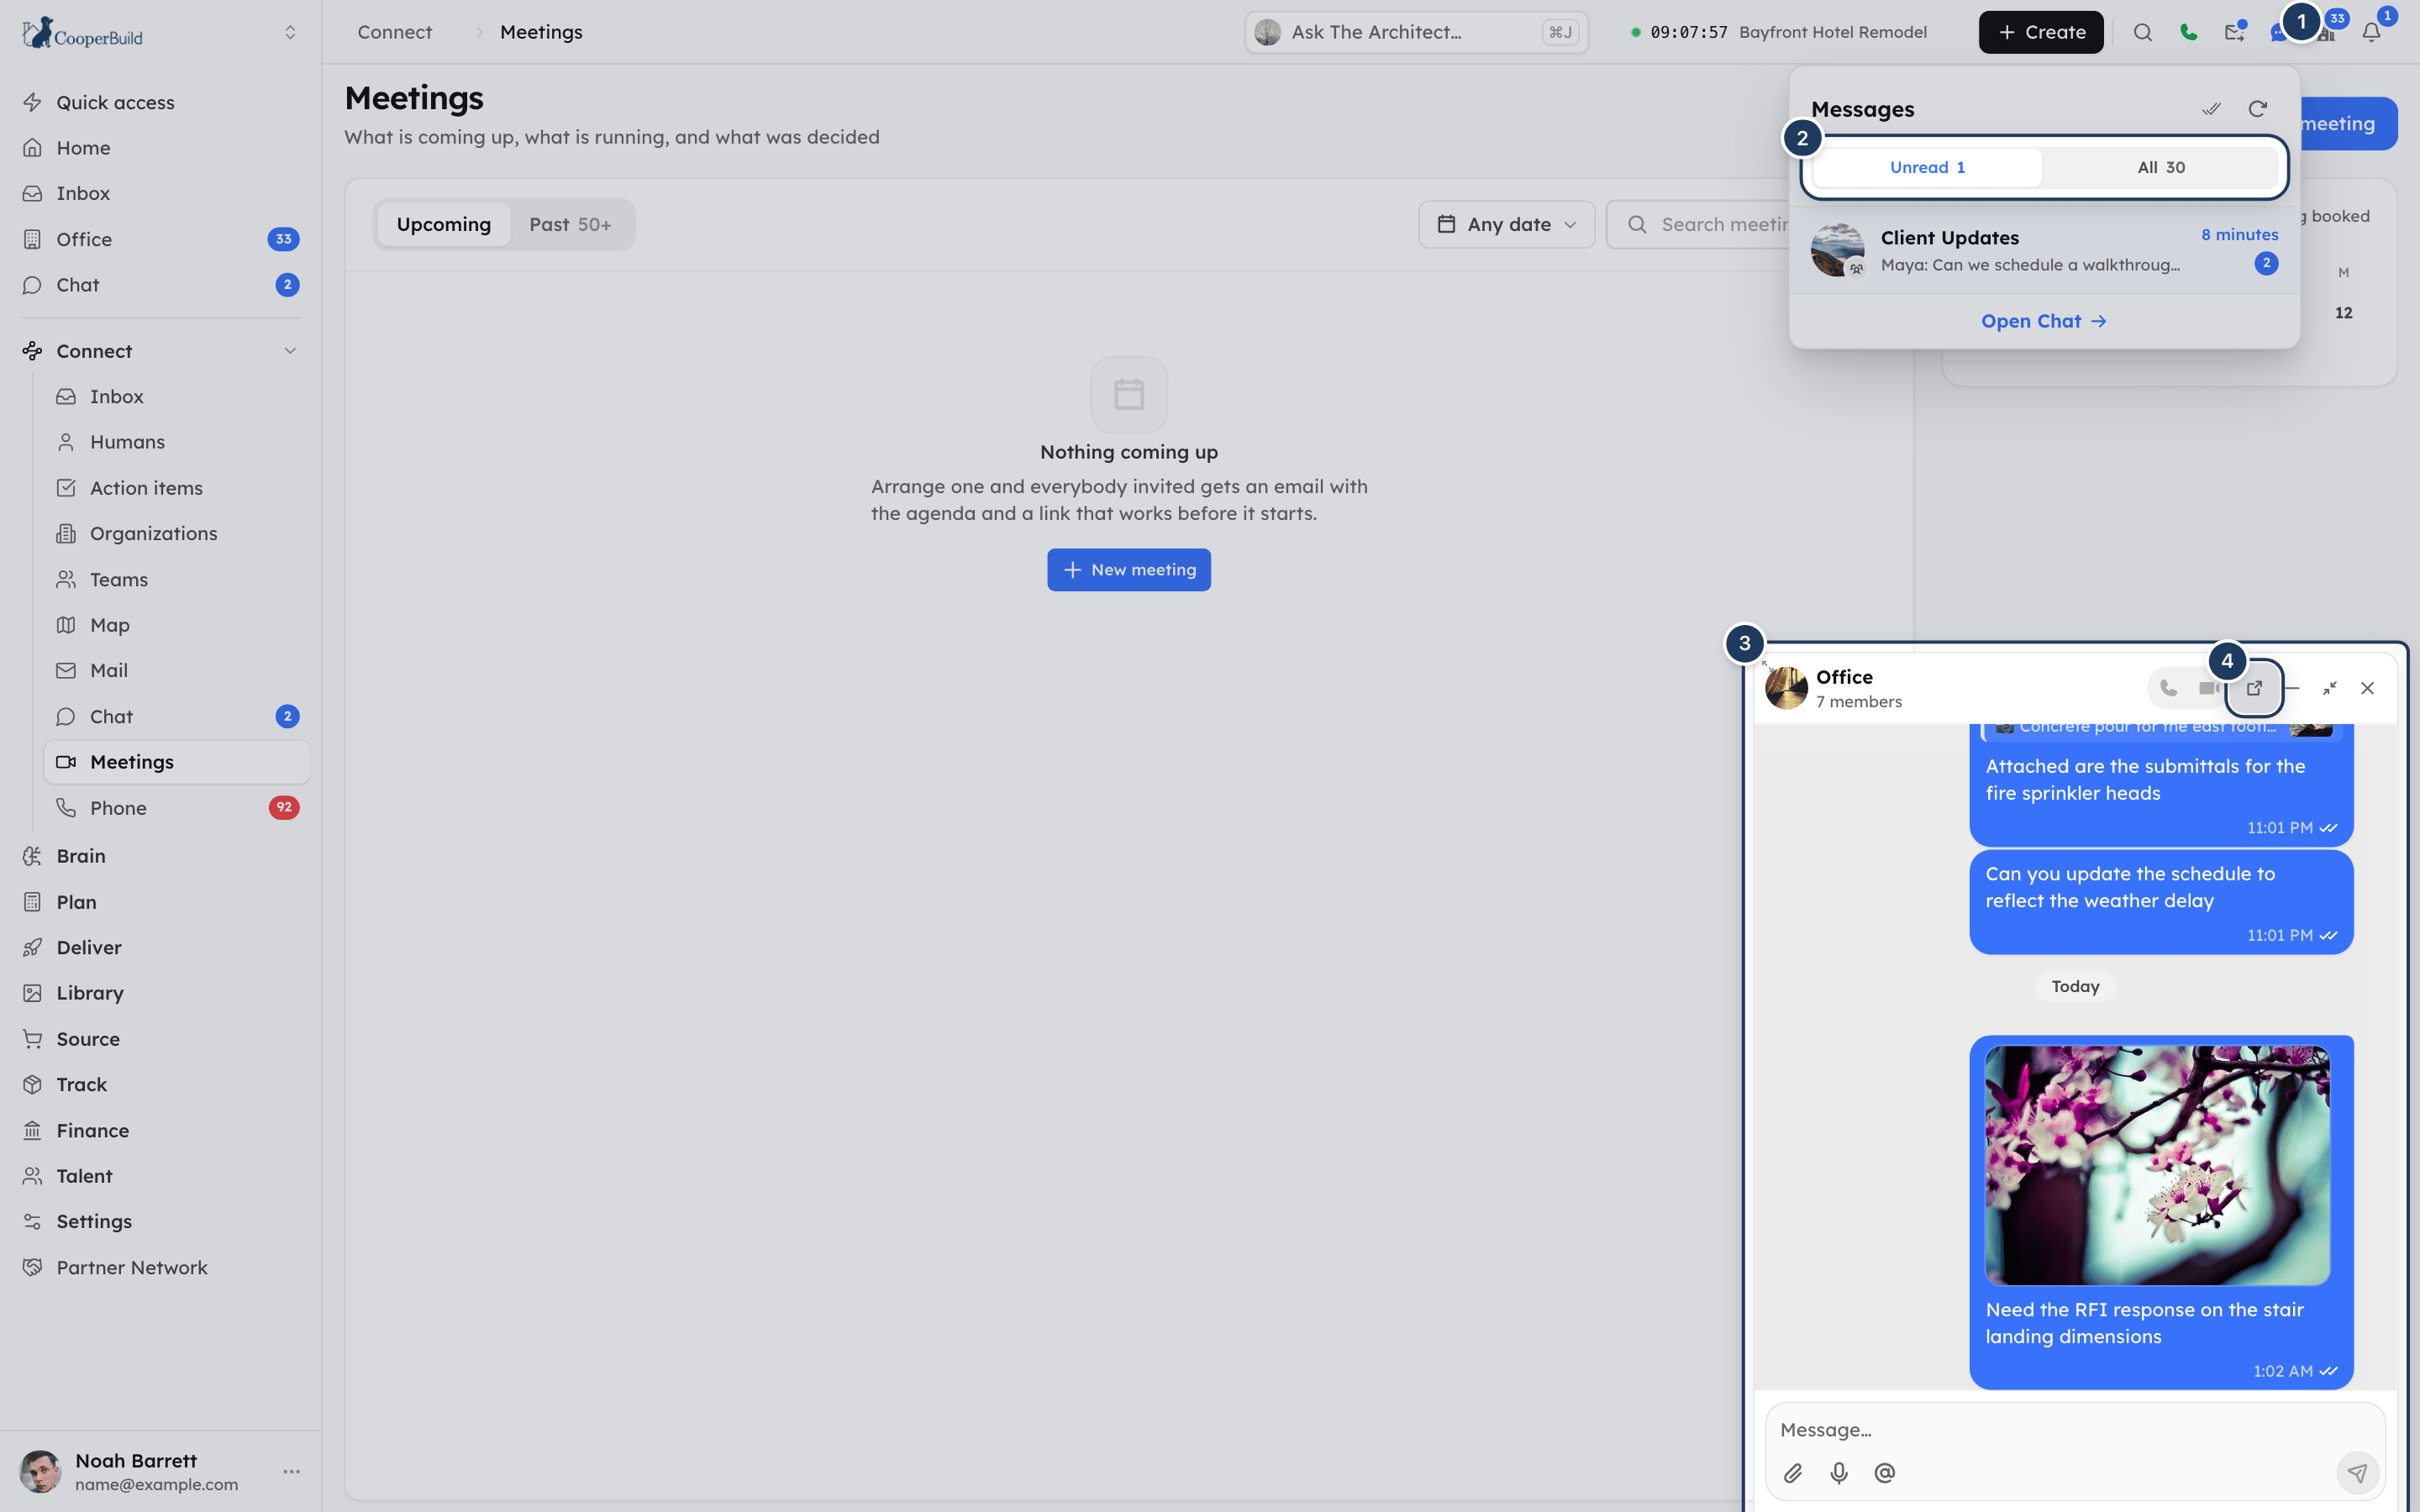
*Screenshot: The chat dock. 1: Messages in the header, 2: Unread and All tabs, 3: a docked chat window, 4: Open full page.*
- Up to 3 windows can be open. Opening a fourth closes the oldest.
- Collapsed windows become a round button at the bottom right. Click it to pick a conversation. Right-click it for **Open all chats** and **Close all chats**.
- Your open windows are restored when you reload the page.
- The dock isn't shown on the Chat page itself or on small screens. There, conversations open in Chat.
## Permissions
Two separate things control what you can do in Chat.
**Your role** decides whether you can use Chat at all. In **Settings** → **Roles**, the **Chat** module has four parts:
| Part | What it allows |
|---|---|
| **Messaging** | Read: open Chat and read conversations. Write: send, react, forward and upload. Delete: delete any message you are allowed to for everyone. |
| **Group Chats** | Read: see groups. Write: create groups and manage their members and settings. Delete: delete a whole group. |
| **Chat Invites & Requests** | Invite links, email invitations and message requests. |
| **AI Agents in Chat** | Use AI agents in conversations. |
Every role has all four by default. An admin can untick them for a role, for example to turn Chat off for site workers. Without **Messaging**, the Chat menu item, the Chat page and the header **Messages** bubble disappear.
**Your role in a group** decides what you can do inside that group:
| Action | Owner | Admin | Member |
|---|:---:|:---:|:---:|
| Send messages | Yes | Yes | Yes, unless **Send messages** is **Admins only** |
| Pin messages, start calls, leave | Yes | Yes | Yes |
| Change name, photo, description | Yes | Yes | Only if **Edit group info** is **Everyone** |
| Add members | Yes | Yes | Only if **Add members** is **Everyone** |
| Remove members | Yes | Members only | No |
| Make or remove admins, transfer ownership | Yes | No | No |
| Link projects, manage the invite link | Yes | Yes | No |
| Delete any message for everyone | Yes | Yes | No (own messages only) |
| Delete the group for everyone | Yes | No | No |
A role permission doesn't make you an admin of somebody else's group.
### Chat clean-up (message retention)
Chat messages and call transcripts are kept forever unless automatic clean-up is turned on. Only Cooper super admins can change this, in **Admin** → **Chat Clean-up**. They set **Keep chat messages for** and **Keep call transcripts for** (**Forever**, **90 days**, **6 months**, **1 year**, **2 years**, **7 years**, or a number of days, minimum 7). Clean-up runs nightly. Deleted messages, and the files attached to them, can't be recovered.
## Tips and best practices
- Link each project group to its project, and turn on **Add files to the project** so site photos and PDFs file themselves.
- Use **Mentions and replies** or mute busy groups. People can still reach you with an `@` mention.
- Use a thread for vendor or subcontractor discussions, so outsiders see only what is shared with them.
- Use a poll instead of a long back-and-forth when the group needs to decide something.
- Pin the message with the current plan, address or gate code so newcomers find it.
## Troubleshooting
### I can't see Chat in the sidebar
Your role doesn't include **Chat** → **Messaging**. Ask an admin to tick it for your role in **Settings** → **Roles**. If you open `/chat` without it, you see an Access Denied page.
### I can't find New group
Your role doesn't include write access to **Chat** → **Group Chats**. Ask an admin to grant it.
### The message box says only admins can post
The group's **Send messages** permission is set to **Admins only**. You still receive every message. Ask the group's owner or an admin to change it.
### I can't add someone to a group
Only the owner and admins can add members, unless **Add members** is set to **Everyone**. People without a Cooper login can't be added. Invite them from **New message** first. A group is full at 512 people.
### Someone at another company hasn't replied
Your message is a message request until they allow it. The conversation shows **Waiting for them to accept**. If it shows **They declined your request**, you can click **Ask again**.
### I don't see any AI agents when I type @
Chat agents may be switched off for your workspace, your role may not include **Chat** → **AI Agents in Chat**, or the group may have **Use AI agents** set to **Admins only**.
### My file won't attach
Each file can be up to 100 MB, and a message can carry up to 30 attachments. You can't add files while editing a message.
### I'm not getting notified
Check that the conversation isn't muted (a muted icon shows next to its name). Turn on browser notifications when Cooper asks, or click **Show me how** if your browser blocks them. Check that **Message sound** is on.
### This invite link no longer works
A group admin reset or turned off the link, or it belongs to a different organization. Ask for a fresh link.
## For AI agents
Use these CooperBuild MCP tools to work with Chat on the user's behalf. The user's role must include the matching **Chat** permission.
| Tool | Use it for | Key parameters |
|---|---|---|
| `chat_send` | Find chats and people (`find`), read recent messages (`read`), and send a message as the user (`send`). Sends immediately, with no preview. | `action`; `query`; `conversationId`; for `send`: `text` (up to 8,000 characters) and exactly one of `conversationId`, `userId` or `email`; optional `replyToMessageId` |
| `chat_group_manage` | Create a group (`create`), rename or change its description or image (`update`), link or unlink projects (`link_project`, `unlink_project`), change a member's role (`set_role`), transfer ownership (`transfer_owner`). | `title`; `userIds`, `names`, `emails`; `projectIds`; `role` (`admin` or `member`); `targetUserId` or `targetName`; `confirm: true` for `transfer_owner` (the first call only previews) |
| `chat_group_members` | List a group's members and what the user may do (`list`); add people (`add`). | `conversationId` or `query`; `userIds`, `names`, `emails` |
| `chat_agent_message` | An agent starts a 1:1 conversation with a staff user. Previews first. | `userId` or `email`; `text`; `agentId`; `reason`; `confirm: true` to send |
Rules to follow:
- Confirm the wording and destination with the user before calling `chat_send` with `send`, because it sends straight away. Don't use it to broadcast to a list of people.
- When `chat_group_members` adds people, report colleagues as **added** and people outside the organization as **invited** (they join only when they accept).
- No tool removes members, leaves a group, deletes a group or changes group permission settings. Send the user to **Group info** in Chat for those.
- `chat_agent_message` reaches staff users only, and is limited to a few agent-started messages per person per day. Use email or SMS tools for outside contacts.
Common errors:
| Error | Fix |
|---|---|
| `TARGET_REQUIRED` / `TARGET_AMBIGUOUS` | Give exactly one destination: `conversationId`, `userId` or `email`. |
| `PERSON_NOT_FOUND` | Use `chat_send` with `find` to look the person up first. |
| `NOT_ON_COOPER` | The person has no Cooper login. Ask the user whether to text or email them instead. |
| `NOT_ALLOWED` | The group's settings or the user's role don't allow it (for example, only admins can add members). Tell the user who can. |
| `NOT_A_MEMBER` / `MEMBER_AMBIGUOUS` | The named person isn't in the group, or the name matches several people. Use `chat_group_members` with `list` and pass `targetUserId`. |
| `NOTHING_TO_CHANGE` | Nothing to update. Permission settings can't be changed through this tool. |
| `CHAT_AGENTS_DISABLED` | Chat agents are switched off for the workspace in **Connected AI Services**. |
| `OUTREACH_CAP_REACHED` | The daily limit of agent-started messages to that person is reached. Try tomorrow. |
To point a user at a message, use `/chat/?m=`.
## Related
- [Meetings](https://docs.cooperbuild.ai/connect/meetings.md) — arrange and hold video meetings, including from Chat.
- [Action items](https://docs.cooperbuild.ai/connect/action-items.md) — the action items you create and track in conversations.
- [Teams](https://docs.cooperbuild.ai/connect/teams.md) — add a whole team to a group at once.
- [Phone](https://docs.cooperbuild.ai/connect/phone.md) — call and text people outside Cooper.
- [Settings](https://docs.cooperbuild.ai/connect/settings.md) — where admins change role permissions.
---
# Meetings
> Schedule or start video and audio meetings with your team and outside guests, let people in, and turn the automatic write-up into decisions and project tasks.
Source: https://docs.cooperbuild.ai/connect/meetings
Keywords: meetings, video meeting, video call, audio meeting, schedule meeting, recurring meeting, meeting invite, guest link, lobby, knock, co-host, transcript, meeting notes, meeting minutes, ai notetaker, write-up, action items, follow-up meeting
Meetings lets you arrange, hold and write up video and audio meetings inside Cooper. You invite teammates, contacts and anyone outside Cooper by email. Everyone gets an invitation with the agenda and a link. Teammates walk straight in. Guests use their personal link, or knock and wait for someone inside to let them in.
When notes are on, Cooper transcribes the meeting. When it ends, Cooper writes up what was decided and the actions people took on, and emails the notes and transcript to everyone who was there. You review the write-up and turn the agreed actions into tasks on a project.
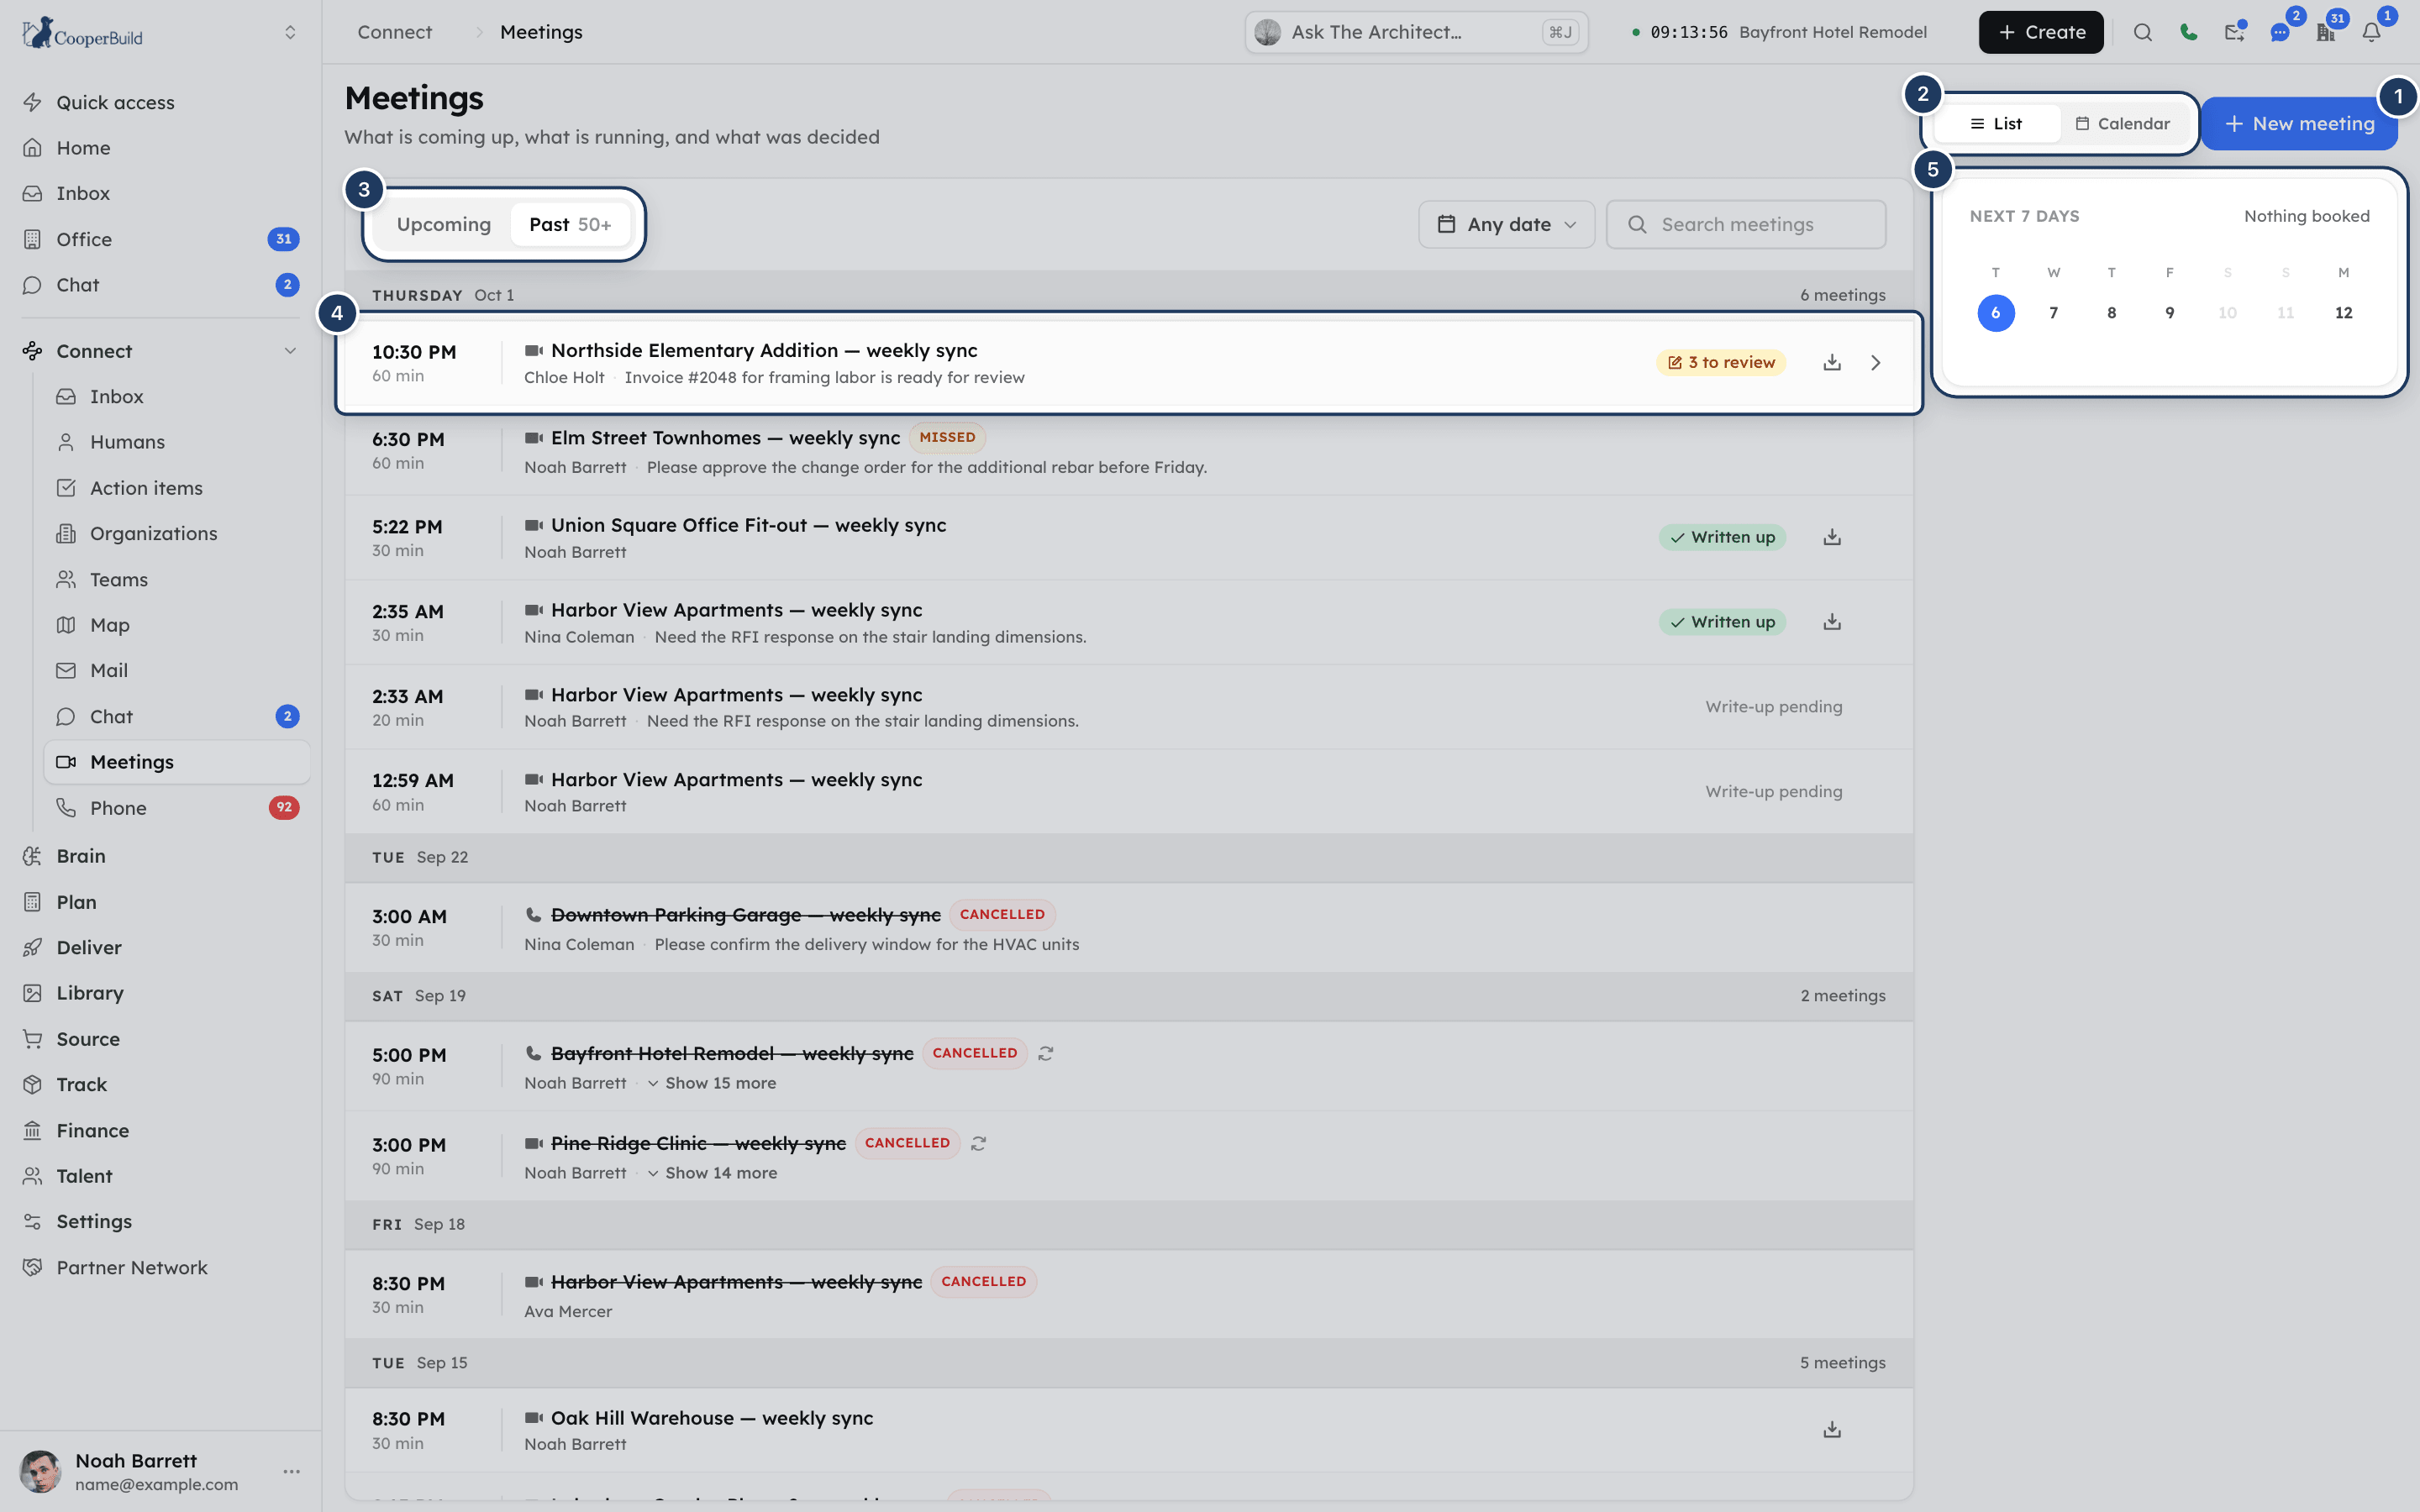
*Screenshot: The Meetings page. 1: New meeting, 2: List and Calendar views, 3: Upcoming and Past, 4: a meeting row, 5: Next 7 days.*
## Key concepts
| Term | Meaning |
|---|---|
| **Meeting page** | The record of a meeting at `/meetings/`: agenda, people, write-up and transcript. Opening it never turns on your camera. |
| **Meeting room** | The live meeting at `/meeting/`. It opens in its own browser tab, with no sidebar. |
| **Host** | The person who arranged the meeting. Only the host can move, cancel, restore or change access. |
| **Co-host** | A teammate the host chose to help run the meeting. Co-hosts can open the room early, let people in and manage the link. |
| **Teammate** | A member of your workspace. Teammates walk straight into a meeting unless the host turned on **Teammates must knock**. |
| **Guest** | Anyone outside your workspace: clients, consultants, subcontractors. |
| **Personal link** | The link in each emailed invitation. It belongs to one invitee and lets them walk straight in when the meeting opens. |
| **Guest link** | The general link you copy and share. Anyone who uses it knocks and waits to be let in. |
| **Knock** | Asking to join. People inside the meeting see who is waiting and click **Admit** or **Decline**. |
| **Notes** | The automatic write-up: **What was decided**, context, and **Actions**. Produced from the transcript after the meeting ends. |
| **Transcript** | The written record of what was said, line by line, with speaker names. |
| **Repeating meeting** | A schedule (for example every Tuesday). Each occasion is its own meeting with its own notes. |
## Open Meetings
In the sidebar, open **Connect** and click **Meetings**. The page opens at `/meetings`. To open the **New meeting** form straight away, go to `/meetings?new=1`.
Every member of your workspace can use Meetings. There is no role permission for it.
You can also arrange a meeting from Chat: click the pencil button at the top of the conversation list and choose **New meeting**. See [Chat](https://docs.cooperbuild.ai/connect/chat.md).
## Find your meetings
The Meetings page shows, from the top:
1. A strip for meetings happening now or starting within 15 minutes, with **Join**, **Going**, **Decline**, **Start now** or **Cancel**.
2. **From other companies**: meetings other companies invited you to. See [Answer an invitation from another company](#answer-an-invitation-from-another-company).
3. Your meetings list, with **Next up** and **Next 7 days** on the right.
### Use the list view
- Click **Upcoming** or **Past**. Live meetings sit at the top of **Upcoming** under **Happening now**.
- When you have more than 6 meetings, use **Search meetings** (matches the title, agenda and host) and the date filter (**Any date**, **Today**, **This week**, **This month**, or a range).
- Meetings are grouped by day. A repeating meeting shows once, with **Show N more** to expand it.
- On **Past**, click **Load earlier meetings** to go further back.
Each row shows the start time, title, host and agenda, plus badges such as **Cancelled**, **Missed**, **Declined** or **Interview**. A microphone icon means the meeting is **Being recorded** or **Will be written up automatically**. Past rows show the state of the notes: **Write-up pending**, **N to review**, **N decisions** or **Written up**.
Clicking an upcoming or live row opens the meeting room. Clicking a past or cancelled row opens the meeting page.
**Next up** shows the live meeting, or the next scheduled one, with **Join now**, **Start** or **Open room** and a button to copy the guest link. **Next 7 days** shows how many meetings are on each day. Click a day to jump to it in the list.
### Use the calendar view
Click **Calendar** at the top of the page. Choose **month** or **week**, move with the arrows or **Today**, and filter by **All**, **Scheduled**, **Live**, **Finished** or **Cancelled**. Click a day to list its meetings, and click a meeting to open its page.
Cooper remembers which view you used last in this browser.
## Schedule a meeting
### Step 1: Open the form
Click **New meeting** at the top right of the Meetings page.
### Step 2: Describe the meeting
Leave the switch on **Schedule**. Enter a title (for example "Shop drawings review") and an agenda. The agenda goes out in the invitation email.
### Step 3: Choose a project and notes
Pick a **Project** if the meeting is about one job. Leave **Write this meeting up automatically** on to get notes and a transcript. Turn on **Teammates must knock** if uninvited teammates should wait to be let in.
### Step 4: Pick the time
Under **When**, use a **Jump to** shortcut (**In 15 min**, **In 30 min**, **In 1 hour**, **Tomorrow 9 AM**, **Tomorrow 2 PM**) or pick a date and time in **Starts**. Choose how long it **Lasts for**. Under **Meet with**, choose **Video** or **Audio only**. Click **Next →**.
### Step 5: Invite people
Search for teammates and contacts, or type a full email address and click **Add**. See [Invite people](#invite-people-to-a-meeting).
### Step 6: Send
Click **Schedule & invite**. If your Gmail or Google Calendar is connected, click **Next →** first to choose how the invitation goes out.
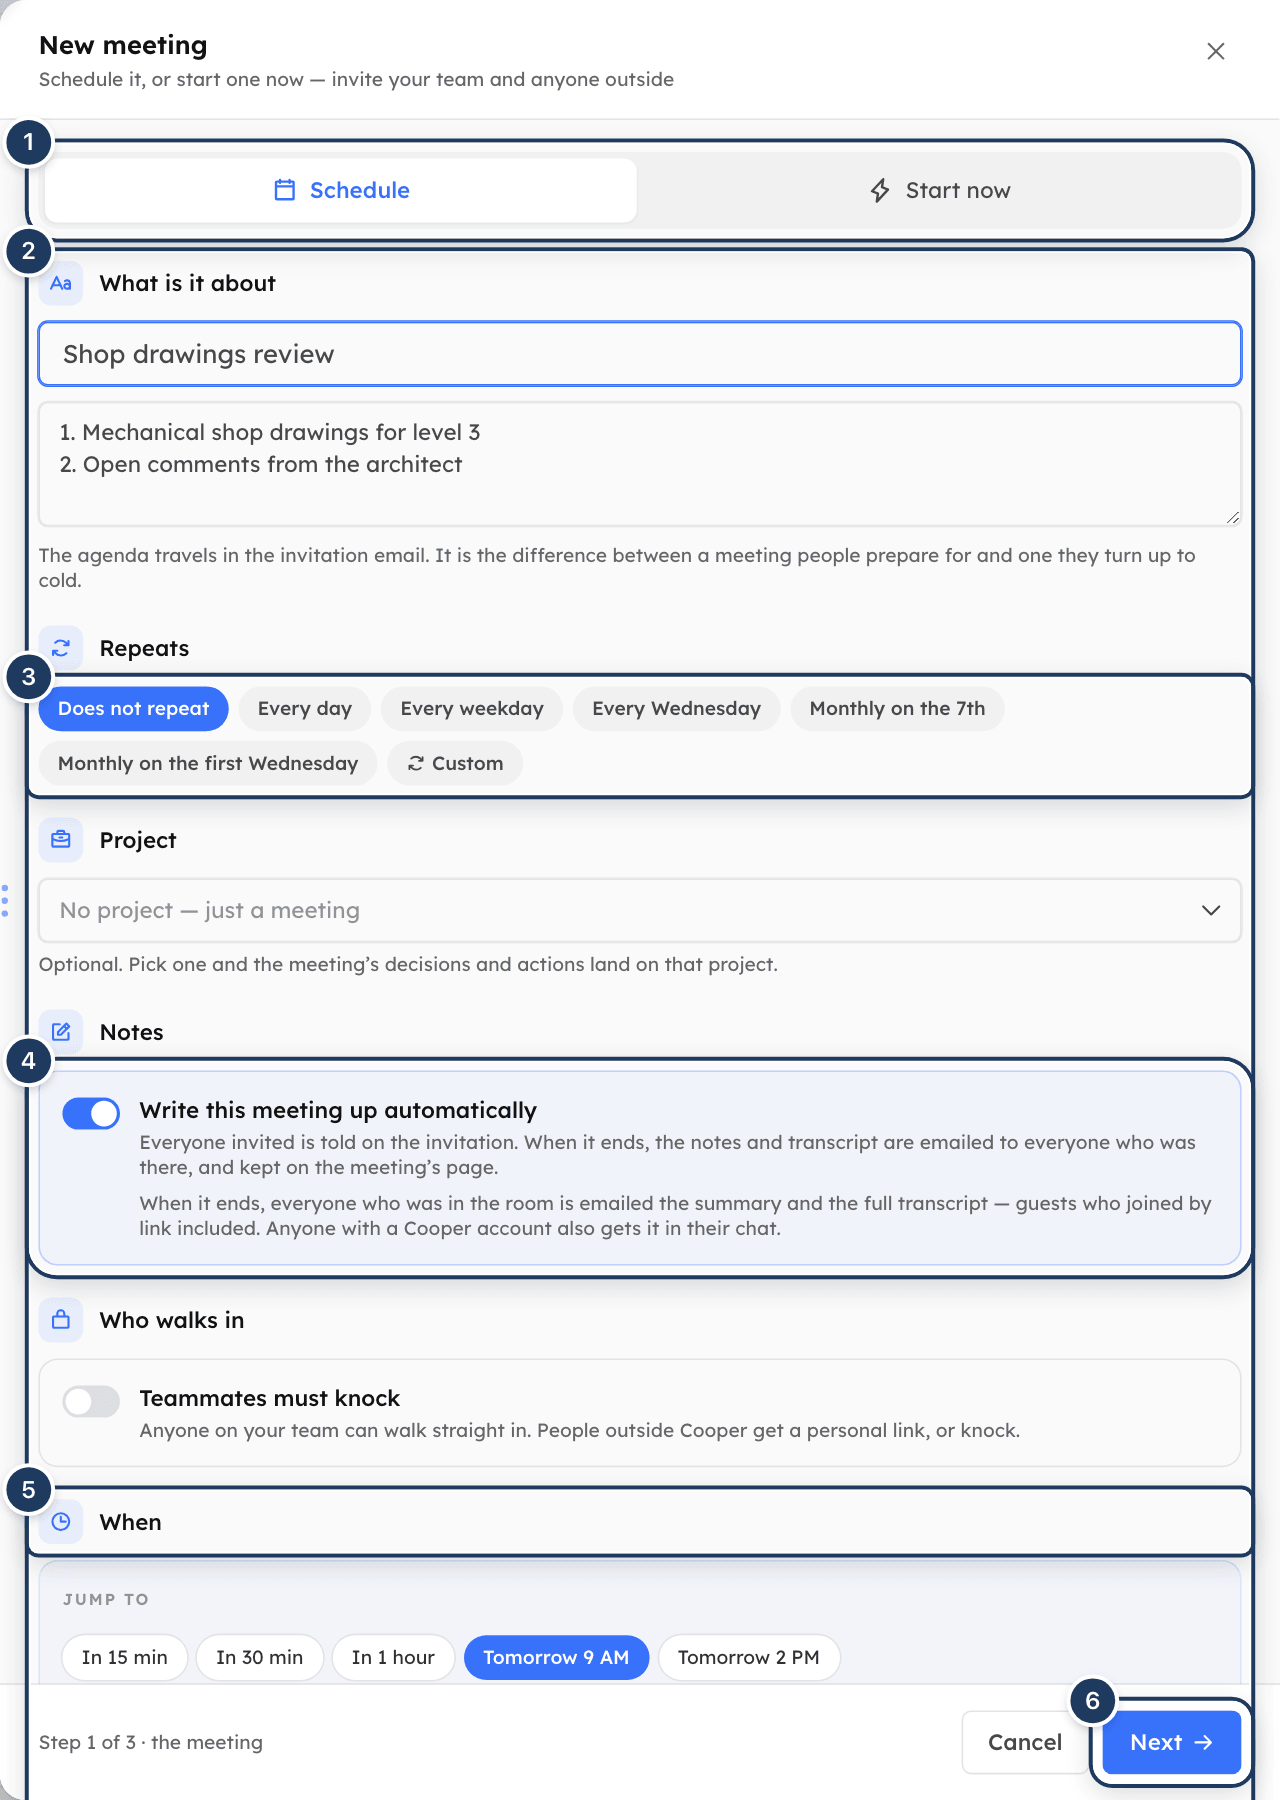
*Screenshot: New meeting. 1: Schedule or Start now, 2: title and agenda, 3: Repeats, 4: notes switch, 5: When, 6: Next.*
Cooper shows **Meeting scheduled** with who was invited and a **Share link** you can **Copy**. Everyone invited gets an email with the agenda and their own link. Click **Open the meeting** to go to the meeting, or **Done**.
The meeting uses your browser's time zone. Invitation emails show the time in the meeting's time zone.
### Start a meeting now
1. Click **New meeting** and switch to **Start now**.
2. Enter a title and choose how long it **Lasts for** and **Video** or **Audio only**.
3. Click **Next →**, add people, and click **Start meeting**.
The meeting opens in a new tab. Everyone you invite gets the link straight away. A meeting started now can't repeat.
### Make a meeting repeat
In the **Repeats** field, choose a preset. The presets are named from the start date:
- **Does not repeat** (default)
- **Every day**
- **Every weekday**
- **Every** (the weekday), for example **Every Tuesday**
- **Monthly on the** (date), for example **Monthly on the 21st**
- **Monthly on the** (week and weekday), for example **Monthly on the third Tuesday**
- **Custom**
With **Custom**, set **Repeat every** (1–52) **Day**, **Weekday**, **Week** or **Month**, the days of the week (for weekly), and **Ends**: **Never**, **On a date**, or **After** a number of meetings (up to 500).
Everyone invited gets one email covering the whole schedule, with one link that works for every meeting in it. If a monthly meeting falls on a date that a month doesn't have (for example the 31st), that month is skipped.
### Choose how invitations go out
Step 3 appears when your Gmail or Google Calendar is connected.
- **Who it comes from**: **Cooper** (sent by CooperBuild on your behalf), or your Gmail address (sent from your own inbox, with your signature; replies come straight back to you).
- **Save this to my Google Calendar**: adds the meeting to your own calendar. If you move or cancel the meeting, the entry follows. Everyone invited already gets a calendar invitation.
Replies to Cooper's meeting emails go to the host.
## Invite people to a meeting
On step 2 of **New meeting**, search in **Search teammates and contacts, or type an email…**. Results are grouped:
| Group | What happens |
|---|---|
| **In your organization** | Teammates. They join straight away. |
| **Your contacts on Cooper** | Contacts who use Cooper at another company. Invited by email. |
| **Your contacts without an account** | Contacts who don't use Cooper. Invited by email. |
| **Invite** (email) | Type anyone's full email address to invite them. |
| **AI agents** | Agents that join when the meeting starts and answer out loud when called by name. Up to 3 per meeting. |
To make a teammate a co-host, click the crown on their chip. The chip then reads **· co-host**.
You must add at least one person. A meeting can have up to 50 invitees.
## Fields reference
| Field | Required | What it means |
|---|---|---|
| **Schedule** / **Start now** | Yes | Schedule for later (default) or open the meeting immediately. |
| Title | Yes | The meeting name, up to 120 characters. |
| Agenda | No | What you want to get through. Sent in the invitation. Up to 2,000 characters. |
| **Repeats** | No | Whether and how the meeting repeats. Schedule only. |
| **Project** | No | The project the notes and action items land on. |
| **Write this meeting up automatically** | No | On by default. Transcribes the meeting and produces notes. Everyone invited is told on the invitation. |
| **Teammates must knock** | No | Off by default. When on, teammates who aren't invited wait to be let in. |
| **Starts** | Yes (Schedule) | Date and time, in 15-minute steps. Defaults to the next half-hour slot at least an hour from now. Up to a year ahead. |
| **Lasts for** | Yes | 15, 30 (default), 45 min, or 1, 1.5 or 2 hours. |
| **Meet with** | Yes | **Video** (default) or **Audio only** (no cameras at all). |
| People | Yes | At least one person. Teammates, contacts, email addresses and AI agents. |
| **Who it comes from** | No | **Cooper** or your Gmail. Shown when Gmail is connected. |
| **Your calendar** | No | Add the meeting to your own Google Calendar. Shown when Google Calendar is connected. |
## Answer a meeting invitation
When a teammate invites you, the meeting appears in your list. Click **Accept** or **Decline** on the row. In the strip at the top of the page, click **Going** or **Decline**. Joining a meeting you haven't answered also accepts it.
The meeting page shows your answer under **You**: **Came**, **Accepted**, **Declined** or **Not answered**.
## Answer an invitation from another company
If another company that uses Cooper invites your email address, the meeting appears under **From other companies** on your Meetings page. You also get a notification.
- Click **Accept** or **Decline**. The host sees your answer.
- Click **Join** when the room opens. The meeting opens in a new tab, and you join as a guest of that company, signed in as yourself, with no form to fill in. Nothing from your own workspace is shared.
You see only what the invitation said: title, time, agenda, host, co-hosts and how many people are invited. You don't see the guest list, the notes or the transcript. When your time zone differs from theirs, the row shows both times.
## Join a meeting
### Step 1: Open the room
Click **Join** (live), **Start** (if you are the host) or **Open** on the meeting's row, or **Join meeting** on the notice Cooper shows when a meeting is starting. The room opens in its own tab. If the meeting is already open in a tab, Cooper brings that tab forward.
### Step 2: Check your camera and microphone
Turn **Mic** and **Camera** on or off, choose your **Microphone**, **Speaker** and **Camera**, and pick a background (**None**, **Blur** or **Backdrop**). Cooper shows who is already inside. Nobody sees or hears you yet.
### Step 3: Join
Click **Join meeting**. If you have to knock, the button reads **Ask to join**, and you see **Waiting to be let in** until someone inside admits you.
### When you can get in
- **Hosts and co-hosts** can open the room at any time.
- **Everyone else** can join from 5 minutes before the start. Before that you see **This meeting hasn't opened yet**. Keep the tab open and the join screen appears by itself. If the room is already open, you can ask to join early.
- **Teammates** walk straight in, invited or not, unless the host turned on **Teammates must knock**. Then uninvited teammates knock.
- **Invited guests** walk straight in with their personal link.
- **Anyone using the guest link** knocks.
A meeting holds up to 100 people at once. The host and co-hosts are never turned away.
You can only be in a meeting from one tab at a time. If it is open in another tab, click **Use here** to move it to this tab.
### Join as a guest
Guests open the link in their invitation (`/meeting/join/`). No Cooper account is needed.
1. Enter **Your name**, **Email** and, optionally, **Company**, and click **Continue**. With a personal link, the email is filled in.
2. Check the camera and microphone.
3. Click **Join meeting**, or **Ask to join** and wait to be let in.
If the meeting hasn't opened yet, the page counts down and takes the guest in when the room opens. A guest who already has a Cooper account at another company can join as themselves.
## Let people in
When someone knocks, everyone inside the meeting sees a card: "… wants to join", with the reason (for example **Guest from outside your company** or **Teammate, not on the invite list**).
- Click **Admit** or **Decline**. With several people waiting, click **Admit all**.
- After declining, click **Undo** to let them in after all.
- Click the **×** to hide the card. They stay in the **People** list under **Waiting in lobby**.
- Click **Alert me when someone knocks and I'm in another tab** to get a desktop notification.
Anyone in the meeting can let people in. If the host isn't in the meeting yet, Cooper notifies the host and co-hosts that someone is waiting.
## Use the meeting controls
| Control | What it does |
|---|---|
| Microphone | **Mute microphone** / **Unmute microphone**. Shortcut `M`. |
| Speaker | **Mute others** / **Unmute others**. Silences the meeting on your device only. |
| Camera | **Turn camera off** / **Turn camera on**. Shortcut `V`. |
| **Captions** | Shows live captions. An AI agent must be in the room to transcribe. |
| **Recording** | Starts or stops recording. See [Record a meeting](#record-a-meeting-and-get-notes). Shown only to people who can record. |
| Share screen | **Share your screen** / **Stop sharing your screen**. Not available on phones. |
| Hand | **Raise your hand** / **Lower your hand**. Shortcut `H`. |
| Reactions | **Send a reaction**: 👍 👏 😂 😮 ❤️ 🎉. |
| Full screen | **Full screen** / **Leave full screen**. |
| Side panel | **Show people and agents**. Shows a badge when people are waiting to be let in. |
| Settings | **Audio and video settings**: microphone, speaker, camera and background. |
| **Leave** | Leaves the meeting. The meeting carries on for everyone else. |
Keyboard shortcuts don't work while you are typing in a box. On a narrow window, the controls move into **More meeting options**.
Up to 12 people show per page of tiles. Click a tile to spotlight it, and click it again to go back. A shared screen takes the main stage. There is no text chat inside a meeting.
### Use the side panel
| Tab | What it shows |
|---|---|
| **Info** | Date, time elapsed, people, meeting details, the invite link, **Book a follow-up** and keyboard shortcuts. |
| **People** | Who is waiting, who is in the room, and who is speaking or muted. Add people and manage the invite link here. |
| **Agents** | The AI agents in the meeting (when agents are on for your workspace). |
| **Transcript** | The live transcript (when agents are on for your workspace). |
In **People**:
- Click **Ask to unmute** next to someone who is muted. They choose **Unmute** or **Not now**. Nobody can unmute you without your say.
- The host or a co-host can click **Remove** next to a guest.
- The host can add teammates (they are added straight away) or **Invite by email** (each person gets their own link).
- Click **Copy invite link** to copy the guest link. To stop an old link working, replace it. Personal links in email invitations keep working.
In **Transcript**, you can search the transcript, download it, email it to yourself or to everyone in it, read it in another language, and click **Make an action item from this line** on any line.
## Record a meeting and get notes
Cooper doesn't store audio or video. Recording means Cooper transcribes the meeting and, when it ends, writes up the notes and emails them with the transcript.
- If **Write this meeting up automatically** was on when the meeting was arranged, recording starts by itself.
- Otherwise, click **Record this meeting** in the room. Click it again to stop. What was recorded is still sent when the meeting ends.
When recording starts, everyone in the room, guests included, sees: "This meeting is being recorded. Notes and the transcript are sent to everyone in this meeting when it ends." The header shows a **Recording** pill. **Not listening** in the header means nothing is transcribing the room.
When the meeting ends:
- Everyone who was in the room gets an email with the summary and the full transcript, and a text file of the transcript. Teammates also get it as a chat message, and a link to the meeting page.
- Guests get only the part of the meeting they were in.
- The write-up appears on the meeting page, usually within a minute after the last person leaves.
## Leave or end a meeting
- Click **Leave** to leave. The meeting carries on for the others. Click **Rejoin meeting** to go back in.
- To end a running meeting for everyone, the host clicks **End** on the meeting's row on the Meetings page (or **Cancel** on the banner) and confirms **End meeting**. Everyone in the room leaves. If the meeting hasn't reached its start time, the people invited are told it is cancelled.
A meeting also ends when everyone leaves. An empty room is kept for 5 minutes.
## Book a follow-up meeting
In the room, open the side panel → **Info** and click **Book a follow-up**. The **New meeting** form opens in a new tab with the same people, the same project, and the title "Follow-up: …". The room stays open.
## Review the notes and create tasks
Open the meeting page: click a past meeting on the Meetings page.
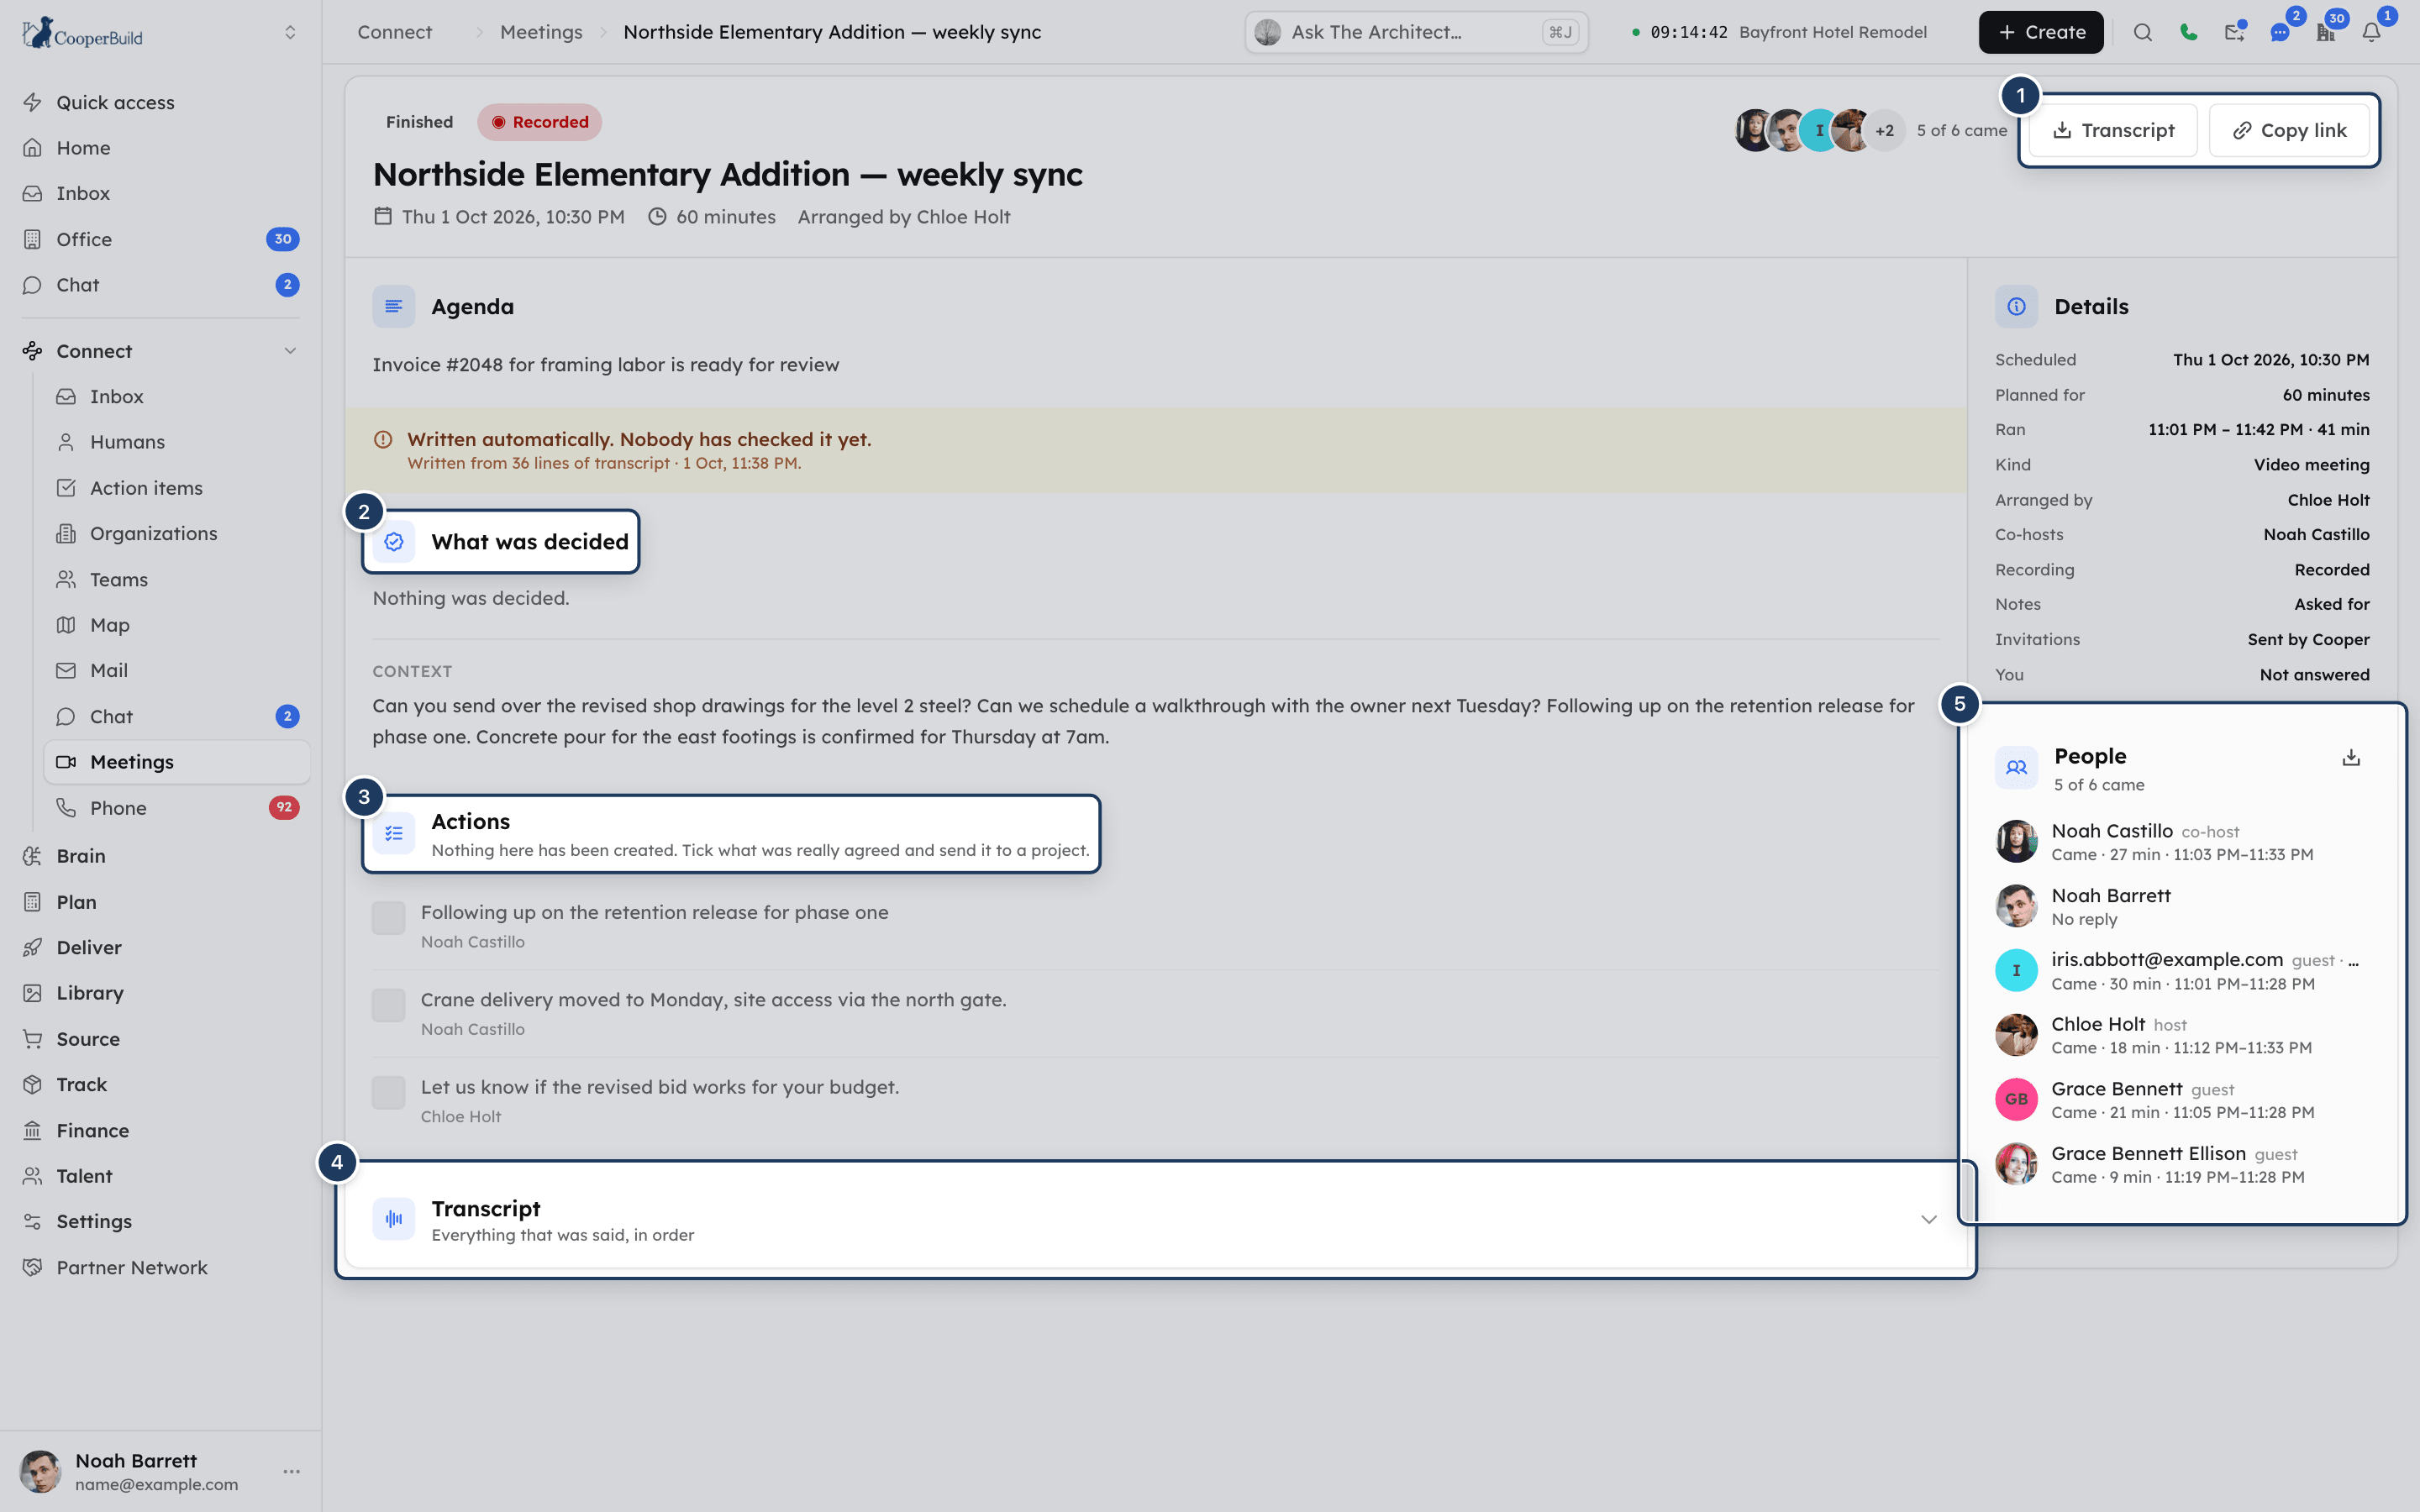
*Screenshot: The meeting page. 1: header buttons, 2: What was decided, 3: Actions with checkboxes, 4: Transcript, 5: People.*
### Step 1: Check the write-up
The write-up shows **Written automatically. Nobody has checked it yet.** Read **What was decided** and the context.
### Step 2: Correct it if needed
Click **Correct this**. Edit or remove decisions, click **Add a decision**, edit the context, and click **Save**. The write-up then shows **Checked by a person on …**.
### Step 3: Pick the actions to keep
Under **Actions**, tick the actions that were really agreed. Each shows its owner and due date when one was said. **not matched to anyone** means the name didn't match exactly one person in the meeting.
### Step 4: Send them to a project
Click **Create N tasks**. Choose the **Project** (defaults to the meeting's project), **Deliverable** and **Task type**, then click **Create N tasks**.
Tasks are created unassigned, with the meeting and the recorded owner in the description. Assign them on the project. Actions that became tasks show **Task created**. Nothing reaches a project until a person does this.
Only people who were in the meeting, and the host, can correct the notes and create tasks. People who were invited but didn't come can read them.
### Why there is no write-up
| Message | What it means |
|---|---|
| **This meeting was not recorded** | Nothing was transcribed. Turn on notes when you arrange the meeting, or press Record in the room. |
| **The meeting is still running** | The write-up is produced once everybody has left. Click **Check again** later. |
| **The write-up is being written** | Usually takes under a minute after the last person leaves. |
| **There was nothing to write up** | Too little was said. The transcript is below. |
| **No write-up for this meeting** | It was transcribed, but notes were never switched on. |
## Read or download the transcript
On the meeting page, open **Transcript**. Each line shows the time, the speaker and what was said. Click **Copy** to copy it, or **Download** to save it as a text file. You can also click **Transcript** at the top of the page, or the download icon on the meeting's row in **Past**.
Very long transcripts show only the first lines on the page. Download the file for the rest.
## Download attendance
On the meeting page, under **People**, click **Download attendance (CSV)**. The file lists each person's name, email, whether they were the host, their invitation answer, whether they came, when they first joined and last left, minutes in the room, and number of visits.
## Move a meeting
1. On the meeting's row, click **Move this meeting**.
2. Pick the **New time**.
3. For a repeating meeting, choose **Move only this one** or **Move this and all following**.
4. Click **Move and notify**.
Everyone invited is told the new time, by notification and by email. The join link doesn't change. Only the host can move a meeting.
## Cancel a meeting
1. On the meeting's row, click **Cancel** (or **Cancel…** for a repeating meeting).
2. For a one-off meeting, click **Cancel meeting**. For a repeating meeting, choose:
- **Only** this date: the rest of the schedule carries on.
- This date **and everything after it**: earlier ones stay as they were.
- **Stop it repeating**: cancels everything still to come. Meetings that already happened keep their notes.
3. Confirm.
Everyone invited gets an email saying it is cancelled. Only the host can cancel a meeting. Meetings scheduled from Recruiting are moved or cancelled in Recruiting.
## Restore a cancelled meeting
The host can restore a meeting that was cancelled or ended early, until its planned end time. For example, a 1:00–1:30 meeting can be restored at 1:15 but not after 1:30.
Click **Restore** on the meeting's row in **Past**, or on the meeting page. The meeting goes back to **Upcoming** with the same people, link and time, and invitees are told it is back on. Cancelling one or more meetings of a repeating schedule can't be undone.
## Edit a repeating meeting
1. Open the meeting page and click **Edit series**.
2. Change the **Title**, **Agenda**, **Length (minutes)** or **Write these up automatically**.
3. Click **Save changes**.
Changes apply to this meeting and every one after it. Meetings that already happened keep their title and notes. To change the time of day, use **Move this meeting** → **Move this and all following**.
## Change who runs a meeting
1. Open the meeting page and click **Access**.
2. Under **Co-hosts**, search for teammates and click **Make co-host**, or remove a co-host.
3. Turn **Teammates must knock** on or off.
4. Click **Save**.
Only the host can do this, and only before the meeting has finished.
### Send a guest a new personal link
If an invitation went to the wrong person, open the meeting page. Under **People**, click **Send a new personal link** next to the guest, then **Send new link**. Their old link stops working straight away. Everyone else keeps their own link. The host and co-hosts can do this until the meeting ends.
## Link a meeting to a project
On the meeting page, click **Link a project** (or **Change**) next to the project name, pick the project and save. The meeting's notes are filed into that project's Knowledge Graph, and its action items can become tasks on it. If you change the project later, the notes move with it. For a repeating meeting, only this meeting changes.
The host and co-hosts can change the project.
## Share a meeting link
- **Copy link** on the meeting page copies the guest link while the meeting can still be joined, and the meeting page's address after that.
- The copy icon on a meeting's row, and on **Next up**, copies the guest link.
Anyone with the guest link waits until someone inside lets them in.
## Meeting notices and the meeting banner
- When a meeting you are invited to is starting, a card appears at the bottom right of Cooper: **Meeting starts soon** or **Meeting starting now**, with **Later** and **Join meeting**.
- From an hour before a meeting until 15 minutes after it starts, a banner under the header shows the meeting with **Open meeting** (and **Cancel** for the host).
- While you are in a meeting in another tab, the banner shows **You are in this meeting — it is open in another tab**, with **Return to meeting** and **Leave**.
## Permissions
There is no role permission for Meetings. Every member of your workspace can see the Meetings page and arrange meetings. Inside a meeting:
| Action | Who can do it |
|---|---|
| Move, cancel, end, restore, edit the series, change access | Host |
| Open the room early, manage the link, send a new personal link, change the project | Host and co-hosts |
| Let people in or decline them | Anyone in the meeting |
| Remove a guest from the room | Host and co-hosts |
| See the people invited | People on the meeting. Others in your workspace see a limited view and can still join. |
| Read the notes and transcript | The host, co-hosts, people invited, and anyone who attended |
| Correct the notes and create tasks | The host and people who attended |
Transcripts can be deleted automatically after a set number of days if a Cooper super admin turns on chat clean-up. See [Chat](https://docs.cooperbuild.ai/connect/chat.md#chat-clean-up-message-retention).
## Tips and best practices
- Write an agenda. It goes out in the invitation, so people come prepared.
- Pick a project when you arrange the meeting. The write-up files into it and the task form is pre-filled.
- Make a teammate co-host so the meeting can start and guests get let in if you are late.
- Review the write-up the same day, while you remember what was agreed.
- Use one repeating meeting for a weekly site meeting instead of arranging it each week. Everyone gets one email and one link.
## Troubleshooting
### It says This meeting hasn't opened yet
You can join from 5 minutes before the start. Keep the tab open and the join screen appears by itself. Only the host and co-hosts can open the room earlier.
### I'm stuck on Waiting to be let in
Someone inside has to admit you. If the host hasn't joined yet, they have been told you are waiting. Keep the tab open; you join automatically once admitted.
### My camera or microphone is blocked
Your browser is blocking Cooper. Click the lock icon in the address bar, allow the camera or microphone, and click **Try again**. If another app is using the device, close it or pick a different one under **Devices**. You can also join without it.
### Could not connect to the meeting
The network you are on may be blocking calls. Click **Try again**, or switch networks.
### This meeting is full
A meeting holds 100 people at once. Try again when somebody leaves.
### A guest's link says it was replaced or is no longer available
The host replaced the guest link or sent the guest a new personal link. Send them the current link.
### There are no notes for my meeting
Notes need a transcript. Turn on **Write this meeting up automatically** when you arrange the meeting, or press **Record this meeting** in the room. The write-up appears after everyone has left. If too little was said, there is nothing to write up.
### I can't move or cancel a meeting
Only the host can. Meetings scheduled from Recruiting are moved or cancelled in Recruiting.
### Restore is missing
Only the host can restore, and only until the meeting's planned end time.
## For AI agents
Use these CooperBuild MCP tools to work with Meetings. Tools that change something preview first: call with `confirm: false` (the default), show the user the preview, then call again with `confirm: true`.
| Tool | Use it for | Key parameters |
|---|---|---|
| `meeting_browse` | Read-only. `list` meetings, `get` one meeting (people with their answer and attendance, co-hosts), `notes` (the write-up), `transcript`, and `find_people` to look up who to invite. | `action`; `meetingId`; `includePast`; `fromOtherCompanies`; `query` (at least two characters) |
| `meeting_manage` | `create`, `reschedule`, `reschedule_series`, `cancel`, `cancel_series`, `add_people`, `set_access` and `rsvp`. | `title`, `scheduledFor` (with a time zone) or `startNow`, `recurrence`, `emails`, `humanIds`, co-hosts, `teammatesMustKnock`, `agentIds` (up to 3), `autoNotes` (on by default), `projectId`, `sendFrom` (`cooper` or `gmail`), `addToMyCalendar`, `confirm` |
| `meeting_share` | Send a meeting's link by email, text message (CRM contacts only) or chat. | `meetingId`; `emails` (up to 50); `smsHumanIds` (up to 10); `chatConversationIds` / `chatUserIds` (up to 25); `note` (up to 300 characters); `confirm` |
| `meeting_notes_act` | `correct` the write-up (replaces context, decisions and actions and marks it reviewed) or `approve_actions` to turn actions into project tasks. | `meetingId`; `actionIds`; `projectId` (unless the meeting has one); `deliverableId`; `taskType` |
Rules to follow:
- Always tell the user who the host will be. The meeting is created as the person you are acting for.
- Give `scheduledFor` with a time zone. Times without one are refused.
- Only the host can change a meeting. Any invitee can `rsvp`.
- `cancel` on a live meeting ends it for everybody. `cancel_series` never touches past meetings.
- Actions in `notes` marked `proposed` are not tasks yet. A `draft` write-up hasn't been checked by a person. Only create tasks for actions the user confirms.
- `meeting_share` by text message needs the user's **Cooper Communications** → **Text Messaging** permission.
Common errors:
| Error | Fix |
|---|---|
| `TITLE_REQUIRED` / `WHEN_REQUIRED` | Ask the user for the title or the time. |
| `TIMEZONE_REQUIRED` / `INVALID_TIMEZONE` | Pass the time with a valid IANA time zone, for example `America/New_York`. |
| `TIME_IN_PAST` | Pick a time in the future. |
| `STARTNOW_CANNOT_REPEAT` | A meeting started now can't repeat. Schedule it instead. |
| `TOO_MANY_PEOPLE` | A meeting can have up to 50 invitees. |
| `PROJECT_NOT_FOUND` / `PROJECT_REQUIRED` | Look the project up first, or pass `projectId` when the meeting has no project. |
| `DESTINATION_REQUIRED` | `approve_actions` needs `deliverableId` and `taskType`. |
| `OCCURRENCE_REQUIRED` | Say which meeting of the repeating schedule to change. |
| `NO_RECIPIENTS` / `NOTHING_SENT` | Give at least one email, contact or chat to share with. |
Point people to the meeting page with `/meetings/`, not the room (`/meeting/`), unless they want to join right now.
## Related
- [Chat](https://docs.cooperbuild.ai/connect/chat.md) — arrange a meeting with the people you are already talking to, and call from a conversation.
- [Action items](https://docs.cooperbuild.ai/connect/action-items.md) — where meeting actions are tracked.
- [Phone](https://docs.cooperbuild.ai/connect/phone.md) — calls and texts to people outside Cooper.
- [Settings](https://docs.cooperbuild.ai/connect/settings.md) — connect Gmail and Google Calendar for meeting invitations.
---
# Phone
> Call, text and listen to voicemail from your company's Cooper phone numbers in the browser, add people to calls, record calls, and save every conversation to the right project.
Source: https://docs.cooperbuild.ai/connect/phone
Keywords: phone, cooper phone, calls, calling, dialer, keypad, softphone, sms, text messages, mms, picture messages, voicemail, voicemail transcript, call recording, conference call, add person to call, phone numbers, business line, caller id, block caller, call history, recents, missed calls, ai calling
Phone is Cooper's own phone system. Your company gets real business phone numbers from Cooper, and anyone allowed to use a number can make and answer calls, send and receive texts, and listen to voicemail right in the browser. Every call and text is matched to the contact in Cooper, and recorded calls can be saved to the project they were about.
Office staff use Phone as their desk phone. Project managers use it to call subcontractors and keep a record of what was agreed on each job. Admins set up the numbers, decide who can use each one, and turn on recording, texting and AI calling.
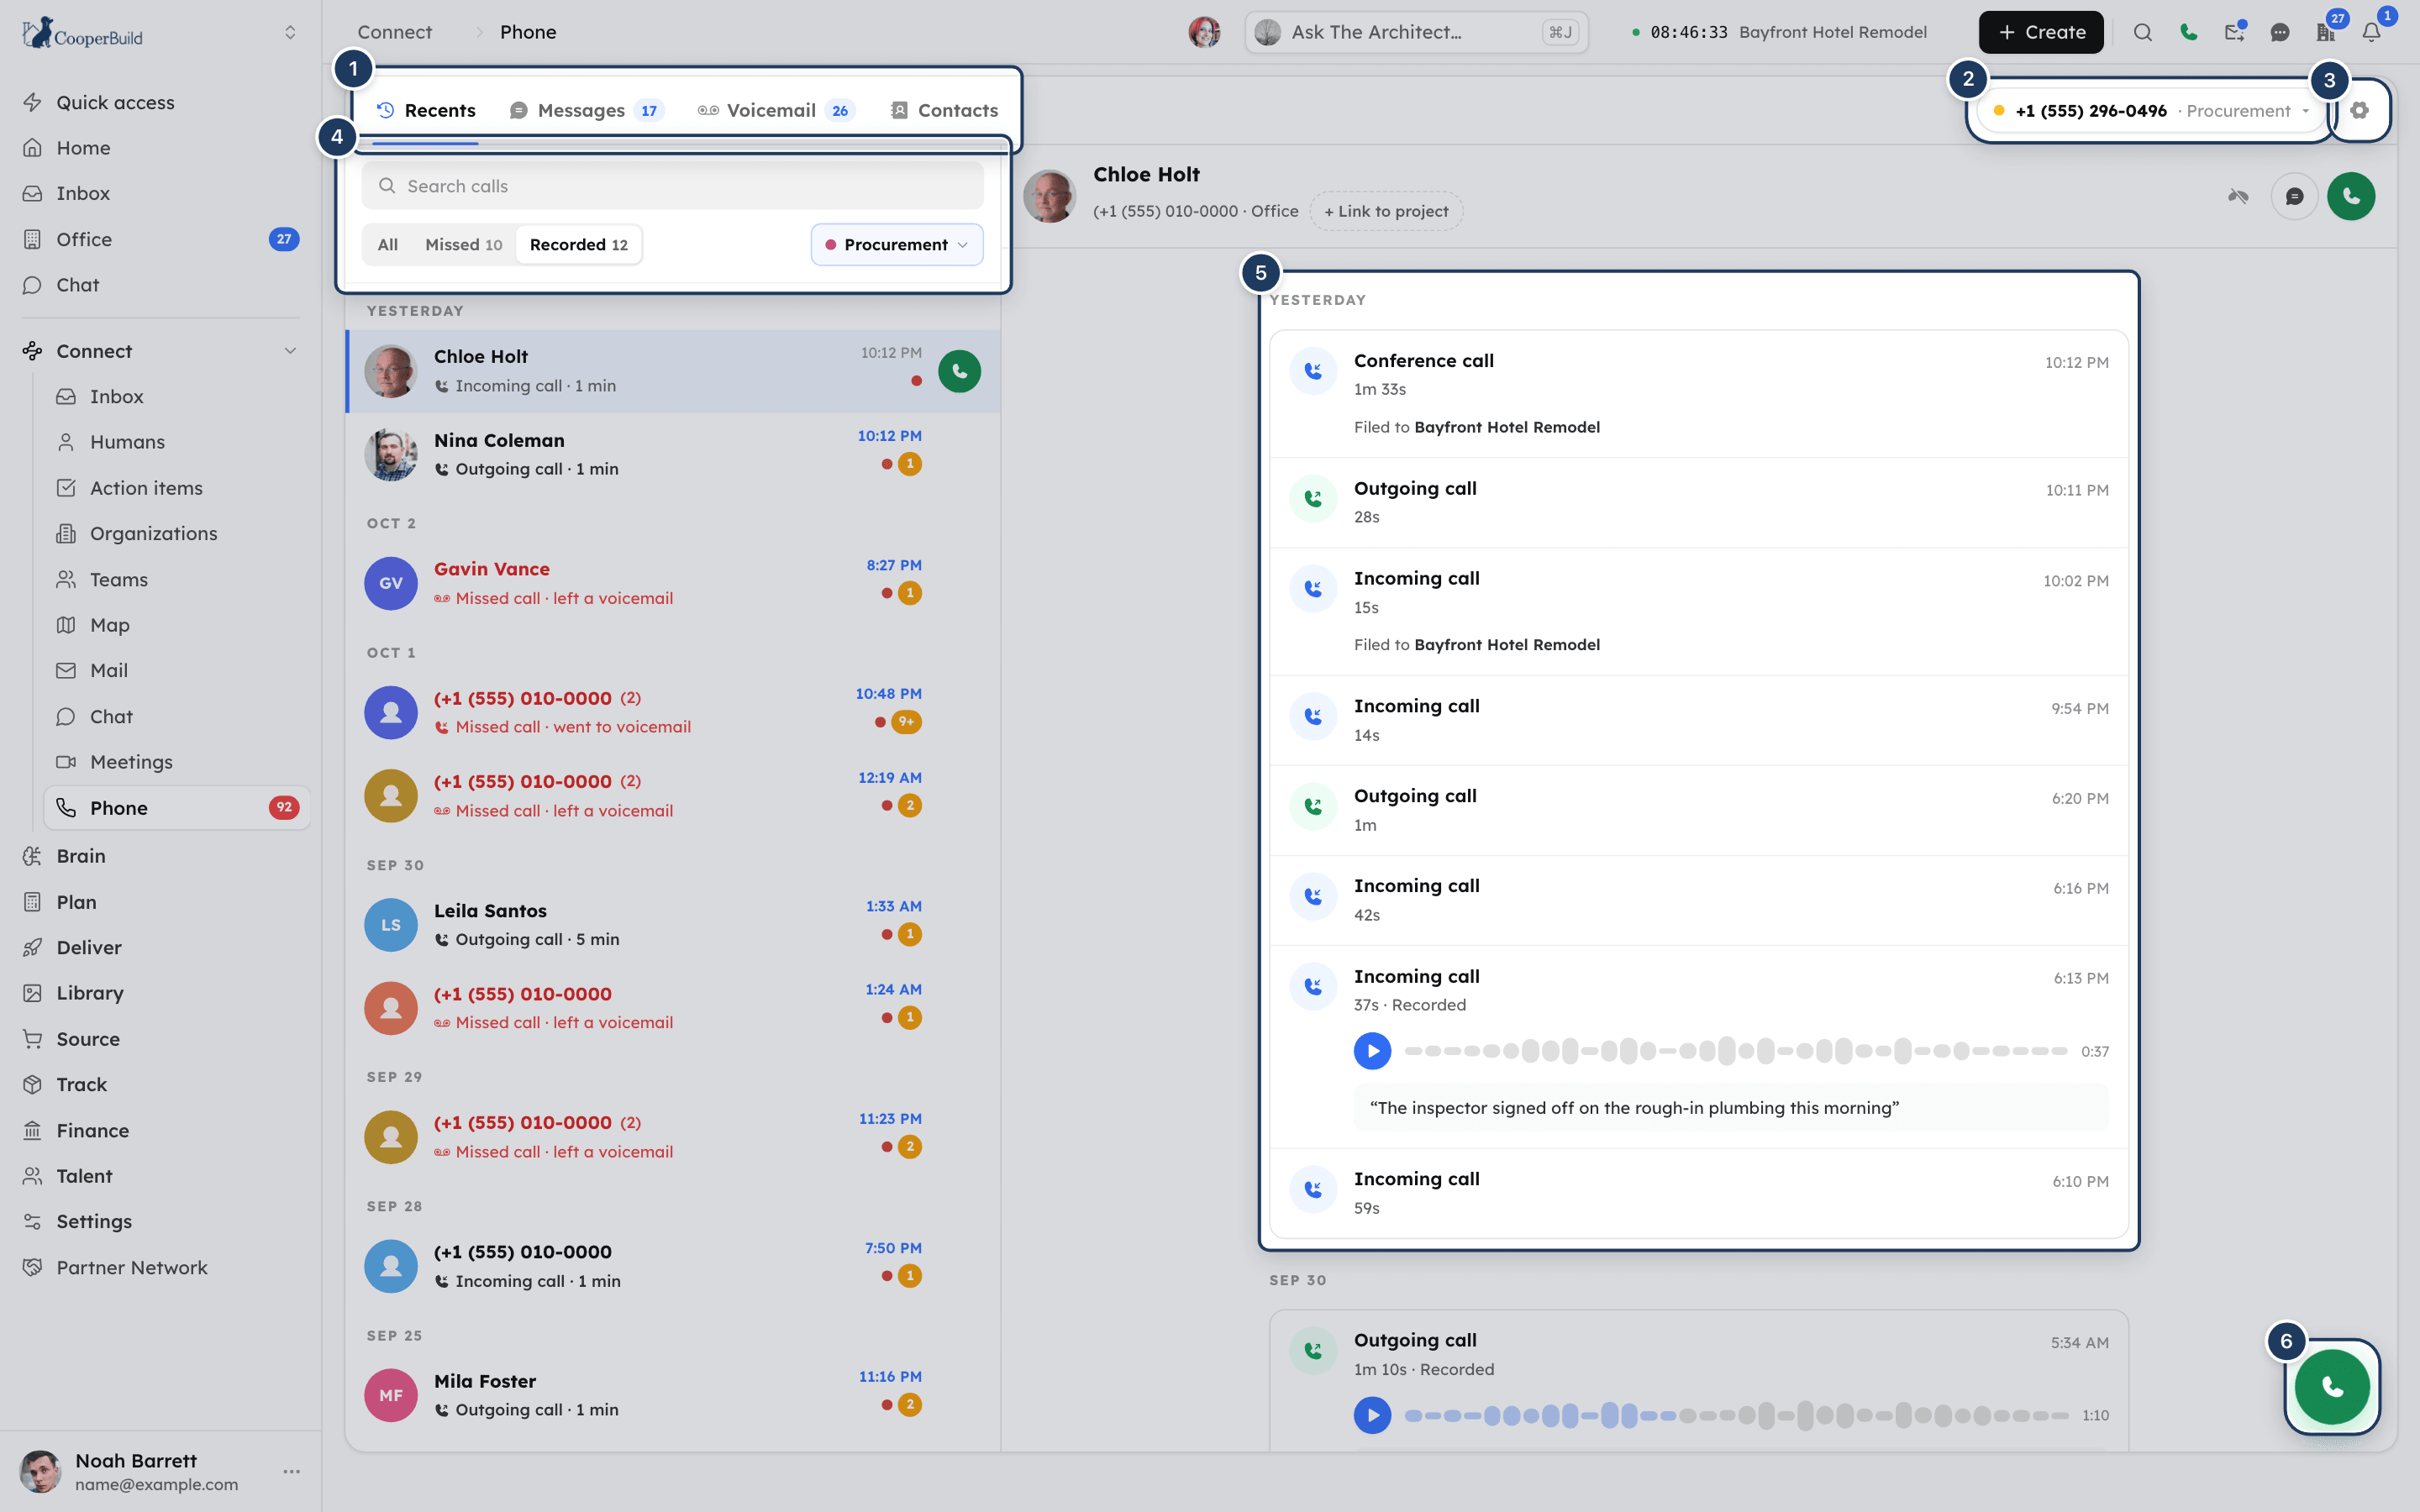
*Screenshot: Phone. 1: tabs, 2: the line you call from, 3: Phone settings, 4: search and filters, 5: the person's call history, 6: the keypad button.*
## Key concepts
| Term | Meaning |
|---|---|
| **Line** | One of your company's Cooper phone numbers. A line can have a nickname, such as "Job site — Miami". |
| **Your line / calling-from line** | The line shown in the pill at the top right of the Phone page. Calls go out from it, and texts go out from it unless you pick another line. Cooper remembers your choice. |
| **Line access** | Each line can be limited to certain people or teams. You only see lines you are allowed to use, and only the calls, texts and voicemail on those lines. A line with nobody listed is open to everyone in the workspace. |
| **Recents** | The call log: incoming, outgoing and missed calls. |
| **Messages** | Text conversations (SMS, and MMS for photos and files). |
| **Voicemail** | Voicemail left on your lines, with a written transcript. |
| **Contacts** | Everyone in Cooper with a phone number, from your contacts and from people who have called or texted you. |
| **Texting approval** | US carriers must approve your business before you can send texts. Calling works before that. Until texting is approved, the **Messages** tab is hidden. |
| **Filing** | Saving a call to a project, so it becomes part of that project's record. |
| **Linked caller** | A phone number tied to a project. Calls with that number are filed to the project automatically. |
## Open Phone
In the sidebar, open **Connect** and click **Phone**. The page opens at `/connect/phone`.
You see Phone only if your role includes **Phone Number Management** under **Cooper Communications** (read or write). Account owners always see it. If your company's plan does not include Phone, you see a locked screen instead.
If your company hasn't set up its phone system yet, the page says **The phone system isn't set up for this organization yet.** Click **Set it up** to open the Cooper Phone settings page (see [Set up Phone for your company](#set-up-phone-for-your-company-admins)).
The sidebar's **Phone** item shows a count of everything waiting for you: unread texts, voicemail you haven't played, and calls you missed since you last opened **Recents**. The count disappears when nothing is waiting.
> **Warning: TEST MODE**
>
> If you see **TEST MODE — nothing here reaches a real phone.** at the top of the page, your workspace is in test mode. Calls and texts do not reach real phones.
## Allow your microphone and notifications
Calling happens in your browser, so the browser needs your microphone.
### Step 1: Click Enable microphone
If the banner **Calling needs your microphone** appears at the top of the Phone page, click **Enable microphone**.
### Step 2: Allow the browser prompts
Allow the microphone when your browser asks. If the browser also asks about notifications, allow them so you get a desktop alert for incoming calls when the Cooper tab is in the background.
If the browser has blocked the microphone, Cooper tells you: click the padlock next to the web address, choose **Microphone** → **Allow**, then refresh the page.
## Choose the line you call from
The pill at the top right of the Phone page shows the line you are on: a status dot, the number, and the line's name.
- A **green** dot means the phone is connected and ready.
- An **amber** dot means it is still connecting.
If you can use more than one line, click the pill and pick a line. Lines assigned to you are marked **yours**. Cooper saves the line as your default, so it is still selected after a refresh and in the header's quick call panel.
Picking a line at the top also filters the list to that line, so the history you are reading and the number you are calling from always match.
## Filter the list by line
When you can see more than one line, a line menu appears next to the list filters on **Recents**, **Messages** and **Voicemail**. It shows **All lines** or the line you picked.
- Pick a line to see only its calls, texts or voicemail. Each line has its own color dot, which also appears on the list rows.
- Pick **All lines** to see everything you have access to.
- With seven or more lines, type in **Find a line** to search.
Cooper remembers your choice on this device. If you pick a line you can call from, the calling-from line at the top changes to match. Picking **All lines** leaves the calling-from line alone.
The first time you open Phone on a device, the list starts on your calling-from line rather than **All lines**.
## Make a call
You can start a call from several places. They all use the same phone and the same call screen.
**Keypad**
### Step 1: Open the keypad
Click the round green phone button at the bottom right of the Phone page, or click **Open the keypad**. You can also just start typing digits anywhere on the Phone page: the keypad opens with them already entered.
### Step 2: Enter the number
Type or click the digits. US numbers can be entered without the country code. For another country, type **+** on your keyboard first, then the country code and number. If the number belongs to a contact, their name appears under the number.
### Step 3: Call
Click **Call** or press **Enter**. Press **Escape** to close the keypad.
The chat bubble button next to **Call** opens a text conversation with the number instead, once texting is approved.
**From a list or contact**
- On **Recents**, **Messages** or **Voicemail**, hover over a person's row and click the green phone button that appears.
- Open a person and click the green call button at the top right of their pane.
- On **Contacts**, open a person and click **Call** on their contact card.
**From anywhere in Cooper**
- Click the green phone button in the header (**Quick call**), or press **Alt+P**. Recent people are listed first; click one to call, or type a name or number and press **Enter**. Use the arrow keys to move through the list. The **Calling from** line can be changed right in the panel. The keypad button in the search box opens a keypad.
- Click a phone number elsewhere in Cooper, such as on a contact. Phone opens with the keypad holding that number. The call starts only when you click **Call**.
The **Quick call** button shows a red count when you have missed calls.
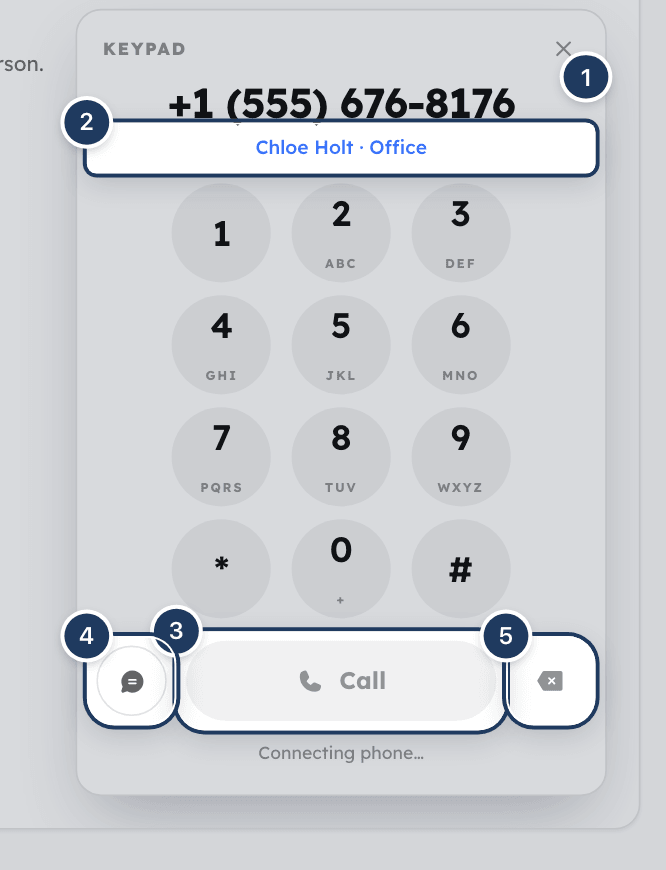
*Screenshot: The keypad. 1: number entry, 2: matching contact, 3: Call, 4: send a text, 5: delete a digit.*
> **Important: No emergency calls**
>
> Cooper Phone cannot call emergency services. Dialing 911, 112 or 933 is blocked with the message **This app cannot call emergency services. Hang up and dial 911 from your phone.**
International numbers can be called only when international calling is allowed for your workspace or for the line you are calling from. See [Control spending and international calling](#control-spending-and-international-calling-admins).
## Answer an incoming call
When someone calls a line that rings you, a card appears at the bottom right of any Cooper page (or full screen on a phone-sized screen). It shows **Incoming call**, the caller's name or number, the line they called (**to** your line), and the caller's linked project if they have one.
- Click **Answer** to take the call.
- Click **Decline** to reject it.
If the Cooper tab is in the background and notifications are allowed, a desktop notification **Incoming call** appears. Click it to bring Cooper to the front.
If nobody answers within the line's ring time, the caller gets voicemail or is forwarded to another phone, depending on how the line is set up.
## Use the call screen
During a call, the call card shows **Calling…**, **On call** or **Conference**, the other person's name and number, the line the call runs on, a timer, and the caller's project when they have one.

*Screenshot: A live call. 1: timer, 2: Mute, 3: Keypad, 4: Record, 5: Note, 6: Add person, 7: End call, 8: minimise.*
| Control | What it does |
|---|---|
| **Mute** | Mutes your microphone. The tile reads **Muted** while on. |
| **Keypad** | Shows a keypad for phone menus ("press 2 for…"). Click **Hide keypad** to go back. |
| **Record** / **Stop rec** | Starts or stops recording the call. A red **Recording** pill shows while recording. Available once the call connects. |
| **Note** | Opens **Note for this call**. Type what was agreed and click **Save note**. The note is attached to the call. |
| **Add person** | Adds someone to the call. Appears once the call connects. See [Add people to a call](#add-people-to-a-call). |
| **End call** | The red button. Hangs up. |
| Minimise | The arrow at the top right of the card. The call keeps going and the header shows a green pill with the person's name and the timer. Click the pill to bring the card back. |
Calls follow you across Cooper. You can keep working on other pages while you talk, and the call card stays at the bottom right.
Whether calls start recording automatically depends on your workspace's recording setting. You need the **Call Recordings** write permission to use **Record**.
## Add people to a call
### Step 1: Click Add person
During a connected call, click **Add person**. The card shows **Add someone to this call**.
### Step 2: Find who to add
Type in **Number, contact or teammate**:
- a phone number shows **Call (number)** — **Add this number**,
- matching contacts with a phone number appear under **Contacts**,
- matching Cooper users appear under **Teammates — rings their Cooper app**.
### Step 3: Pick them
Click the person or number, or press **Enter** to call a typed number. Cooper shows **Calling (name)…** and the call becomes a **Conference**.
The call card lists everyone on the call with their state: **Calling…**, **Ringing…**, **On the call**, **Left**, **Busy**, **No answer**, **Could not connect** or **Cancelled**. If you started the call, you can remove someone with the remove button next to their name.
A call has a maximum number of people. When it is full, the card says **This call already has N people — the most a call can hold.**
## Save a call to a project
When a call ends, Cooper may show a panel at the bottom right asking where the conversation belongs.
- If Cooper already filed it, you see **✓ Saved In (project)**. Click **Change** to move it.
- If the caller is linked to a project, the panel says so and saves there unless you click **Change project**.
- If the caller isn't linked, pick a project from the list (type in **Search projects…** to find one).
Then choose:
| Button | What it does |
|---|---|
| **Continue** | Saves this conversation to the project. The next call with this number asks again. |
| **Save & link this caller** | Saves this conversation and links the caller's number to the project, so future calls file themselves. |
| **Not project related** | Leaves the call out of project memory. |
| **Skip** | Only for calls that weren't recorded. Drops the call without saving. |
If the call wasn't recorded, the panel asks **This call wasn't recorded — what was discussed?** Write a few lines before saving; the note is the only record of the call.
Calls Cooper couldn't place on its own wait in **Settings** → **Cooper Phone** → **Unfiled calls**. Click **Choose project**, pick one, and click **Continue** or **Save & link this caller**, or click **Not related**. Filing one teaches Cooper that caller for next time.
## Link a caller to a project
Linking a phone number to a project files every call and voicemail with that number to the project, including the ones already in your history.
### Step 1: Open the person
Open the person on any tab. Under their name, click **+ Link to project**. If they are already linked, the project name is shown instead; click it to change.
### Step 2: Pick the project
Search for and pick the project, then click **Link** (or **Change**). Click **Unlink** to remove the link.
## Review your calls (Recents)
The **Recents** tab is your call log. People are grouped by day (**Today**, **Yesterday**, then dates). Each row shows the person, an arrow for incoming or outgoing (or a voicemail icon), and the time. Missed calls are red. Several calls of the same kind in a row show as one row with a count, for example **(3)**.
Use the filters above the list:
- **All**, **Missed** or **Recorded** — each shows how many rows match.
- **Search calls** — search by name, number or the row's text.
Click a person to see your full call history with them on the right. Each call shows:
- **Incoming call**, **Outgoing call**, **Conference call** or **Missed call**,
- how long it lasted, **Recorded** if it was recorded, or what happened (**No answer**, **Busy**, **Failed**, **Cancelled**, **Went to voicemail**, **Not answered**, **Left a voicemail**),
- which line it was on, when you have several lines,
- a player for the recording, when there is one and you may play recordings,
- the transcript, an AI summary, and **Filed to (project)** when available.
A call that was recorded in more than one piece shows the extra parts under **Later in the call** or **After people were added**.
Opening **Recents** clears the missed-call count in the sidebar.
## Play a recording
Click the play button on the call or voicemail. Drag along the waveform, or use the left and right arrow keys, to skip 5 seconds at a time.
You need the **Call Recordings** read permission to play recordings. Recordings are deleted after the retention period your admin sets.
## Listen to voicemail
### Step 1: Open the Voicemail tab
Click **Voicemail**. The tab shows how many voicemails you haven't played. Click **Unheard** to see only those.
### Step 2: Open the person
Click a person to see their voicemails, each with a player and the written transcript. Opening a person on the **Voicemail** tab marks their voicemails as heard. On **Recents**, a voicemail is marked heard when you press play.
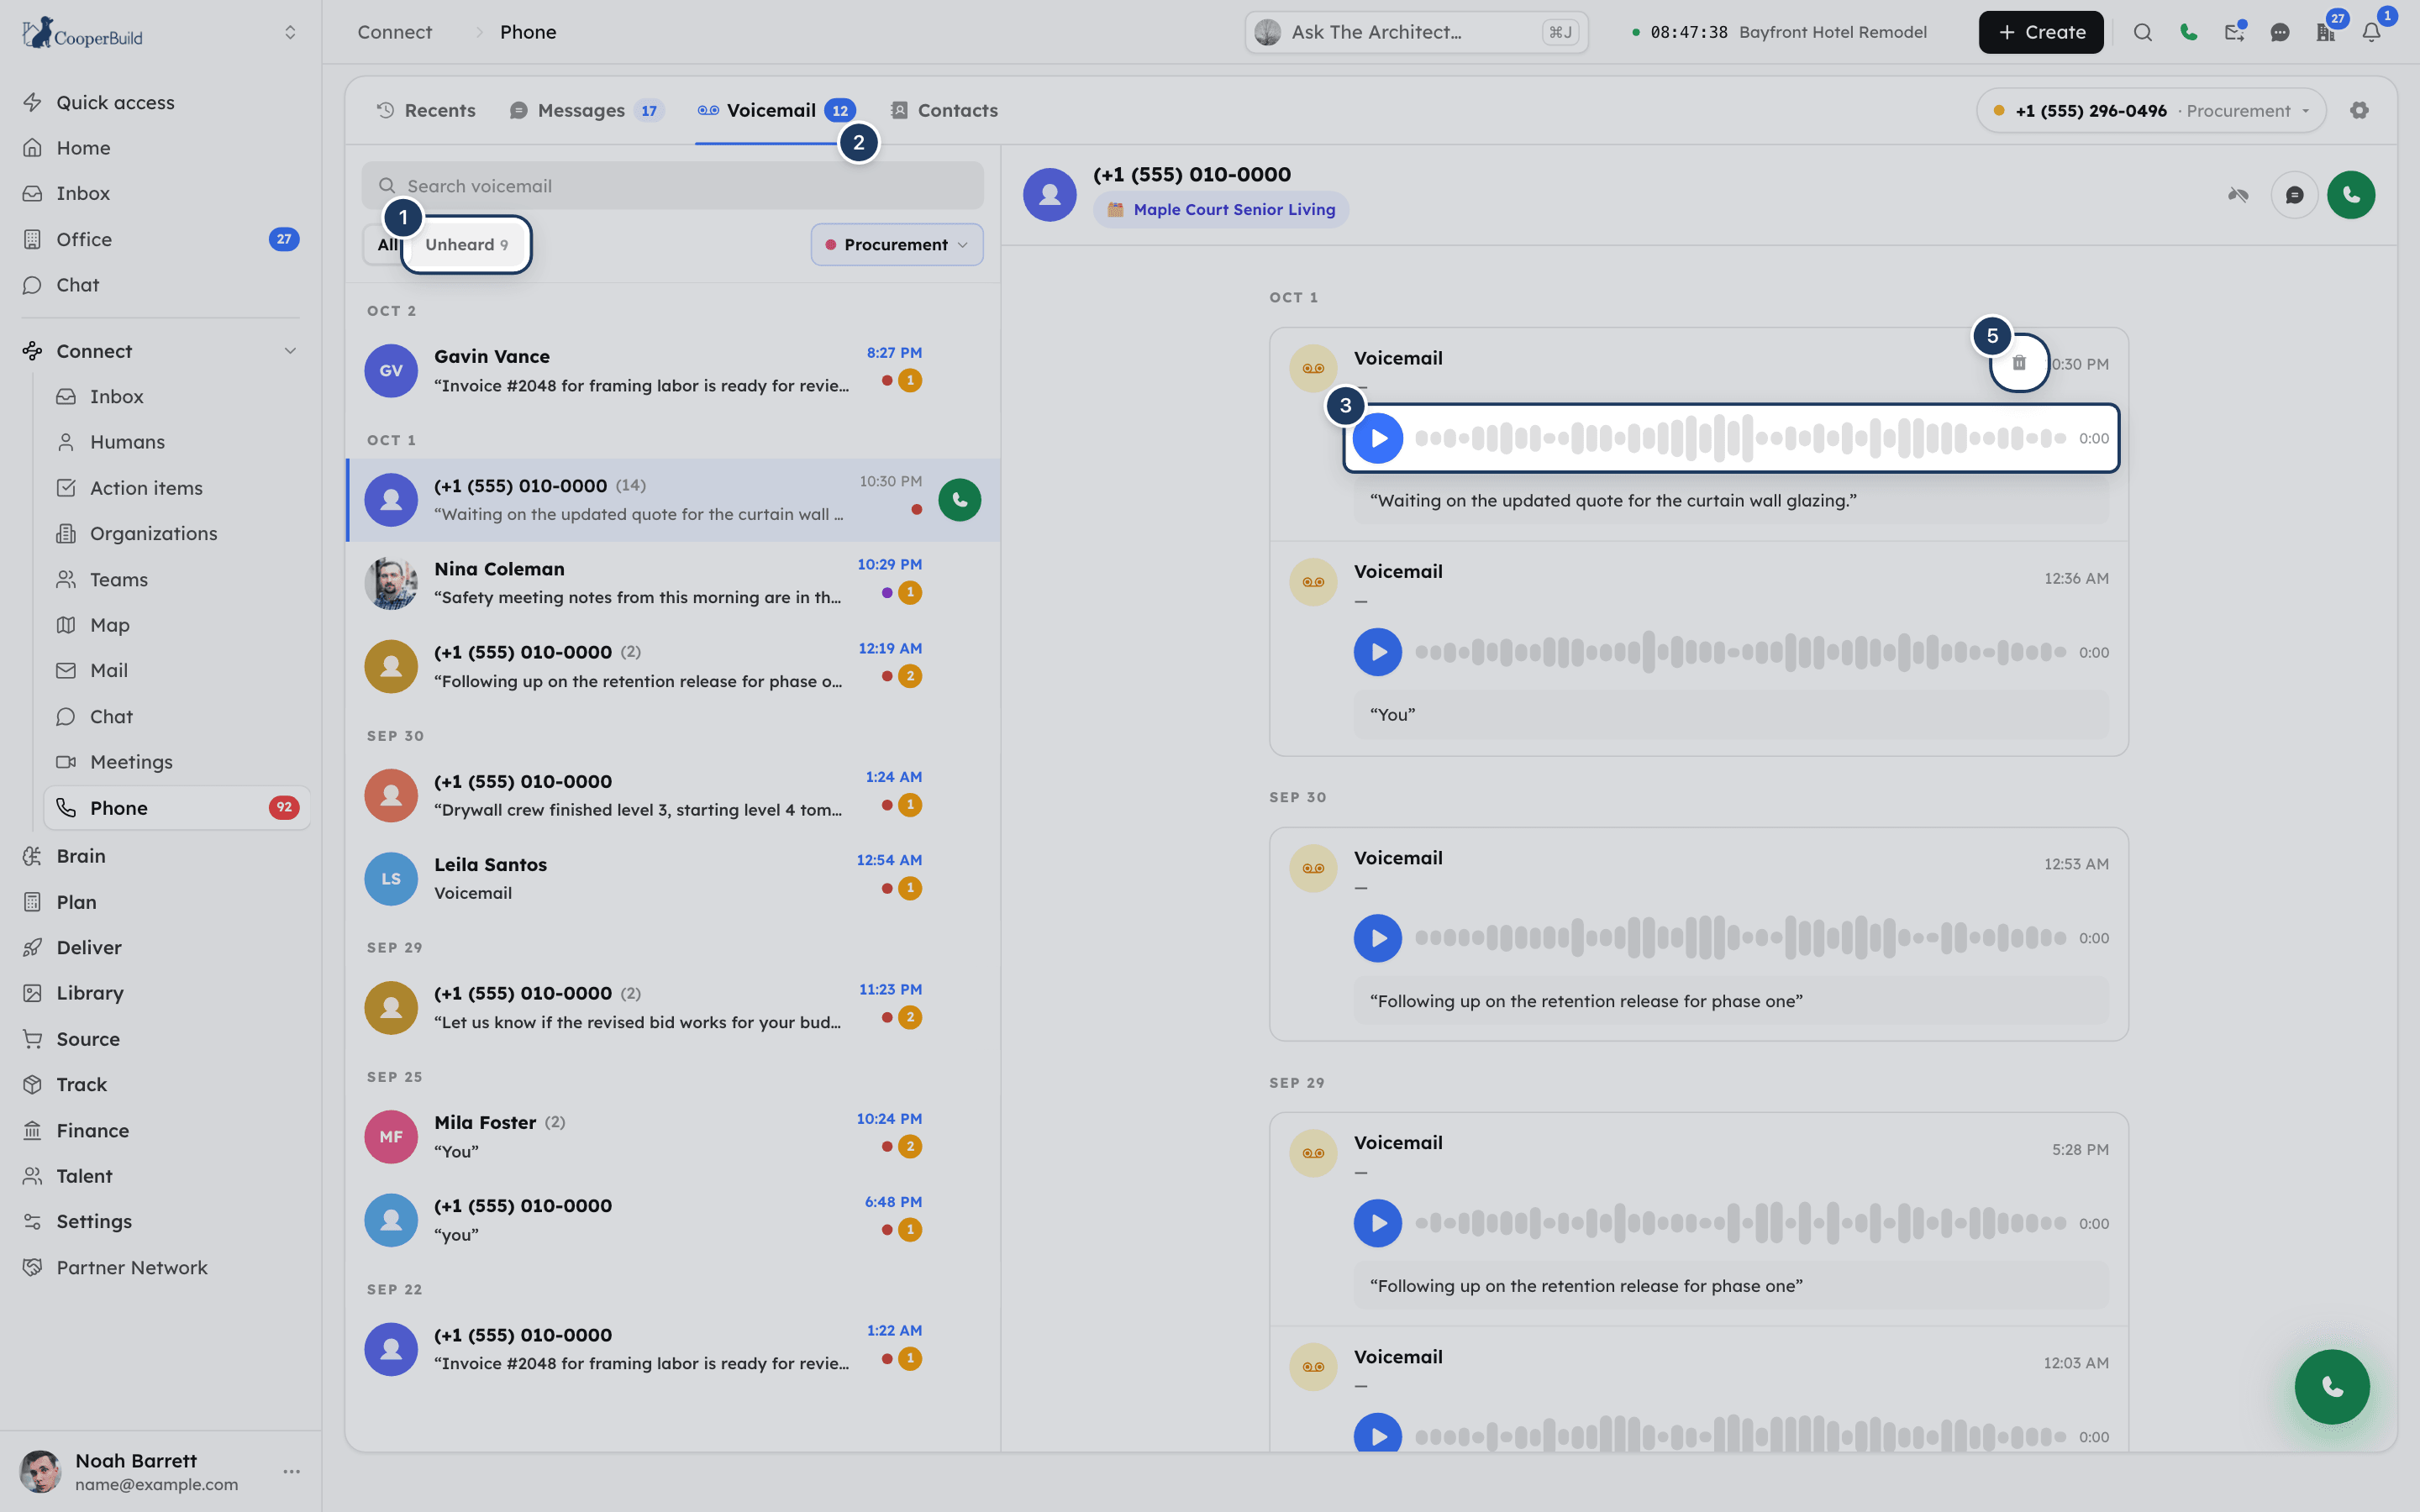
*Screenshot: Voicemail. 1: Unheard filter, 2: unheard count, 3: player, 4: transcript, 5: delete.*
"Heard" is remembered in this browser. On another computer or browser, the same voicemails show as unheard again.
## Delete a voicemail
Hover over the voicemail and click the trash button (**Delete this voicemail**). Confirm the message **Delete this voicemail? The audio and its written transcript go too — this cannot be undone.**
You need the **Inbox & History** delete permission to delete voicemail.
## Send and read texts (Messages)
The **Messages** tab is your text inbox. It appears once carriers have approved your business for texting. Rows show the person, their last text, and a blue count of unread texts. Use **All** or **Unread** and **Search messages** to narrow the list.
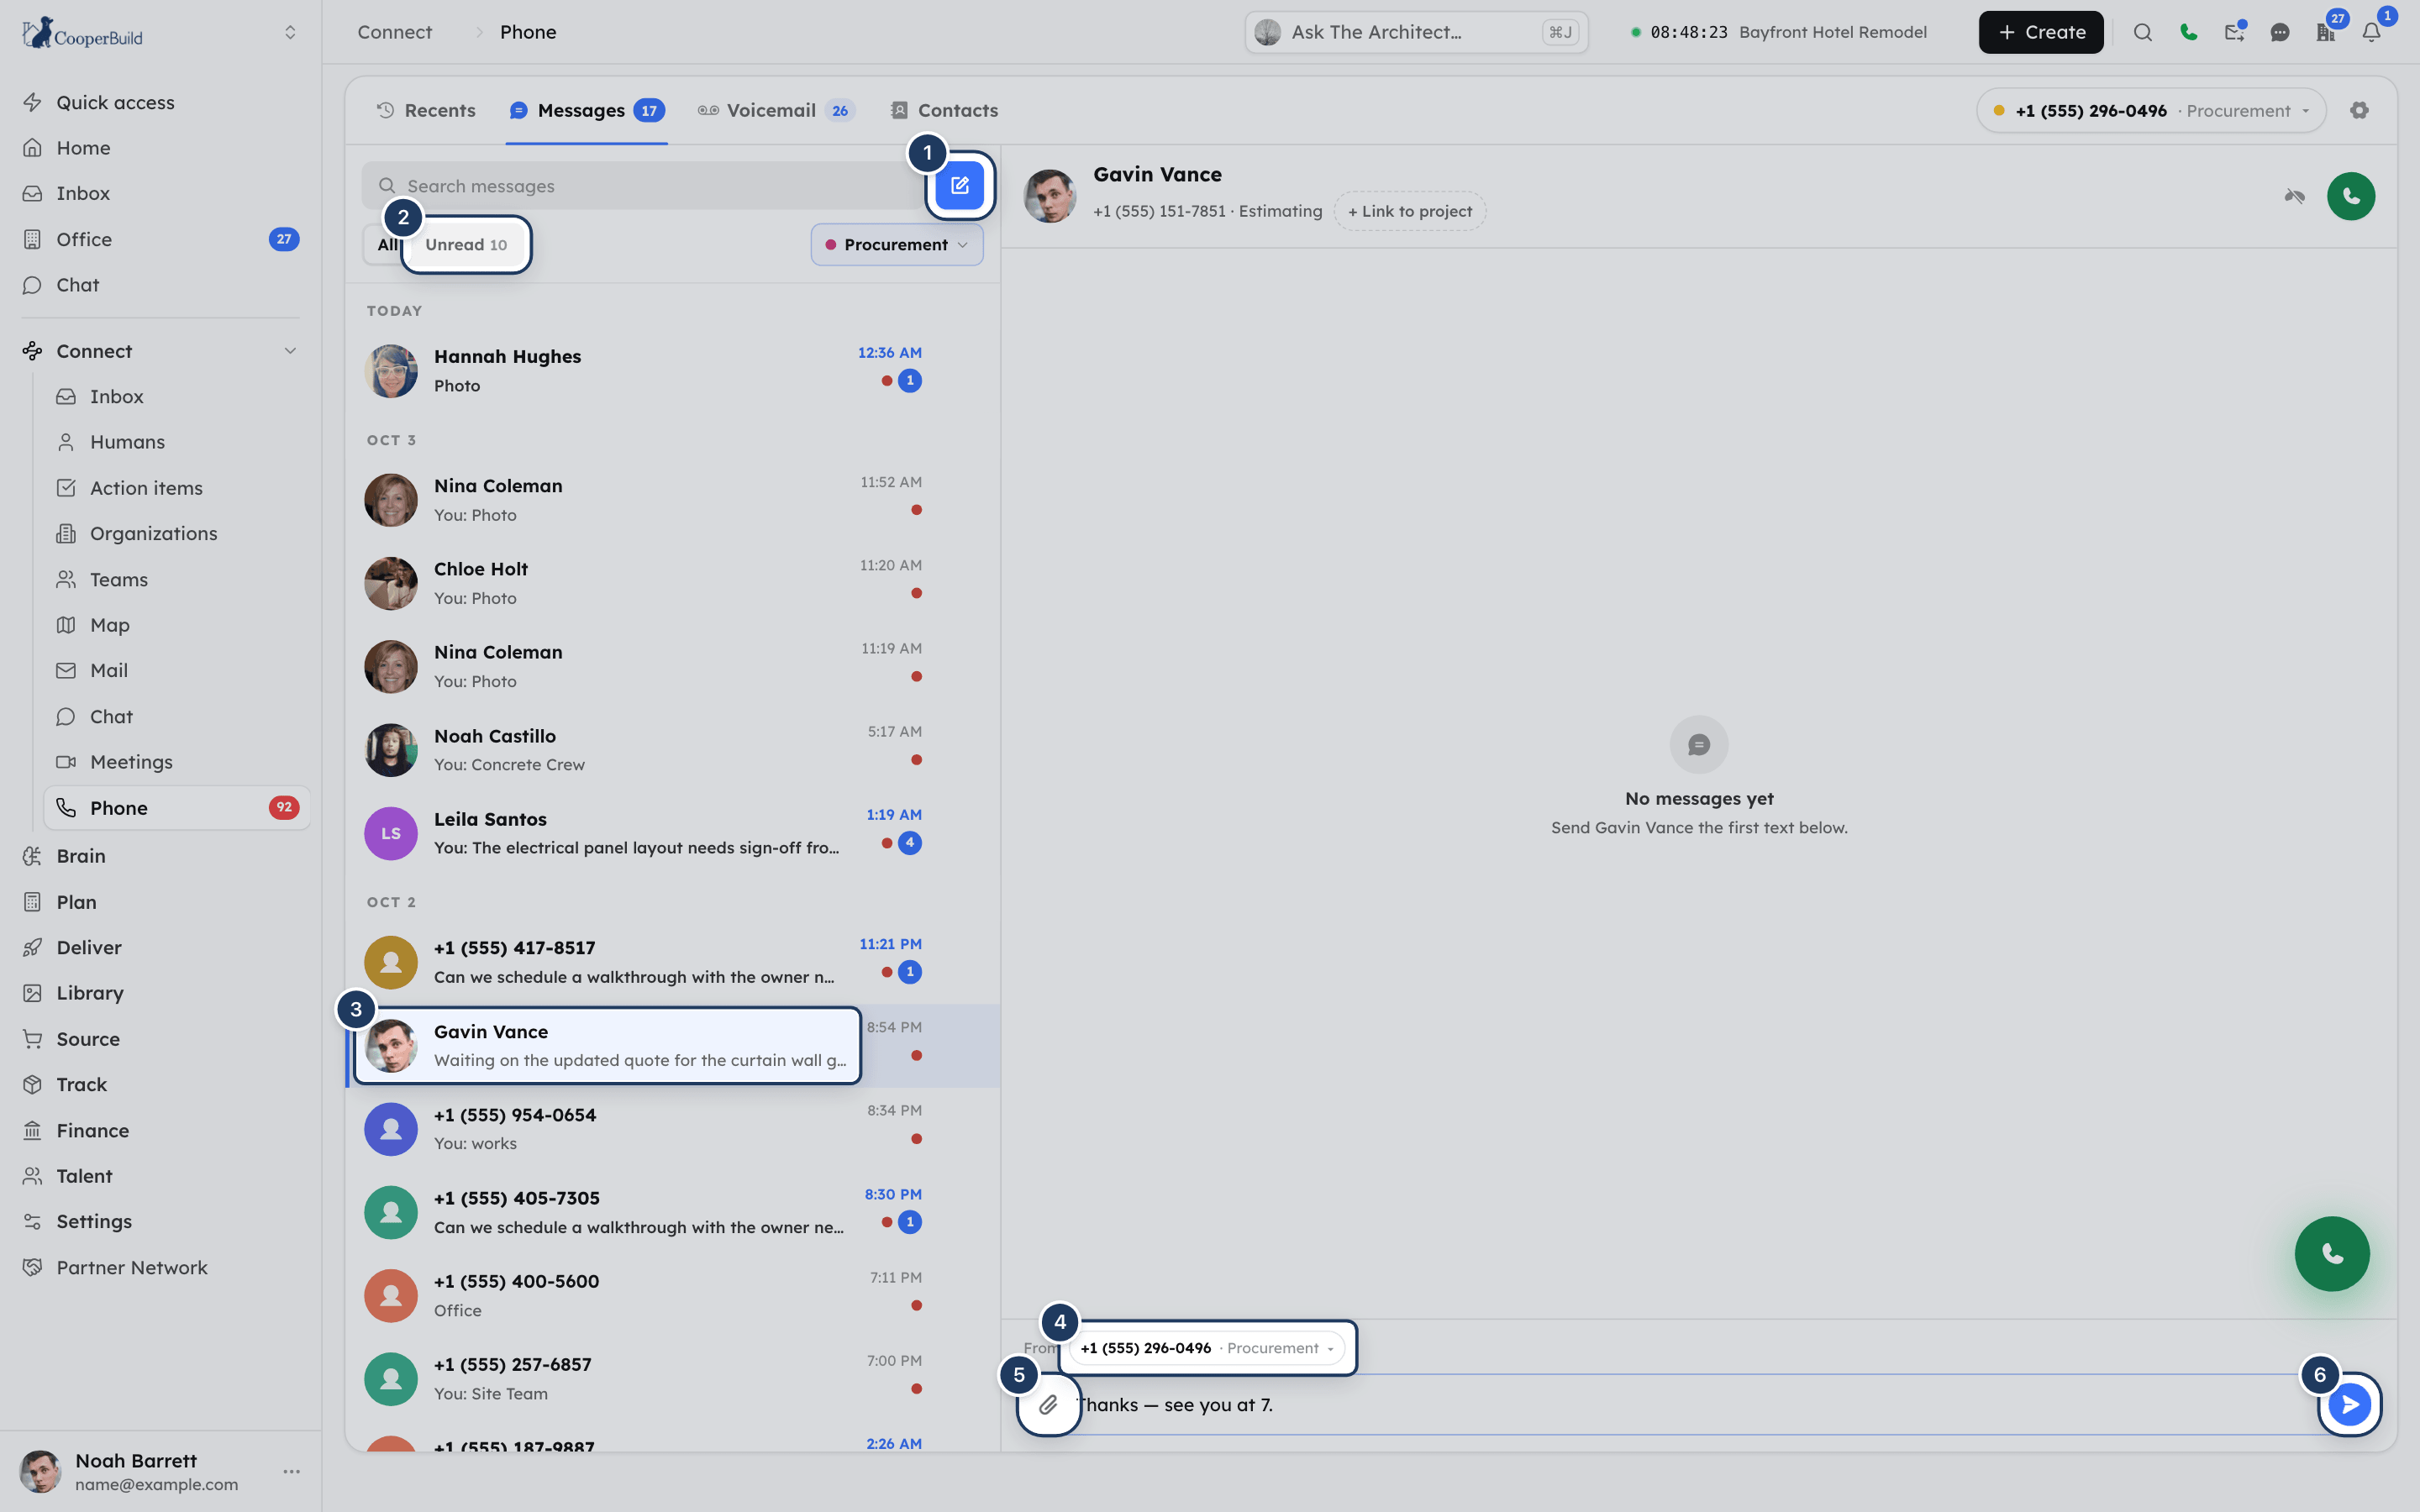
*Screenshot: Messages. 1: New text, 2: Unread filter, 3: conversation, 4: delivery status, 5: From line, 6: attach, 7: Send.*
### Step 1: Start a new text
Click the pencil button (**New text**) next to the search box. In **New text**, search your contacts, or type a number (for example `305…` or `+92…`) and click **Text (number)** — **Goes straight to the number — no contact needed**.
### Step 2: Check the From line
Above the message box, **From** shows the line the text goes out on. If you can text from more than one line, click it to choose another.
### Step 3: Write and send
Type in the box and press **Enter** to send. Press **Shift+Enter** for a new line. You can also click the send button.
Opening a conversation on the **Messages** tab marks its texts as read, on every device you use. Looking someone up on **Recents** or **Contacts** does not.
Each person keeps their own draft, so half a text typed to one person never follows you to another conversation.
### Which line a text goes out from
Cooper picks the **From** line in this order:
1. the line you picked in this conversation,
2. your calling-from line at the top of the page,
3. the line this conversation last used,
4. your own line.
Changing the calling-from line at the top changes **From** in every conversation at once. If a contact is used to texting a different number of yours, replying from another line starts a new thread on their phone.
### Delivery status
Under your latest text you see its status: **Sending…**, **Sent**, **Delivered**, **Partly delivered**, **Read**, **Not delivered**, **Failed**, **Cancelled** or **Blocked**. **Sent** means the carrier accepted it; only **Delivered** means it reached the phone. Failed texts are marked in red; hover over the time to see why.
## Send photos and files by text
### Step 1: Attach
Click the paperclip (**Attach a photo or file**) and choose **Upload from this device** or **Choose from media library**. You can also drag a file onto the message box or paste a screenshot into it.
### Step 2: Wait for the upload
Attachments appear above the message box. **Send** waits until every upload finishes. If one fails, retry or remove it.
### Step 3: Send
Add words if you like and send. A text can carry attachments with no words.
| Limit | Value |
|---|---|
| Attachments per text | Up to 10 |
| Total size | 5 MB per text |
| File types | Photos (JPG, PNG, GIF), PDFs, short MP4 videos, audio clips and contact cards |
| Where | Only to US and Canadian (+1) numbers |
Photos people text you show as **Receiving photo…** for a few seconds while Cooper saves them, then appear in the conversation. Click a photo to open it.
## Look someone up (Contacts)
The **Contacts** tab lists everyone with a phone number, A to Z. Type in **Search contacts** to search all your contacts by name, email or phone, not just the ones shown.
Click a person to open their contact card: name, title and company, number, and their linked project. Use **Call**, **Message** or **Block**. Under **Activity**, click **Calls**, **Messages** or **Voicemail** to jump to that tab with the person open.
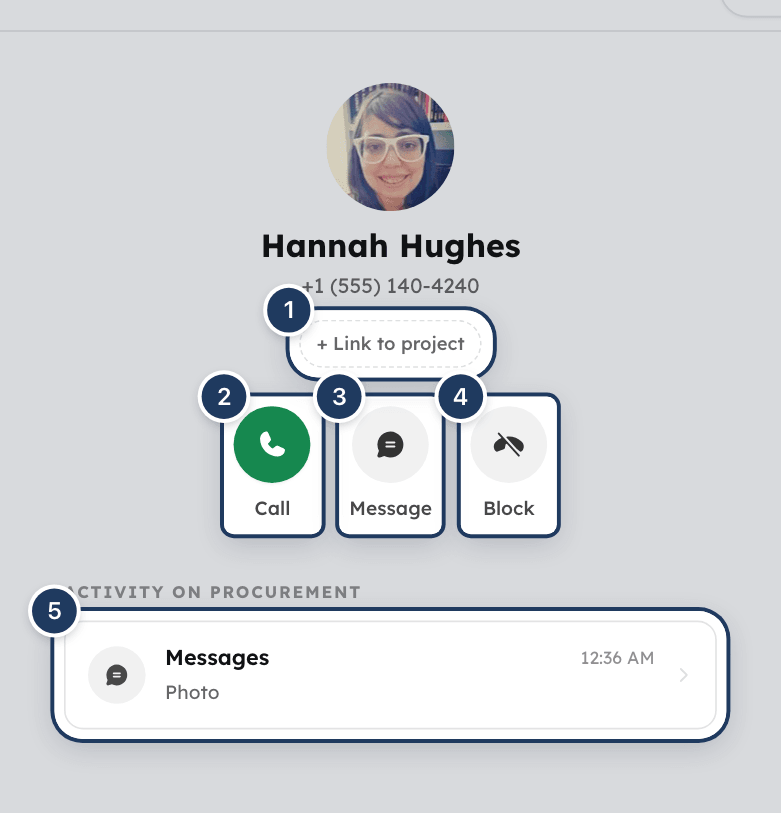
*Screenshot: A contact card. 1: Link to project, 2: Call, 3: Message, 4: Block, 5: Activity.*
To add or edit a contact, use [Humans](https://docs.cooperbuild.ai/connect/humans.md).
## Block a caller
### Step 1: Click Block
Open the person and click the crossed-out phone button (**Block this caller**), or click **Block** on their contact card.
### Step 2: Confirm
Confirm **Block (number)? Their calls to your numbers will get a busy tone.** Cooper adds the number to the block list of every active line.
To unblock a number, an admin removes it from **Blocked callers** on each line in **Settings** → **Cooper Phone** → **My numbers**.
## Use Phone in more than one tab
Only one browser tab can hold the phone at a time. If you open Phone in a second tab, the keypad says **Phone is active in another tab — use it here**, and the quick call panel says **The phone is active in another tab.** Click **use it here** (or **Use the phone here**) to move the phone to the tab you are in.
## Set up Phone for your company (admins)
Phone is set up and managed in **Settings** → **Cooper Phone** (`/settings/cooper-phone`). You can also open it from the gear button (**Phone settings**) at the top right of the Phone page.
### Step 1: Start setup
On **Get a business phone line**, review the prices shown and click **Start setup**. Calling works as soon as you have a number.
### Step 2: Get a number
In **Get a number**, search by **Area code** (and optionally digits or a word, such as `COOPER`, with **Match to**), then buy the number. Number rent is charged to the card on file.
### Step 3: Set up texting
Click **Set up texting** and fill in your business details. Carriers must approve them before texting works. Track progress on **Overview** → **Texting approval**. Once approved it says **Texting is live**, and the **Messages** tab appears for everyone.
The Cooper Phone settings page has these sections:
| Section | What it is for |
|---|---|
| **Overview** | Spending this month, a spending chart, texting approval progress, and billing history. |
| **My numbers** | Every number, who can use it and who it rings. Click a number to change its settings. Removed numbers can be restored from **Recently removed** for 10 days. |
| **Unfiled calls** | Recorded calls Cooper couldn't match to a project. |
| **Get a number** | Search for and buy a number. |
| **Bring your number** | Move an existing number to Cooper. Shown only when porting is turned on for your workspace. |
| **Pricing** | The rates you are charged. Rates are set by Cooper. |
| **Settings** | Card on file, workspace spending limits, international calling, call recording and AI calling. |
## Set up a number (admins)
In **My numbers**, click a number to open its settings. Changes take effect on the next call after you click **Save changes**.
| Setting | Tab | What it does |
|---|---|---|
| **Nickname** | Top of the panel | A name for the line, shown to everyone, such as "Job site — Miami". |
| **Who can use this number** | **Calls & voicemail** | People and teams who may call and text from the line and see its history. Leave it empty to open the line to everyone (Cooper asks you to confirm **Open to everyone**). |
| **Who it rings** | **Calls & voicemail** | One person, or everyone at once. If nobody is assigned, every caller goes straight to voicemail. |
| **Ring the browser for** | **Calls & voicemail** | 10, 15, 20, 30 or 45 seconds before the no-answer rule applies. |
| **Project this line belongs to** | **Calls & voicemail** | For a line dedicated to one job. Every recorded call on the line is saved to that project. Leave empty for a general line. |
| **When nobody answers** | **Calls & voicemail** | **Take a voicemail** (audio and a transcript land in Phone) or **Forward to another phone** (enter the number in **Forward to**; forwarded minutes are billed as normal minutes). |
| **Voicemail greeting** | **Calls & voicemail** | The greeting, typed here and spoken to callers. Leave empty for the standard greeting. |
| **This number's spending limits** | **Usage & limits** | **Per day** and **Per month** limits. Calls and texts from the number pause at the limit. |
| **Notifications** | **Advanced** | **Email me when a call is missed**. |
| **International calling** | **Advanced** | **Use workspace setting**, **Always allowed** or **Never allowed** for this number. |
| **Blocked callers** | **Advanced** | Numbers that hear a busy tone when they call. |
| **Remove this number** | **Advanced** | Stops the monthly charge and the number stops ringing immediately. |
## Control spending and international calling (admins)
In **Settings** → **Cooper Phone** → **Settings**:
- **Workspace spending limits** — **Per day** and **Per month**. Calls and texts pause once spending reaches them. Each number can have its own limits too.
- **International calling** — turn on **Allow international calling**. It is off by default so a mis-dial abroad can't surprise your bill. Changing it needs the **International Calling** permission.
## Turn on call recording (admins)
### Step 1: Switch it on
In **Settings** → **Cooper Phone** → **Settings**, turn on **Call recording**. The switch saves immediately.
### Step 2: Set the announcement and retention
Edit **Announcement played to the other party** and **Keep recordings for (days)**, then click **Save announcement and retention**.
Recording is off by default. The other party always hears the announcement, and it must contain the word "recorded". The default announcement is "Just so you know, this call is being recorded to keep an accurate project record. Thanks!" Recordings are deleted after the retention period (365 days unless you change it).
## Turn on AI calling (admins)
AI calling lets Cooper's AI agents phone contacts and vendors on your behalf. The agent dials from one of your numbers, delivers the message, and posts back what the person said. It always says it is an assistant, it can only call people already in your CRM, and it cannot agree to prices or change anything in Cooper on a call.
### Step 1: Switch it on
In **Settings** → **Cooper Phone** → **Settings**, turn on **AI calling**. The switch saves immediately.
### Step 2: Set the voice and limits
Choose a **Default voice**, set **Longest a single call may run (minutes)** and **Most AI calls per day**, and choose whether to **Leave a voicemail when nobody answers**. Click **Save voice and limits**.
> **Warning: AI calls cost more**
>
> AI calls are charged per minute on top of the normal call rate and appear as **AI calling** on your bill. The agent shows the estimated cost before placing any call.
| Setting | What it means |
|---|---|
| **Default voice** | The voice the agent speaks in. The badge says **Your ElevenLabs account** if your workspace has connected its own ElevenLabs key (billed there), or **Supplied by Twilio** otherwise. An agent with its own voice overrides this. |
| **Longest a single call may run (minutes)** | 1 to 30. The call is cut off at this length. Default 10. |
| **Most AI calls per day** | Resets at midnight UTC. 0 removes the limit. Default 25. |
| **Leave a voicemail when nobody answers** | On: the message is left and reported back as "not reached" (the call is still charged). Off: the agent hangs up and reports that nobody answered. |
You see the AI calling card only if your role has the **AI Voice Agent** read permission.
## Fields reference
### New text
| Field | Required | What it means |
|---|---|---|
| Search contacts — or type a number | Yes | A contact with a phone number, or any phone number. |
### Text composer
| Field | Required | What it means |
|---|---|---|
| **From** | Yes (filled in) | The line the text is sent from. |
| Message box | Yes, unless you attach a file | The text. |
| Attachments | No | Up to 10 photos or files, 5 MB in total, to +1 numbers only. |
### Note for this call
| Field | Required | What it means |
|---|---|---|
| What was agreed? | Yes | A note attached to the live call. |
### Call recording
| Field | Required | What it means |
|---|---|---|
| **Call recording** switch | — | Records calls in this workspace. Off by default. |
| **Announcement played to the other party** | Yes, when on | Must contain the word "recorded". |
| **Keep recordings for (days)** | Yes, when on | At least 1. Default 365. |
## Permissions
Phone permissions live under **Cooper Communications** in **Settings** → **Roles**.
| Permission | Read | Write | Delete |
|---|---|---|---|
| **Phone Number Management** | Open Phone and Cooper Phone settings; see numbers. | Buy, set up and remove numbers; set up texting; change spending limits and the card. | — |
| **Inbox & History** | See calls, texts, voicemail, contacts and filing. | Send texts, add call notes, file calls, link callers to projects. | Delete voicemail. |
| **Calling** | See who is on a conference call (Inbox & History read also allows this). Used by AI agents to read call history. | Add or remove people on a call (Inbox & History write also allows this). Required for AI calls. | — |
| **Text Messaging** | Used by AI agents to read texts and lines. | Used by AI agents to send texts. | — |
| **Call Recordings** | Play recordings. | Use **Record** / **Stop rec** during a call. | — |
| **Call Routing & Business Hours** | — | Change the call recording settings. | — |
| **AI Voice Agent** | See AI calling settings and AI call results. | Change AI calling settings; let agents place AI calls. | — |
| **International Calling** | — | Turn international calling on or off. | — |
On top of the role, each line can be limited to certain people or teams. You only see and use the lines you have access to. Account owners have every permission.
## Tips and best practices
- Give every line a nickname so people can tell "Main office" from "Job site — Miami" in the line pill and the line filter.
- Link regular callers (a superintendent, a supplier) to their project with **+ Link to project** so their calls file themselves.
- Set **Project this line belongs to** only for a line used for one job. Pinning the main office line buries every unrelated call in that project.
- Keep **Unfiled calls** empty. A growing list means a caller or a line wants linking to a project.
- Use **Note** during calls that aren't recorded. Without a recording, the note is the only record.
- Check **Delivered**, not **Sent**, when you need to know a text reached the phone.
## Troubleshooting
### I can't see Phone in the sidebar
Your role needs **Phone Number Management** (read) under **Cooper Communications**, or your company's plan doesn't include Phone. Ask an admin to update your role in **Settings** → **Roles**.
### The page says the phone system isn't set up
Your company hasn't started Phone yet. An admin clicks **Set it up**, then **Start setup** in **Settings** → **Cooper Phone**.
### There is no Messages tab
Texting isn't approved yet. The **Messages** tab appears once carriers approve your business. An admin can check progress in **Settings** → **Cooper Phone** → **Overview** → **Texting approval**. Calling works in the meantime.
### The Call button is gray
The number isn't complete yet (it needs 8 to 15 digits with the country code), the phone is still connecting (**Connecting phone…**), the phone is active in another tab, or your workspace has no number (**No phone number yet — get one in Phone settings.**).
### The line pill has an amber dot or says Connecting phone…
The phone is still connecting. Check your internet connection. If Cooper says **Cooper Phone lost its connection and is trying to reconnect**, incoming calls may not ring until it reconnects; refresh the page if it doesn't recover.
### Calls can't start or be answered
Your microphone is blocked. Click **Enable microphone** in the banner, or click the padlock next to the web address → **Microphone** → **Allow**, then refresh.
### The call did not go through
**The call did not go through. The number was busy, rejected the call, or is not in service.** Check the number and try again. International numbers also need international calling allowed for your workspace or line, and calls pause when a spending limit is reached.
### I don't see a line, or someone's calls
You only see lines you have access to. Ask an admin to add you under **Who can use this number** on that line. Also check the line menu above the list; pick **All lines** or click **Show all lines**.
### I can't play a recording
You need the **Call Recordings** read permission, and the recording must still be within the retention period. If your browser blocked playback, press play again.
### I can't attach a photo
Photos and files can only be texted to US and Canadian numbers, up to 10 attachments and 5 MB per text, as JPG, PNG or GIF photos, PDFs, short MP4 videos, audio clips or contact cards.
### A text says Blocked or Failed
**Blocked** means the text was stopped before sending, for example because the person opted out of texts. **Failed** or **Not delivered** means the carrier couldn't deliver it; hover over the time under the text to see the reason.
### Voicemail shows as unheard on my other computer
Heard voicemail is remembered per browser. Open the voicemail on that computer to clear it.
### The list is empty
The list says why: **No missed calls.**, **No unheard voicemail.** and similar mean a filter is on (click **Show all**); **Nothing on (line) yet.** means a line filter is on (click **Show all lines**).
## For AI agents
The CooperBuild MCP server has these Phone tools. They respect the same line access as the Phone page: a user only reaches lines they may use.
| Tool | What it does | Key parameters |
|---|---|---|
| `comm_phone_lines` | Phone status for the workspace and the lines the current user may use: number, nickname, assignment, capabilities. `textingActive: false` means texting isn't approved yet. Use this first. | none |
| `comm_list_sms_conversations` | The text inbox: one row per person, newest first, with last message, unread count, line and matched contact. | `limit` (default 50, max 200), `phoneNumberId` |
| `comm_get_sms_thread` | The full text conversation with one person, oldest first, with delivery status and line. | `humanId` or `phone` (E.164), `limit` (default 200) |
| `comm_send_sms` | Text one existing contact. Preview first (`confirm: false`), show the user, then send with `confirm: true`. | `humanId` (never a raw number), `body` (max 1600 characters), `phoneNumberId`, `useAlternatePhone`, `confirm` |
| `comm_sms_status` | The current delivery status of texts you sent. "sent" means the carrier took it; only "delivered" means it reached the phone. | `twilioSid` (returned by `comm_send_sms`) or `humanId`, `limit` |
| `comm_call_history` | Calls, voicemail and call notes, newest first, with direction, duration, status, transcript, AI summary, filed project and contact. Recordings are not downloadable; send the user to the Phone page to play them. | `limit` (max 200), `phoneNumberId`, `types` (`call`, `voicemail`, `note`), `humanId` |
| `comm_place_agent_call` | Have the AI phone a contact or vendor, deliver a message or ask a question, and report back. Preview first, quote the cost, then `confirm: true`. Returns as soon as the phone rings; the summary is posted when the call ends. | `humanId` or `externalOrgId`, `objective`, `context`, `projectId`, `phoneNumberId`, `maxMinutes` (1–30), `confirm` |
| `comm_agent_call_status` | State of an AI call: `dialing`, `in_progress`, `wrapping_up`, `completed` or `failed`. Don't poll it in a loop. | `sessionId` or `callSid`, `includeTranscript` |
| `comm_call` | Does **not** dial. `initiate` returns a click-to-call link for a person; `log` records a call that already happened. | `action` (`initiate`, `log`), `contactId` or `contactPhone` + `contactName`, `callOutcome`, `callNotes` |
Rules for agents:
- Texting and AI calling are limited to people and companies that exist in Cooper. Resolve names with `search_humans` or `search_external_orgs` first; never pass a raw phone number to `comm_send_sms` or `comm_place_agent_call`.
- Always preview, show the preview to the user, and wait for agreement before `confirm: true`. A sent text or a placed call cannot be undone.
- There is no bulk texting. Requests like "text these 200 leads" belong in GTM.
- If `comm_send_sms` previews `alsoReachableInApp`, the recipient is a Cooper user; ask whether to use [Chat](https://docs.cooperbuild.ai/connect/chat.md) (`chat_send`) instead.
- To actually phone someone with the AI, use `comm_place_agent_call`, never `comm_call`.
Common refusals and what to do:
| Code | Meaning | Fix |
|---|---|---|
| `PHONE_NOT_SET_UP` | The workspace has no phone system. | An admin sets it up in **Settings** → **Cooper Phone**. |
| `TEXTING_NOT_ACTIVE` | Texting isn't approved yet. | Tell the user; calling still works. |
| `RECIPIENT_OPTED_OUT`, `RECIPIENT_SUPPRESSED` | The person can't be texted (they texted STOP, or they are on your company's suppression list). | Report it; don't retry another way. A STOP is lifted only when the person texts START. |
| `COMMS_NO_SEND_LINE`, `COMMS_LINE_NOT_FOUND`, `COMMS_LINE_FORBIDDEN` | No line to send from, the line doesn't exist, or the user may not use it. | Call `comm_phone_lines` and pick a line the user has access to. |
| `NO_PHONE` | The contact has no phone number. | Add a number to the contact in Humans. |
| `AGENT_CALLING_DISABLED` | AI calling is off. | An admin turns on **AI calling** in Cooper Phone settings. |
| `AGENT_CALL_DAILY_CAP` | The daily AI call limit is reached. | Wait until midnight UTC or raise **Most AI calls per day**. |
| `CALL_BLOCKED_SPEND_CAP` | A spending limit is reached. | An admin raises the workspace or number limit. |
| `CALL_BLOCKED_INTERNATIONAL` | International calling isn't allowed. | An admin allows it for the workspace or the line. |
Permissions: text tools need **Text Messaging**, call history needs **Calling**, and AI calls need **AI Voice Agent** plus **Calling** write. A missing permission comes back as a refusal; tell the user to ask an admin.
## Related
- [Humans](https://docs.cooperbuild.ai/connect/humans.md) — the contacts Phone names, calls and texts.
- [Organizations](https://docs.cooperbuild.ai/connect/organizations.md) — vendors and companies the AI can call.
- [Chat](https://docs.cooperbuild.ai/connect/chat.md) — free, in-app messaging with teammates.
- [Meetings](https://docs.cooperbuild.ai/connect/meetings.md) — arrange and write up meetings.
- [Map](https://docs.cooperbuild.ai/connect/map.md) — find out where a team member is before you call them.
- [Settings](https://docs.cooperbuild.ai/connect/settings.md) — Connect settings.
---
# Connect settings
> Connect settings are the lookup lists behind Connect, such as organization types, relationship types, relationship categories, industries, industry subcategories and skill categories. Use them to control the choices people see when they classify organizations, humans and AI skills.
Source: https://docs.cooperbuild.ai/connect/settings
Keywords: connect settings, crm settings, lookup lists, dropdown values, picklists, reference data, organization types, relationship types, relationship categories, industries, industry subcategories, sub-industry, skill categories, machines
**Connect settings** hold the lists of values that Connect uses in its dropdowns, filters and reports. When someone adds an [organization](https://docs.cooperbuild.ai/connect/organizations.md) and picks its relationship type, organization type and industry, the choices come from these lists. Admins and office managers maintain them so that everyone classifies companies, people and skills the same way.
Each list works the same way: a table you can search, an add form, an edit form, a details window, and delete.
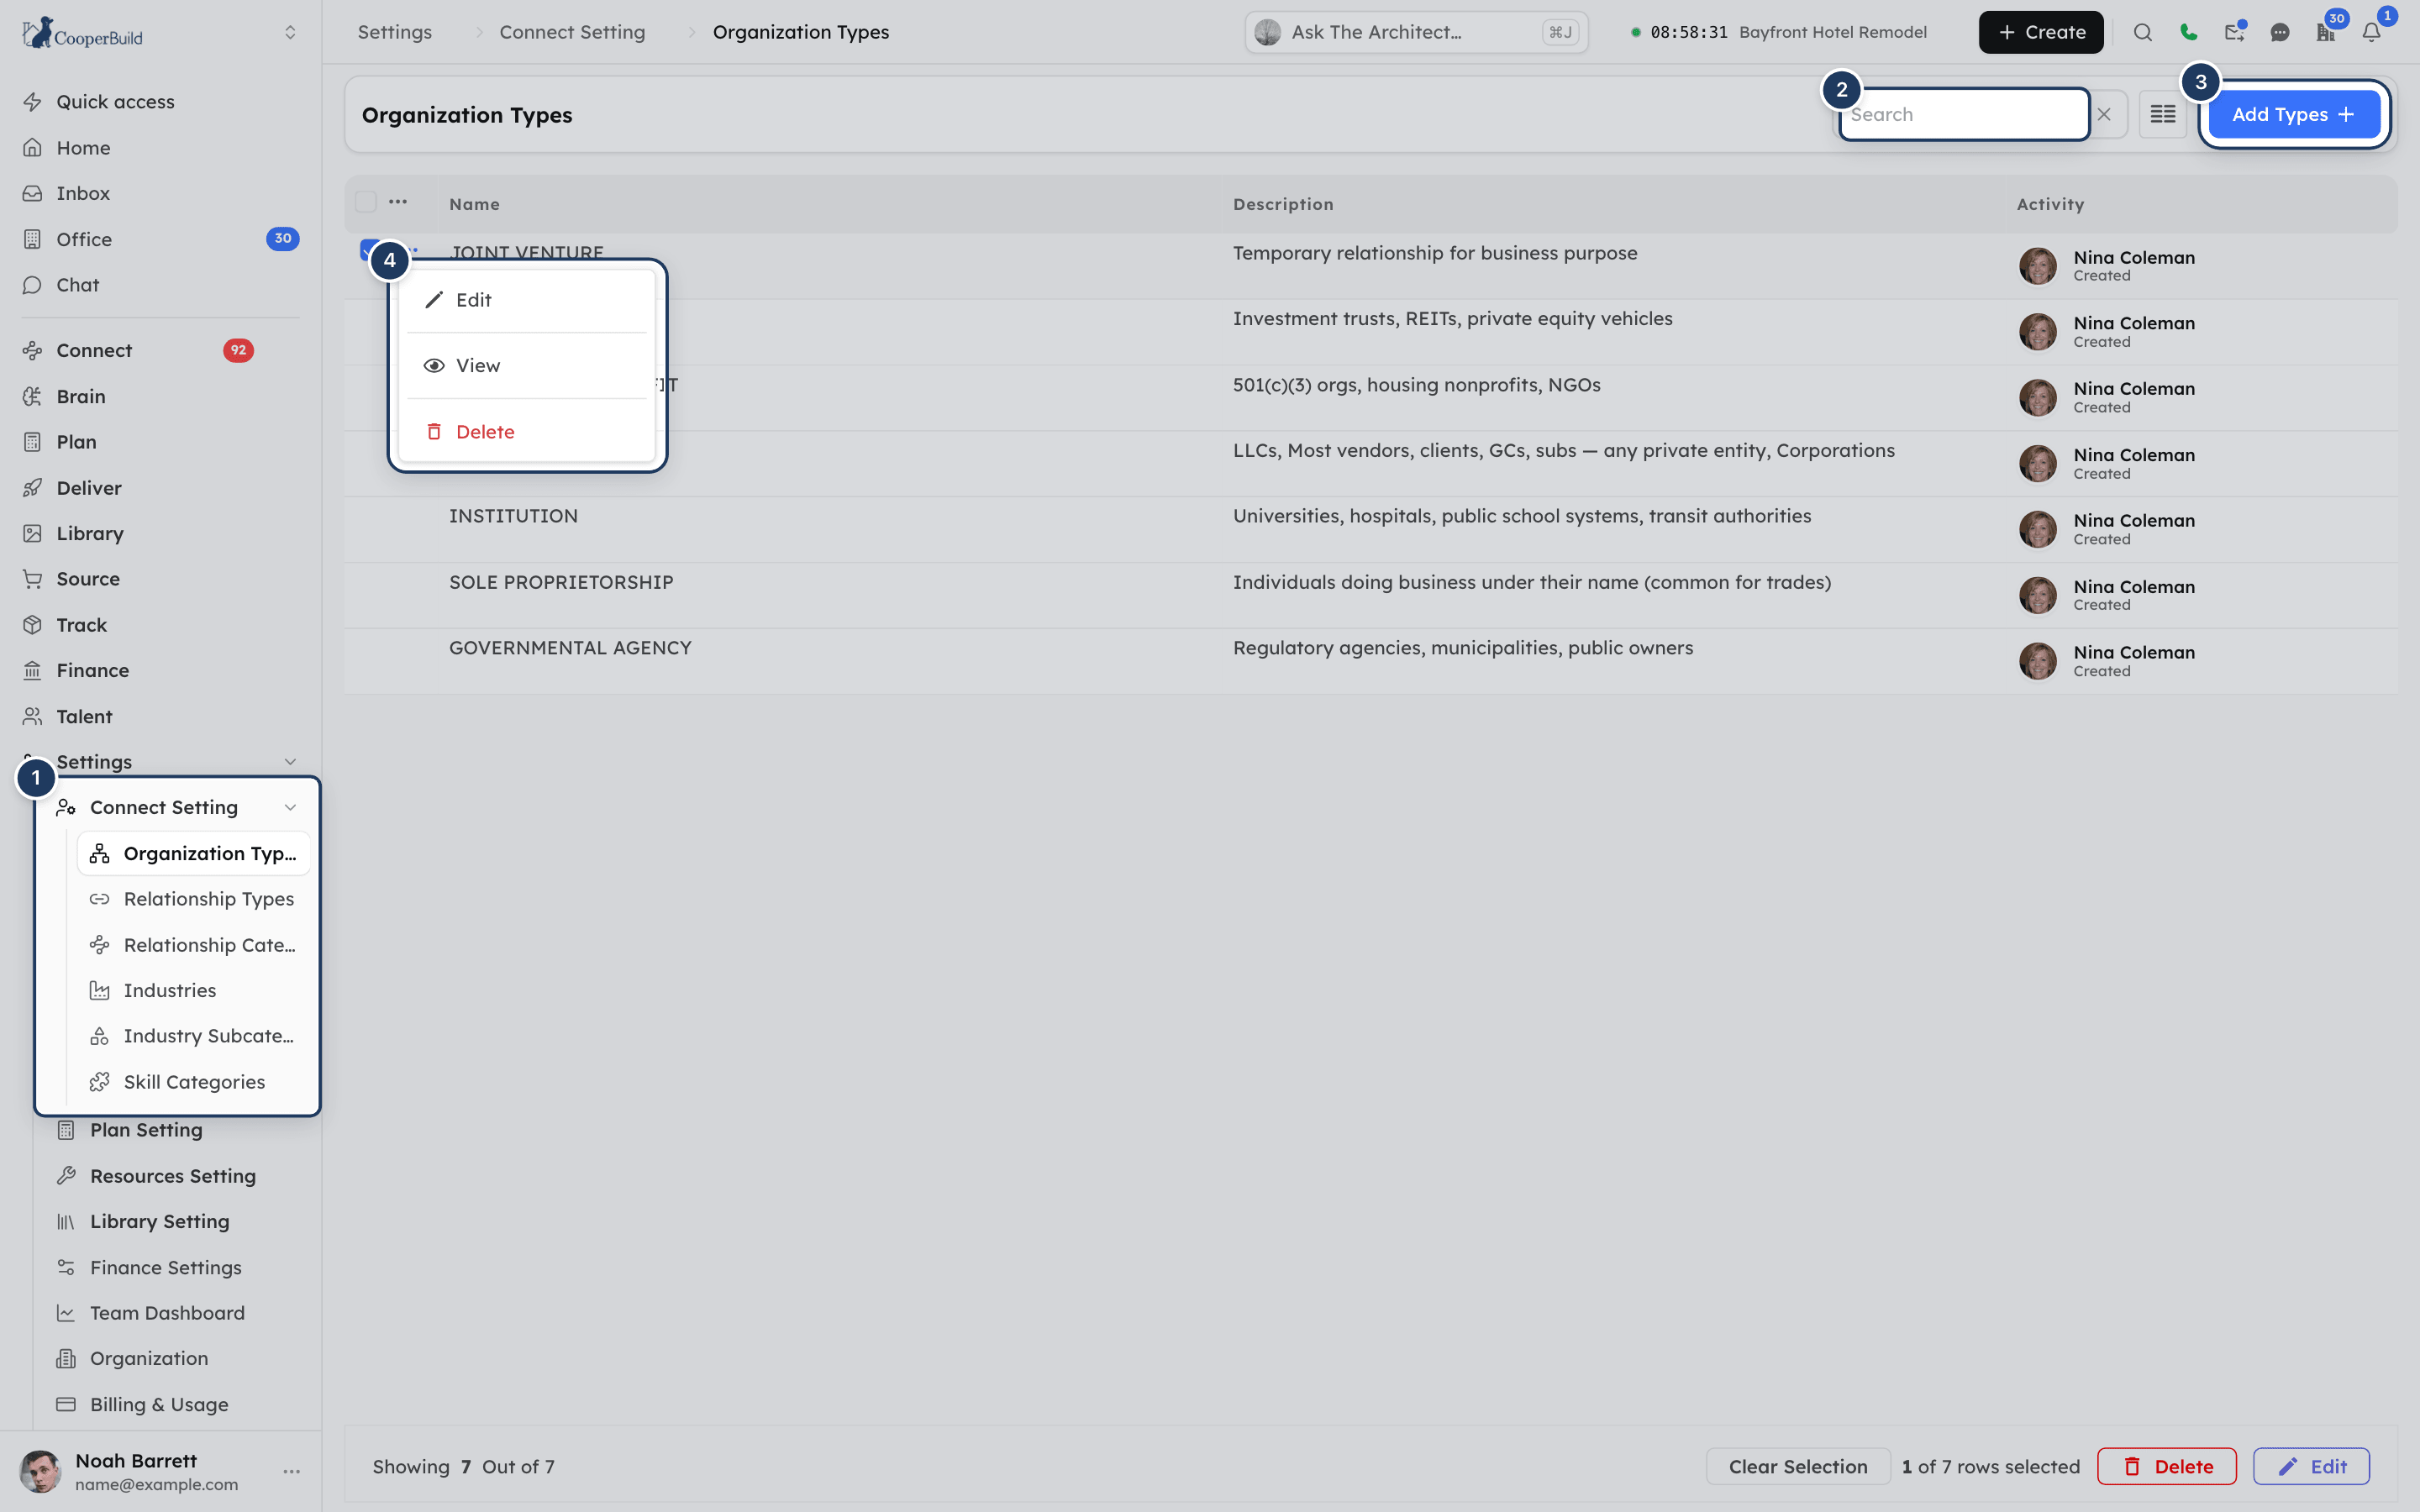
*Screenshot: A Connect settings list. 1: the Connect Setting menu in the sidebar, 2: search, 3: Add Types, 4: the row menu with Edit, View and Delete.*
## Key concepts
| List | What it classifies | Where its values show up |
|---|---|---|
| **Organization Types** | What kind of company an organization is, such as Corporation or Partnership. | The **Organization Type** field and **Org Type** column in [Organizations](https://docs.cooperbuild.ai/connect/organizations.md), the **All filters** panel, role restrictions, compliance requirement rules and vendor sourcing. |
| **Relationship Types** | How a company or person relates to you, such as Client, Vendor or Subcontractor. | The **Relationship Type** field on [organizations](https://docs.cooperbuild.ai/connect/organizations.md) and [humans](https://docs.cooperbuild.ai/connect/humans.md), list filters and grouping, role restrictions, and compliance requirement rules. |
| **Relationship Categories** | A finer split of a relationship type, such as kinds of subcontractor. Each category belongs to one relationship type. | Organization forms in **Plan → Solutions Providers** and vendor candidate lists. |
| **Industries** | A company's line of business, such as Technology. | The **Industry** field and column in [Organizations](https://docs.cooperbuild.ai/connect/organizations.md), filters, role restrictions, compliance rules and vendor sourcing. |
| **Industry Subcategories** | A finer split of an industry, such as Cloud Computing under Technology. Each subcategory belongs to one industry. | The **Sub-Industry** field and filter in [Organizations](https://docs.cooperbuild.ai/connect/organizations.md). |
| **Skill Categories** | Groups for AI skills, such as Research & Analysis. | The **Category** field and column in **Brain → Skills**. |
| **Machines** | Machines such as drones, robots and crawlers. | Only on its own page. |
## Open Connect settings
1. In the sidebar, open **Settings**.
2. Open **Connect Setting**.
3. Click the list you want: **Organization Types**, **Relationship Types**, **Relationship Categories**, **Industries**, **Industry Subcategories** or **Skill Categories**.
| List | Page address |
|---|---|
| Organization Types | `/connect/setting/organizationtype` |
| Relationship Types | `/connect/setting/relationshiptypes` |
| Relationship Categories | `/connect/setting/relationshipcategories` |
| Industries | `/connect/setting/industries` |
| Industry Subcategories | `/connect/setting/industrySubcategories` |
| Skill Categories | `/connect/setting/skill-categories` |
| Machines | `/connect/setting/machines` (not in the sidebar) |
Each list needs its own permission. See [Permissions](#permissions).
## Search a list
Type in the search box at the top of the list. The list shows entries whose name contains your text. The footer shows how many entries are showing out of the total, and more load as you scroll.
**Relationship Categories** and **Industry Subcategories** are grouped. Each relationship type or industry appears as a highlighted parent row, with its categories or subcategories underneath. Click the arrow on a parent row to collapse or expand it.
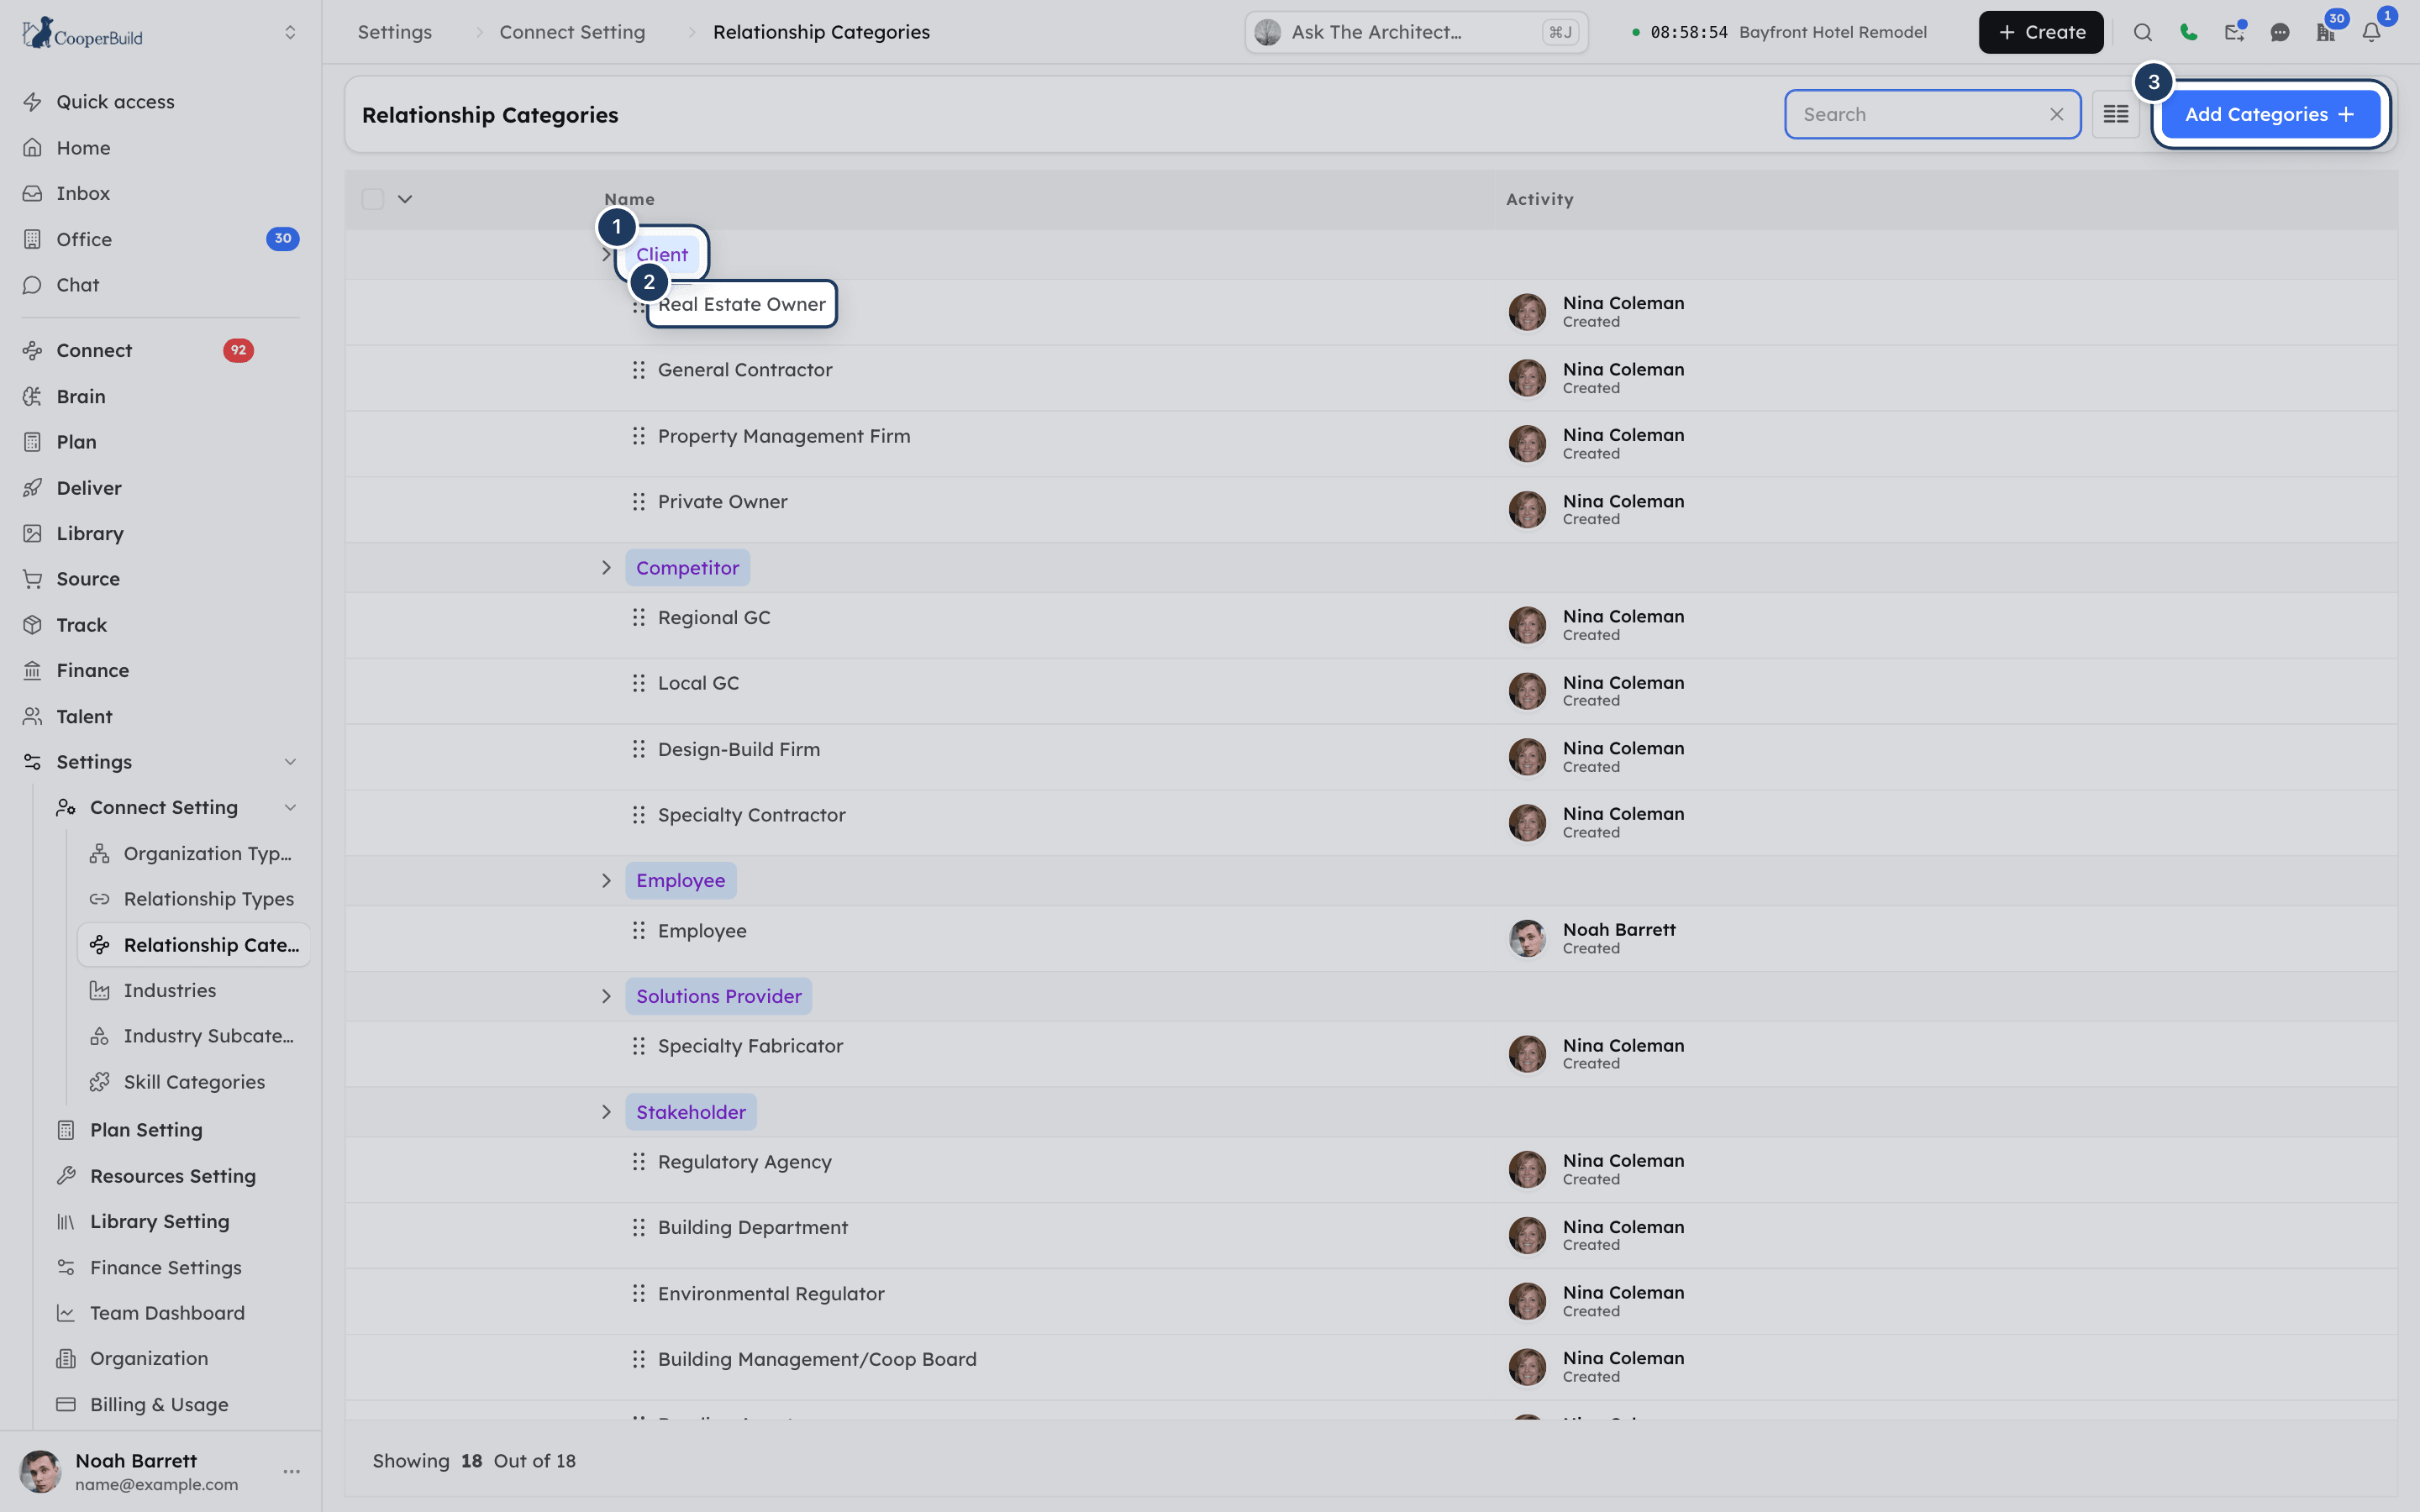
*Screenshot: A grouped list. 1: a relationship type (parent row), 2: one of its categories, 3: Add Categories.*
## Add organization types
### Step 1: Open the form
On **Organization Types**, click **Add Types**. The **Add Organization Types** panel opens.
### Step 2: Enter the type
Enter a **Name** (required), for example "Corporation", and an optional **Description**.
### Step 3: Add more in one go
Click **+ Add New** to add another row. Click **Remove** on a row to drop it.
### Step 4: Save
Click **Submit**.
## Add relationship types
1. On **Relationship Types**, click **Add Types**. The **Add Relationship Types** panel opens.
2. Enter a **Relationship Name** (required), for example "Subcontractor".
3. Click **+ Add New Relationship Type** to add more rows.
4. Click **Submit**.
Every workspace has a built-in relationship type named **Internal Team Member**. You cannot edit or delete it.
## Add relationship categories
### Step 1: Open the form
On **Relationship Categories**, click **Add Categories**. The **Add Relationship Categories** panel opens.
### Step 2: Choose the parent type
Choose the **Relationship Type** the category belongs to (**Select Relationship Type**). It is required.
### Step 3: Name the category
Enter the **Relation Category Name** (required, 2 to 200 characters).
### Step 4: Add more and save
Click **+ Add Relationship Category** to add more rows. Click **Submit**.
## Add industries
1. On **Industries**, click **Add Industry**. The **Add Industry** panel opens.
2. Enter the **Industry Name** (required), for example "Technology", and an optional **Description**.
3. Click **+ Add New Industry** to add more rows.
4. Click **Submit**.
## Add industry subcategories
### Step 1: Open the form
On **Industry Subcategories**, click **Add Subcategories**. The **Add Industry Subcategories** panel opens.
### Step 2: Choose the parent industry
Choose the **Industry Name** (**Select Industry Name**). It is required.
### Step 3: Name the subcategory
Enter the **Industry Subcategory Name** (required).
### Step 4: Add more and save
Click **+ Add Industry Subcategories** to add more rows, or **Remove Industry SubCategory** to drop one. Click **Submit**.
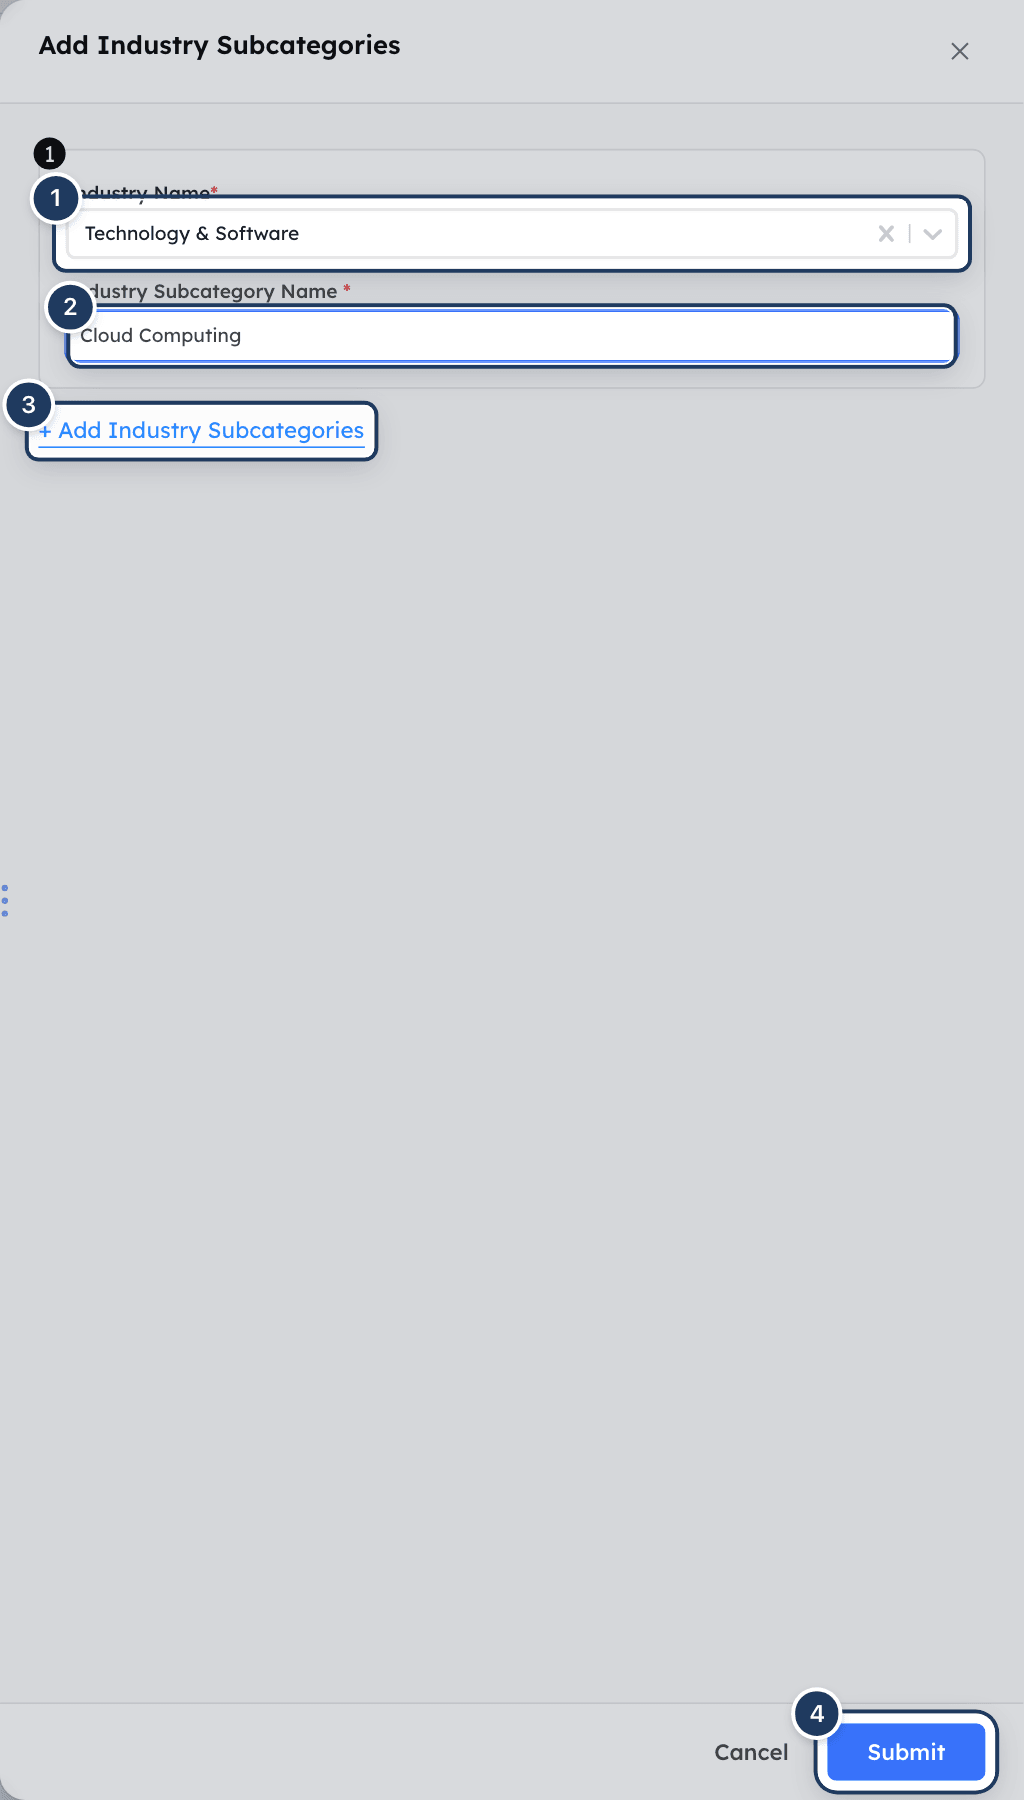
*Screenshot: Adding industry subcategories. 1: Industry Name, 2: Industry Subcategory Name, 3: + Add Industry Subcategories, 4: Submit.*
> **Note**
>
> You can also add a relationship type, organization type, industry or subcategory while you fill in an organization. Click **+ Add Relationship Type**, **+ Add Organization Type**, **+ Add Industry** or **+ Add Subcategory** at the bottom of the dropdown. See [Organizations](https://docs.cooperbuild.ai/connect/organizations.md).
## Add skill categories
1. On **Skill Categories**, click **Add Category**. The **Add Skill Categories** window opens.
2. Enter a **Name** (required), for example "Research & Analysis", and an optional **Description**.
3. Click **+ Add New** to add more rows.
4. Click **Submit**.
Categories marked **System** come with Cooper and are shared by every workspace. Only Cooper super admins can edit or delete them. A skill category name must be unique in your workspace. A duplicate fails with "A skill category named "…" already exists in this organisation."
## Add machines
The **Machines** list is not in the sidebar. Open it at `/connect/setting/machines`.
1. Click **Add Machines**. The **Add Machines** window opens.
2. Enter the **Machine Name** (required), for example "Survey Drone A".
3. Optionally choose **Projects** (**Select Project**).
4. Choose the **Machine Type** (required): **Drone**, **AI**, **Crawler**, **Robot**, **Automation** or **Other**.
5. Enter a **Description** (required, at least 3 characters).
6. Choose at least one role under **Roles**. Click **+ Add Role** for more.
7. Click **+ Add New Machine** to add another machine, then click **Submit**.
The table shows **Machine Name**, **Project**, **Machine Type**, **Role** and **Description**.
## Edit list entries
### Step 1: Open the edit form
Click the row's **...** menu and choose **Edit**. The **Update ...** panel opens, for example **Update Industry**.
### Step 2: Edit several at once
To edit several entries in one form, tick their checkboxes and click **Edit** in the footer.
### Step 3: Save
Change the fields and click **Update** (or **Submit**). You can also add new rows in the same form.
You can also click **View** in the row menu. The details window shows the name, description, who added and last changed the entry, and when. Click the name or description to edit it in place.
In **Relationship Categories** and **Industry Subcategories**, the **Edit**, **View** and **Delete** actions work on the category rows, not on the parent rows.
## Delete list entries
1. Click the row's **...** menu and choose **Delete**. To delete several, tick their checkboxes and click **Delete** in the footer.
2. In the **Are You Sure?** window, click **Delete**.
Deleting archives the entry. It no longer appears in this list or in dropdowns. Records that already use it are not changed.
## Full-page add forms
Each list also has a full-page add form, for example `/connect/add-organizationtype?newPage=true`. The full-page form has **Save as Draft** and **Submit** buttons. Entries saved as drafts show a **Draft** badge in the grouped lists.
| List | Full-page form |
|---|---|
| Organization Types | `/connect/add-organizationtype` |
| Relationship Types | `/connect/add-relationship-types` |
| Relationship Categories | `/connect/add-relationship-categories` |
| Industries | `/connect/add-Industry` |
| Industry Subcategories | `/connect/add-industry-Subcategories` |
| Machines | `/connect/add-machines` |
## Fields reference
| List | Field | Required | Rules |
|---|---|---|---|
| Organization Types | **Name** | Yes | Up to 500 characters. Cannot start with a space or special character. |
| Organization Types | **Description** | No | Up to 3,000 characters. |
| Relationship Types | **Relationship Name** | Yes | Up to 500 characters. Cannot start with a space or special character. |
| Relationship Categories | **Relationship Type** | Yes | An existing relationship type. |
| Relationship Categories | **Relation Category Name** | Yes | 2 to 200 characters. Cannot start with a space or special character. |
| Industries | **Industry Name** | Yes | Up to 500 characters. Cannot start with a space or special character. |
| Industries | **Description** | No | Free text. |
| Industry Subcategories | **Industry Name** | Yes | An existing industry. |
| Industry Subcategories | **Industry Subcategory Name** | Yes | Free text. |
| Skill Categories | **Name** | Yes | Up to 500 characters. Cannot start with a space or special character. Unique in your workspace. |
| Skill Categories | **Description** | No | Free text. |
| Machines | **Machine Name** | Yes | Up to 500 characters. Cannot start with a space or special character. |
| Machines | **Projects** | No | A project. |
| Machines | **Machine Type** | Yes | Drone, AI, Crawler, Robot, Automation or Other. |
| Machines | **Description** | Yes | 3 to 3,000 characters. |
| Machines | **Roles** | Yes | At least one role. |
## Permissions
Each list has its own permission in the **Settings** module of a role: **Organization Types**, **Relationship Types**, **Relationship Categories**, **Industries**, **Industry Subcategories** and **Skill Categories**. Each offers **Read**, **Write** and **Delete**. An admin sets them in **Settings → Roles**.
| Action | Permission needed |
|---|---|
| Open the list page | Read or Write on that list |
| Add and edit entries | Write on that list |
| Delete entries | Delete on that list |
| Pick values in dropdowns elsewhere | None. Every signed-in user can read these lists. |
The **Machines** page has no separate permission.
Workspace owners can do everything. System skill categories and the **Internal Team Member** relationship type are protected for everyone except Cooper super admins.
## Tips and best practices
- Agree on the lists before your team adds many organizations. Renaming later is easy; reclassifying hundreds of records is not.
- Keep lists short and distinct. Two near-identical values, such as "Sub" and "Subcontractor", split your filters and reports.
- Add subcategories only where you filter or report on them.
- Use relationship types, organization types and industries to limit roles. An admin can restrict a role to selected values in **Settings → Roles**, so for example a buyer sees only vendors.
- Delete values you no longer use. Existing records keep their value, but nobody can pick it again.
## Troubleshooting
### I can't see Connect Setting in the sidebar
Your role has no permission on any Connect settings list. Ask an admin to grant Read or Write on the lists you manage in **Settings → Roles**.
### Error: Cannot start with a special character
Names cannot start with a space or a symbol such as a dash or a period. Start the name with a letter or a number.
### Error: System-defined relationship types cannot be modified
**Internal Team Member** is built into every workspace. You cannot edit or delete it. Add a new relationship type instead.
### Edit and Delete are missing on a skill category
The category is marked **System**. System categories are shared by every workspace and only Cooper super admins can change them.
### A value I deleted still shows on some organizations
Deleting archives the value. Records that already use it keep it. Edit those records and choose another value.
### My new subcategory doesn't appear in the organization form
A subcategory appears only after you choose its parent industry in the organization's **Industry** field. Check that you added it under the right industry.
## For AI agents
There is no dedicated MCP tool for these workspace lists. Agents read them with `db_find` and change them with `db_create` and `db_update`. Every signed-in user can read them. Writes need the matching Settings permission.
| List | Model | Name field |
|---|---|---|
| Organization Types | `OrganizationType` | `name` |
| Relationship Types | `RelationShipTypes` | `relationShipName` |
| Relationship Categories | `RelationshipSubcategory` | `relationshipSubcategoryName` (parent: `relationshipType`) |
| Industries | `IndustriesModel` | `industryName` |
| Industry Subcategories | `IndustriesSubcategories` | `industrySubcategoryname` (parent: `industry`) |
| Skill Categories | `SkillCategory` | `name` |
Rules and common errors:
- `ref_data_browse` and `ref_data_manage` are not for these lists. They manage platform-level templates for new workspaces and need a Cooper super admin. To read the current workspace's values, use `db_find`.
- Organization and human records store the ID of the chosen value. Look up the ID with `db_find` before you create or update an organization.
- Deleting archives the entry (`status: "Archived"`). Filter on active entries when you list them.
- "System-defined relationship types cannot be modified." / "Cannot delete system-defined relationship types: …": the record has `isSystem: true`. Leave it alone.
- "System-level skill categories can only be deleted by super admins.": the record has `isSystemLevel: true`.
## Related
- [Organizations](https://docs.cooperbuild.ai/connect/organizations.md): where relationship types, organization types, industries and subcategories are used.
- [Humans](https://docs.cooperbuild.ai/connect/humans.md): uses relationship types.
- [Teams](https://docs.cooperbuild.ai/connect/teams.md): groups of people and organizations.